Logo

2004 BF25 Very hard cold start, wont idle

whaler13

New member
Symptoms:

Very hard cold start. The only way I can get it to fire at all is to push up on the diaphragm to squirt a little fuel in, it will cycle a few times and die. If i repeat this I can feather the throttle up to high RPM. The only way I can get to idle is to turn the idle up to 1400 rpm and get the engine warm. This takes a TON of cranking, a 15 to 20 minute ordeal. As it warms up it will idle better and I can lower the idle setting if I keep the engine hot

While idling at 1400, if I pull the top cylinder spark plug cap off, nothing happens, no change. If i pull the middle cap, a very slight dip in RPM. If i pull the bottom, engine stops dead.

Spark plugs are brand new

Engine runs GREAT at high rpm. If i can feather the throttle up while in gear it pushes me 22 knots in a 13 whaler no problems


Work done so far:

Complete carburetor rebuild. Ive had all three carburetors apart to replace gaskets, o-rings, needles and even replacement of the carburetor pilot jets themselves. Of course I cleaned the main jets and carb bowls.

The carburetor tubing confuses me. I have them connected right according to the diagram but it just doesnt really make sense. According the the tubing diagram theres a fuel side and an air side. On each side the 3 carbs are daisy chained together and then drain out the cowling. On each side, the bottom three-way has a connected that isnt used? Diagram here https://www.hondapartsnation.com/oemparts/a/hma/50955f4ff87002378814c37b/carburetor-tubing

I've adjusted the mixture screws to 2 1/4 turns out as per the manual

I've replaced the Bystarter assembly, didnt seem to have any effect. The new one gets very hot.

I've checked valve timing and cam and flywheel lines up according to the manual

Fresh gasoline with Sta-bil and piston ring additive. Have taken Racor out for the moment and only using small inline filter which is new.
 
Well, it sure sounds like #3 cylinder is doing most of the work. Hondadude would be the guy that knows the routing of those carb tubes but he hasn't posted here for some time now.

I would like to see the results of a proper cylinder compression test on this one as it sounds like those upper cylinders may be low.

Can you provide some history for us? Have you owned it for awhile? Recent purchase in this condition? Basket case/puzzle and you're bringing it back to life? Or, it ran great then all of a sudden....??? That sort of stuff.

Sadly, the Honda Marine Carburetion Manual doesn't have a great deal of info on routing those tubes. I don't have any experience with the multiple carbed engines but I do know that many, if not all, of the three cylinder model carburetors have a specific carb that fits the #1 position and is different from the other two. Also, the bottom, or #3, carb is the one that is considered the "base" carb when adjustments are being made.

These engines also seem to be particularly sensitive to carb balance for smooth idle and peak performance. I saw no mention of balancing in your post.

Hopefully someone with a bit more experience with the triples will chime in. Otherwise, I'll try my best to help you sort it out.
 
I would like to see the results of a proper cylinder compression test on this one as it sounds like those upper cylinders may be low.

Sorry, forgot to mention this. I've done a compression test and i got 160-170psi on all cylinders

Can you provide some history for us? Have you owned it for awhile? Recent purchase in this condition? Basket case/puzzle and you're bringing it back to life? Or, it ran great then all of a sudden....??? That sort of stuff.

I've owned the engine since 2005, model year 2004. I was 14 at the time so my memory on things is a bit hazy. It only ran well for maybe 2 or 3 seasons, not more than 3. After this point it started to show symptoms I've described. I was less knowledgeable then so I don't remember exactly but it definitely included hard starts and bad idle. I know it went back to the dealer at some point. My guess is the carbs needed cleaning as ethanol in gasoline was starting to become a problem then and the jets were tiny.

When it came back from the dealer, it still didnt run right, I dont think it even ran better. Perhaps the dealer messed up the carb tube routing? As you mention, Honda does not publish much information on this.

Sadly, the Honda Marine Carburetion Manual doesn't have a great deal of info on routing those tubes. I don't have any experience with the multiple carbed engines but I do know that many, if not all, of the three cylinder model carburetors have a specific carb that fits the #1 position and is different from the other two. Also, the bottom, or #3, carb is the one that is considered the "base" carb when adjustments are being made.

These engines also seem to be particularly sensitive to carb balance for smooth idle and peak performance. I saw no mention of balancing in your post.

Correct, the top carburetor only fits in the top position because it houses the bystarter assembly, a rubber diaphragm with a needle that goes in the top of the carb and connected to 12v. It appears to open and close a passageway down the the carb bowl.

The bottom and middle carburetors appear to be the same except for how the hoses are routed.

I dont have or have access to a carb synchronizing tool.I have tried adjusting idle mixture screws in the past (not this time around since carb rebuild) and I saw no change in engine rpm using a Tiny Tach. No change even with the idle screw removed.


UPDATE: I tried two new things. The engine actually runs a little better with the air side carb tubes removed, meaning they aren't linked together at all, just open to the air. They pull a small vacuum, the top being strongest and the bottom the weakest.

Additionally, the the top carburetor has small hose in the intake side of the carburetor throat. It looks like it is part of the bystarter circuit. When I cover this hole with my finger the engine runs much better, sounding smooth. The middle and top cylinder run stronger and I hear a noticeable difference when I remove any one of the spark plug caps. The top is still the weakest and the bottom the strongest. Keep in mind, the bystarter is brand new.

Thank you for the reply
 
Great feedback! Thanks.

With those compression numbers and your observations about how the engine changes as you manipulate the hoses I'm convinced now that the problem is the carbs.

It's all too common for these to be "cleaned" or "rebuilt" with no improvement. And, I agree with you that the dealer didn't do you any favors. That's too common as well.

I'm going to try to find out what I can about the hose routing and get back to you.

But, in the meantime, I would have you consider getting the HONDA MARINE CARBURETION MANUAL and revisit the cleaning of these carbs. Your description of the idle circuit responses as you manipulated the mixture screws tells me the cleaning wasn't complete. These carburetors are just plain hard to get completely flushed out without specific knowledge about how they work. For that, the carb manual is invaluable.

https://publications.powerequipment.honda.com/marine

Look to the bottom of the list just above the last wiring PDF's.
$44 + shipping.

Not as easy to find since I bought mine. I have the 3rd edition and this is the 6th.
I'm tempted to buy one myself just to see if they've added better descriptions of your tubes/vacuum hose routing.
 
Last edited:
Ok, after looking in the carb manual it does have a good description of the bystarter fuel enrichment and tubing placement for the three carbs. I will describe it here as best as I can. Please keep in mind that I'm talking about fuel enrichment ONLY and I will try to find more info on the vacuum hose placement for the accel/decel diaphragm (dashpot).
Here goes:

The enrichment bystarter is normally open when the engine is cold. As air begins flowing through the #1 carb during cranking, the bystarter picks up fuel from the fuel bowl and mixes it with air incoming through the air passage atop the venturi (carb throat).

The fuel/air mixture exits the #1 carb via a fitting just forward of the throttle linkage. Two tubes are connected to that fitting. The upper tube travels from the fitting and connects to a nipple at the top of the upper intake manifold runner. This feeds the intake directly with the enrichment mixture.

The other tube travels vertically down to a similar fitting in the side of carb #2.

Another tube is connected to the bottom side of the fitting in carb #2 and travels vertically down to another, similarly placed fitting in the side of #3 carb.

The enrichment mixture delivered to #2 and #3 carbs via the external tubes from the enrichment circuit of #1 carb is delivered to the intake through internal passages in the lower two carbs

I will add that the very upper tube from #1 carb to the intake runner nipple is depicted as a formed tube with three 90° bends forming a sort of rectangular O to connect from the upper carb fitting to the intake runner nipple. But, it occurs to me that this connection could be made with a looped section of straight hose. Just wanted to say that to clarify where the formed hose SHOULD go.

I hope that this makes sense to you.
 
Last edited:
Back to how your outboard performs. I do believe your idle circuit is pretty plugged up based on your taking the mixture screws out and no change taking place.

Each carb has three circuits...idle or low speed.....intermediate and high speed. When the throttle plate is fully closed, the idle circuit is the only one that can deliver fuel because the orifices are on the engine side of the plate. As the plate is opened, the intemediate (transition) orifices begin delivery and as the throttle plate fully opens, the high speed orifices add their delivery until all three circuits are delivering some portion of capacity for full fueling of the engine.

When cleaning the carbs, all of these orifices must be tested to ensure that they are clear. They are all located toward the intake end of the carb throat at the top of the passage. You must prop open the throttle linkage in order to access the intermediate and high speed orifices.

By the same reasoning these carbs have three jets.....main....slow speed and high speed.

The slow speed jet is very problematic in that it can be almost impossible to get perfectly clean and it is prone to cracking.

The high speed jet gets plugged and, if it can't be cleared, it is non replaceable so a new carb body is needed.p the main jets are almost trouble free.

If any or all of this is gibberish to you and you are doing your own carb work, then you need the carb manual to get this outboard whipped into shape.
 
Carb manual ordered, The only one I had seen was the TM044 which only pictures one carb and not the whole assembly which doesn't tell me anything about the hoses/tubes. Unfortunately, due to my location (an island in New England) it will be at least 3 weeks until I receive it. Could you email me pictures of the relevant pages? Phone pics are fine.


The enrichment bystarter is normally open when the engine is cold. As air begins flowing through the #1 carb during cranking, the bystarter picks up fuel from the fuel bowl and mixes it with air incoming through the air passage atop the venturi (carb throat).
The fuel/air mixture exits the #1 carb via a fitting just forward of the throttle linkage. Two tubes are connected to that fitting. The upper tube travels from the fitting and connects to a nipple at the top of the upper intake manifold runner. This feeds the intake directly with the enrichment mixture.

The other tube travels vertically down to a similar fitting in the side of carb #2.

Another tube is connected to the bottom side of the fitting in carb #2 and travels vertically down to another, similarly placed fitting in the side of #3 carb.

The enrichment mixture delivered to #2 and #3 carbs via the external tubes from the enrichment circuit of #1 carb is delivered to the intake through internal passages in the lower two carbs

I will add that the very upper tube from #1 carb to the intake runner nipple is depicted as a formed tube with three 90° bends forming a sort of rectangular O to connect from the upper carb fitting to the intake runner nipple. But, it occurs to me that this connection could be made with a looped section of straight hose. Just wanted to say that to clarify where the formed hose SHOULD go.

I hope that this makes sense to you.

Pictures linked are from before the rebuild.

https://imgur.com/eJvge3l
I believe the tube you're talking about is the grey one from the top of the manifold that curls around the white rubber piece (bystarter itself) and connects the the top part of the brass fitting on the first carb. I checked this tube is clear when I did the rebuild but I will check again.

Here's another pic that shows the tube with the carbs removed https://imgur.com/u2rGGqz

From what you describe, the larger black hoses should form the rest of the enrichment circuit. I am confident that these tubes are connected on the correct order as frankly these are the only places they fit/reach.

It's the air vent/vacuum tubes I am concerned about. They are the smaller black tubes in the photos that connect to the smaller brass fitting directly able the throttle links. Cant see them much from these photos as the are routed between the carbs and the block for neatness I assume. Right now all air vent tubes are the the outside where I can see them. They are daisy chained together using three-way connectors with one connector at teh bottom that has an unused nipple. The only documentation i currently have for these are on this diagram https://www.hondapartsnation.com/oemparts/a/hma/50955f4ff87002378814c37b/carburetor-tubing

Relevant part numbers include 1, 2, 3, 4 (2)10, 22 and 23. It appears to terminate at F-8 and I have no idea what that means, I haven't seen F-8 in any other diagram. There's two ports through the cowling underneath the carbs and thats where they appear to go, just "draining" overboard.


EDIT: Here's a pic of the air vent/vacuum hoses on the engine https://imgur.com/xQR5utM

It looks messy because they are supposed to be tucked behind the carbs, but this is correctly connected from what I can tell in the above carb tubing diagram. The engine actually runs much better with the tubes removed completely.....I don't understand
 
Last edited:
Each carb has three circuits...idle or low speed.....intermediate and high speed. When the throttle plate is fully closed, the idle circuit is the only one that can deliver fuel because the orifices are on the engine side of the plate. As the plate is opened, the intemediate (transition) orifices begin delivery and as the throttle plate fully opens, the high speed orifices add their delivery until all three circuits are delivering some portion of capacity for full fueling of the engine.

When cleaning the carbs, all of these orifices must be tested to ensure that they are clear. They are all located toward the intake end of the carb throat at the top of the passage. You must prop open the throttle linkage in order to access the intermediate and high speed orifices.

By the same reasoning these carbs have three jets.....main....slow speed and high speed.

The slow speed jet is very problematic in that it can be almost impossible to get perfectly clean and it is prone to cracking.

The high speed jet gets plugged and, if it can't be cleared, it is non replaceable so a new carb body is needed.p the main jets are almost trouble free.

I was not aware there were three jets, I thought only just two. I did not know there was anything on the manifold side of the throttle plate as I did not really look in there.

I believe the part I replaced was the slow and/or medium speed jet. Here is a picture: https://imgur.com/Cc8PeBH. This is actually two parts and they were both replaced with new ones in each carb.

https://www.hondapartsnation.com/oemparts/a/hma/50955f4ff87002378814c37a/carburetor-assy

Replaced part numbers are 25 and 26 including the associated o-ring.

I am not worried about the high speed jets being plugged as the engine runs perfectly at high speed under load. All the power you'd expect from 25hp.

Once again thank you for your replies and I look forward to seeing some pages of the carb manual.
 
Well......I have a "smart phone" with a good camera but I am a senior citizen that's not as smart as the phone! I tried uploading the photos but couldn't get it done. I have read that I may need to resize them for this site. I will try to figure that out.

In the meantime, I wanted to let you know that you are correct in not having to clear the high speed jet as your carb doesn't have one. I realized when looking at the parts pages you sent that we are dealing with a BF25D not a BF25A. Slightly different carburetors.

The picture you sent of your carbs "before cleaning" shows the enrichment hoses routed exactly as depicted in the manual.

I will continue to try to upload the photos but I have too much going on to attend to it right now.

Also wanted to let you know that the carburetion manual is still labeled TM044 but is the sixth edition.

I just ordered one too hoping that it has some pertinent upgrades...such as the vacuum hose routing.

My third edition TM044 does have depictions of the three cylinder manifold with carbs attached but still leaves one guessing about how the routing of the hoses is done.
 
Last edited:
Sorry for the delay and poor picture quality. Old dog learning new tricks. It was about time that I learned how to add pictures here so these are my first attempts.

This photo points out the low and high speed air passageways. These are often missed by first time DIYer carb mechanics simply because they don't know about them. Very critical to hose them out thoroughly.

More to come after I go back and try to clean up the compression quality.


View attachment 21771View attachment 21771
 
Last edited:
Photo below is of the enrichment hose routing. As you can see, it's identical to yours.

View attachment 21772

I added this so that you can verify you have the correct anti-stall check valve.

View attachment 21773

Sorry about the orientation but I haven't figured out why that's happening.....among other things.
 
Last edited:
20190913_095625_compress85.jpg

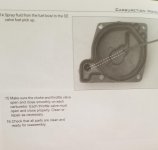
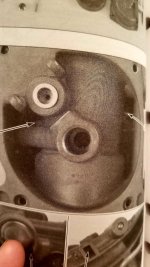
Above is the float chamber and the feed passage to the bystarter dip tube. The tunnel can get so clogged it takes digging out with wire before carb spray will flow.

Bottom photo is the float chamber air vents....make sure they are clean to the vents at the top of the carb.

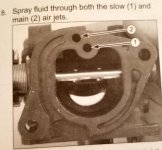
Below is another perspective of the slow speed and main air jet passages.
These should be hosed out with the slow jet (jet set in Honda parts speak) and idle mixture screw removed.

Ok!!! I give up! Everytime I try to update the labeling the @$%# pictures swap places!!! Crazy! Hopefully you can discern the air jet picture from the vent one because it just got too weird for me!
 

Attachments

  • 20190913_101909_compress25.jpg
    20190913_101909_compress25.jpg
    64.2 KB · Views: 66
  • 20190913_101834_compress25.jpg
    20190913_101834_compress25.jpg
    63.3 KB · Views: 78
Last edited:
Sheesh! This is FRUSTRATING! I now see that my deleting photos so that this thing would let me load more simply erased the ones from earlier!
Sorry for the confusion!
I'll try again later after I meditate.
 
I service a fleet of these smaller Honda OBs (BF30's)for a local Yacht club..... I replace the carbs as a complete assembly when they need work. Problem solved.

They are cheap enough as a unit already mounted to a new intake...

I have tried to clean these carbs many times of the last decades with a 50% success rate.... Easier and less costly just to replace. When replaced as a complete set, No adjustments needed...Runs as it should.
 
Oh......yeah.....another $9 beans + shipping...

But I still prefer the "project price" of 3x $10 for gasket sets and 3x $17 for new jet sets and about 6 cans of carb spray.....<$100 and....USUALLY..... good as new! :>)

But, if a guy is paying shop labor rates, I see your point Chris.
 
Oh......yeah.....another $9 beans + shipping...

But I still prefer the "project price" of 3x $10 for gasket sets and 3x $17 for new jet sets and about 6 cans of carb spray.....<$100 and....USUALLY..... good as new! :>)

But, if a guy is paying shop labor rates, I see your point Chris.

Problem is you cannot remove the mixture screws and the some of the passages on the body are the size of human hair. The only time I had success is hot tanking them in a high-end ultrasonic cleaner over night..... It was just cheaper for the client to pay for new carbs and .5 hrs labor.
 
Back
Top