Logo

At my wits end with this qd-17 10hp

393Clevor

Regular Contributor
top cylinder constantly miss fires.. changed everything three times swapped everything three times... been working on this for months and it still has a miss.. tried three different sets of points, condensers and coils tried a different mag plate that is way tighter... swapped everything from one side to the other.. changed the wires... new crank seal... and the top cylinder will not fire a constant spark.. I hook my timing light to the bottom hole and it's perfect.. hook it to the top hole and it randomly lights up.. I'm at the point of smashing it with a hammer I just don't know what else I can try.. Never in my life has anything kicked my ass like this, I've been twisting wrenches for 40 plus years,.. what am I missing here..
 
Ok so I'm going to bite the bullet and buy all new parts from this site.. all OEM see what happens.. I mean the bottom hole fires beauty and you swap everything over and it still fires beauty while the top hole misses like crazy no matter what I do...

0580148 - Breaker Point
0584477 - Ignition Coil and Lamination with Grommet
0580321 - Condenser
 
Are you 100% sure it is a spark issue ?----Have you installed the perfect parts from the bottom into the top cylinder ??----Have you threaded new plug wires into the coils , yes or no ?
 
Should be easy to determine what is wrong here.-----So I do not believe you have a spark problem !!!------Something else is wrong !!!
 
it's spark, trust me.. hook my snapon timing light to it and when it skips the light goes out when it hitting the light is on... put the light on the lower hole and it flashes a nice constant light as it should move the pickup to the top wire and the light is on and off with the skip.. can't be more simple than that.. it's spark..
 
Driving me nuts, like I said this not my first rodeo I've been around awhile, that's why I ask questions even if it's a simple one... I got all new OEM parts coming.. will see what happens.. this will be 4 sets of points three set of coils and three sets of condensers...
 
New Spark plug wire:
1 - Cut to 3' lengths. Trim one end of the wires so that the bare wire shows. fan that wire back and cut excess away so that it does not extend past the circular form of the wires insulation.
2 - coat one end of the wire lightly with WD40 (lubricant) and push/screw it into the spiral thread like coil prong.

Coil setting:
1 - A slight bevel exists at the top of the aluminum seat that the coil sits upon.
2 - Adjust the vertical metal portion of the coil so that it aligns with the top inside portion of that bevel.
3 -Repeat for second coil.

Install armature plate to powerhead
1 - Install 2 sets of points with 2 condensers.

Point setting:
1 - Have the fiber rubbing portion of one set of points aligned with the flywheel key.
2 - Set the points so that a .020 will slide thru but a .020 will not.
3 - Repeat for the second set of points.

1 - Have engine in gear and adjust spark plug wires so that there is no binding, both are of the proper length (cut to fit) when retarded or fully advanced.
2 - Make sure that the inside wire at the armature plate leads to the top cylinder.
3 - Again trim one end of the wires so that the bare wire shows. fan that wire back and cut excess away so that it does not extend past the circular form of the wires insulation.
4 - The rubber boot, spark plug end.... With the wire cut to the length required, trim back 1/4" insulation again but do not solder tint the wires. Simply fan out the wires and fold them back against the insulation, cutting the excess off as explained above. Holding the spring wire terminal, estimate where the prong should be inserted so that the spring will be flush against the exposed wire. Hold the spring terminal away from the wires end (sideways) and insert the prong into the insulation and into the center wire, then swing the spring terminal in front of the exposed wire portion (makes a tight fit for continuity purposes).

Now... With the above performed as listed..... there is no excuse for not having spark UNLESS you have grounded out both pair of points via a shorted out Push Stop Button.
 
man I have done all that 50 times it seems.. I've had this apart so many times the flywheel nut is getting worn out. no matter what I do, what parts I change it's always the top hole.. spark is intermittent... of all the ignition parts I have only one set I bought new.. the rest are from older motors.. but I can't for the life of me figure out why it's always the top hole.. got the new oem parts coming we'll see what happens.. got a broken arm so I have to have my buddies kid help me.. even he is getting sick of it.. lol..
 
man I have done all that 50 times it seems.

Well then, I don't know what to tell you except to say that (no insult intended) you must be overlooking something obvious. Too bad you don't live next door. Nothing else I can do except wish you luck as what I typed above is foolproof... there is no way to have that setup avoid having spark without purposely shorting it out.

Wouldn't simply be a case that you're jerking our chain would it? :)
 
What happens if you start it up and pull the bottom plug wire off leaving the top on. No timing light. How's it run ??
 
I'm going to look real closely at the post that the points pivot on... maybe there could be some binding there..

That brings to mind a long buried memory..... Back when I was first starting out in the trade, I came across a 35hp Evinrude that kept loosing spark on one cylinder (forget which one)... and everything was perfect and new! It even had my mentor in stall mode.

Eventually it was revealed that either the pivot point fiber insulator material one new set of points was a few thousands too high on the pivot post... OR... the post was too short by a few thousands. This allowed the points to open/close for setting and test purposes... BUT... when actually running, the speed that the points operated at created such friction/heat that within seconds the insulation expanded and the points stuck in the open position.

Switching the points proved the problem to be that the pivot post was too short. The cure was to replace the armature plate and NOT to simply file the points so as not to drive someone else nuts at a future date.

exactly what I thought this morning laying in bed thinking about this.. kinda like a weak valve spring sorta..
 
exactly what I thought this morning laying in bed thinking about this.. kinda like a weak valve spring sorta..

If this happens to be the problem, if it were me, I'd file the insulation on whichever set of points a couple thousands... just enough to create clearance but not enough to allow the point contact to slide.

If this cures the problem, pass along the information should you sell that engine. It's not like you'd forget it! :)
 
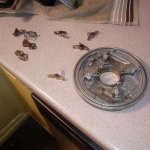
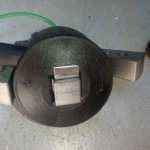
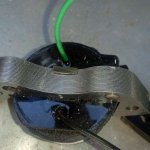
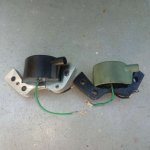
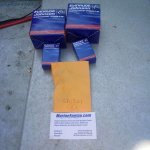
so I got the new OEM parts and the points fit over the pivot perfect with very little resistance.. all the other aftermarket points I have fit way tighter than these new ones..and at 5 to 6000 rpms I can see where this would be a problem. not much of a spring there to keep them closed.. and the coils look different too they have some sort of ground strap running thru them.. see pic.. should have the new solid copper core plug wires Saturday.. getting sick of this.. hopping this will be the end of my problems..

20190719_091840-600.jpg
20190719_091830-600.jpg
20190719_091820-600.jpg
20190719_092031-600.jpg
 
Last edited:
I think your motor only spins to 4500 rpm.
4500? 5000 same thing... to fast for that little spring to close points that are binding on the post they pivot on.. that was my point.. I built many many small block fords in my day the 5 to 6000 rpm was just a guess...
 
4500? 5000 same thing... to fast for that little spring to close points that are binding on the post they pivot on.. that was my point.. I built many many small block fords in my day the 5 to 6000 rpm was just a guess...

Yeah... I remember when I started out in the trade, 4800 rpm was about tops!
 
Ok it's way to hot out and my arm is broken so I'm waiting for my buddy to come back from vacation to put it back together and I have been thinking... So @4800rpm's that's (revolutions per minute) / that by 60 those point are opening and closing 80 times a second. On a 4 stroke it would half that at 40 times a second.. that's why the old hyper289 fords had dual points to share the load and be more accurate.. If you ever change your points and you loose some top end power look closely at how tight the points pivot on the posts.. I can't believe that little spring can keep up with it..
 
Back
Top