Logo

1990 Force 120 mystery

Knowlzy0791

New member
Hey everyone,

I have been working with a 1990 Force 120 for the past couple of weeks. I will get straight to the point.

Started with no power or anything. Have redone some wiring, rebuilt the fuel pump, rebuilt both carbs, replaced all spark plugs, verified spark at all cylinders, and pulled and cleaned all Reed valves. Also verified fuel makes it to both carb bowls through all fuel lines.

I check compression across all cylinders and got 150psi on all.

Engine now turns over, kind of sputters. Getting fuel to cylinders 3 and 4 but NOT to 1 and 2. I have swapped the carbs around, swapped floats, tried every combination I can think of and it is always the same outcome.

If I put starting fluid manually into the cylinders, or through the Reed valves, engine will fire immediately. Without that, only sputters on 3 and 4.

I have scoured these forums and Google. Called every marine mechanic around me. I am at a loss.

Any and all guidance would be greatly appreciated!
 
Last edited:
That sounds like a fuel delivery problem??
You check the fuel pump?

Myself, I've never been able to tell if there's fuel on a plug unless there's too much fuel and
fowling it out??


You have the old plunger style choke or the newer primer system?
The new: unhook the hose to the bowl and activate the primer.
It should have a spurt of fuel when the key's pushed in.
Repeat on the other carb.
There's a diaphragm in the primer that goes bad, age, ethanol and additives can melt the rubber.
Feeding too much fuel can cause it to not run right.
Pinch off the hose from the primer and try to start.

What did you set the air screw after the rebuild?
1 1/2 turn out for initial setting.

Did it ever backfire?
A backfire can blow a gasket on the intake and cause hard starting as it's now sucking air???
 
Wow, this one is on me. Unless of course it changed during the course of my working on it.

I only have spark at cylinder one. So I started scoping out wires, found one that was hardly connected due to corrosion, so I put a new end on that, and now I have no spark anywhere :mad:

So I am back to the drawing board learning about stators and the like. Which is a different thread I am sure. Probably a few in here somewhere.

As far as the carbs go though, those badboys should be in mint condition after all of the cleaning they got!


That sounds like a fuel delivery problem??
You check the fuel pump?

Myself, I've never been able to tell if there's fuel on a plug unless there's too much fuel and
fowling it out??


You have the old plunger style choke or the newer primer system?
The new: unhook the hose to the bowl and activate the primer.
It should have a spurt of fuel when the key's pushed in.
Repeat on the other carb.
There's a diaphragm in the primer that goes bad, age, ethanol and additives can melt the rubber.
Feeding too much fuel can cause it to not run right.
Pinch off the hose from the primer and try to start.

What did you set the air screw after the rebuild?
1 1/2 turn out for initial setting.

Did it ever backfire?
A backfire can blow a gasket on the intake and cause hard starting as it's now sucking air???
 
Was working on a boat with twin 120's
The stbd. motor had a problem.
No matter what I did it still ran like crap.
Comp. spark and fuel all there, timing ok.
Changed the carb with the one from the other motor, the problem followed the carb.
Cleaned the carb 4 times, my helper cleaned it(just in case I did something wrong???)
The last time I cleaned it did the trick.
Ran great.
Must have been something in a passage somewhere??
 
Hahahaha isn't that just wild? Amazing what can stop the whole wild process of it running!

I suppose I have to walk the electrical trail for awhile before I can get back to finding out if the fuel system is working properly.
 
outboardignitiondotcom has test procedures for your motor.
Prestolite ignition.

IF??? the stator's ever been changed??
Some after market stators have different specs.
CDI is the main one who makes the after market stators.
 
One more, a stator can test good and still be bad :(

Oh great ��*♂️ I was able to make contact with the guy I got it from. He has changed the stator and CDI. So possibility of it being wired incorrectly?

Still working out how to do the resistance tests on it. Can I test the VAC output to the rectifier, then test the DCV coming out of it? If he replaced everything else, but not the rectifier would it be safe to assume it could be the culprit?
 
It would be safe, yes.

You can do the next tests with a regular meter.
IF NO FIRE ON ANY CYLINDER:
  1. Disconnect kill wire AT THE PACK.
  2. Check for broken or bare wires on the unit, stator and trigger.
  3. Measure DVA voltage of the stator between the output wire sets. With everything connected, reading s should be approximately 180 volts or more. Resistance readings between the stator wire sets range from 680 - 800 ohms.
  4. Disconnect the rectifier. If the engine fires, replace the rectifier.
The next tests need a DVA or Peak Reading Volt Meter.
You can buy it and add it to the regular meter or buy a meter with it built in.

O FIRE OR INTERMITTENT ON ONE CYLINDER:
  1. Check stator and trigger resistance, trigger wire sets read approximately 50 ohms between the wire sets (DVA-4V or more), stator reads 680-800 ohms (factory) and 200- 300 (CDI/RAPAIR) DVA 180V or more from blue to yellow.
  2. If readings are good, disconnect kill wire from one pack. If the dead cylinder starts firing, the problem is likely the blocking diode in the other pack

You can do specific component tests too.
Lok at the Force parts and each part has test procedures.


I attempted to check all of the those readings off a different forum, the other one confused me though and I am not sure I did it all correctly. I will wrap my head around it better and try again with your instructions. I have never done this so I am piecing this all together at once.

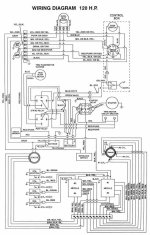
As far as what I do know now, I downloaded the wiring schematic of this engine and traced all of the wires. There did appear to be a couple that were either in the wrong place or had bad terminals. Still no luck after fixing these issues though.

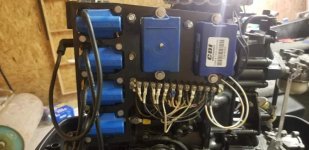
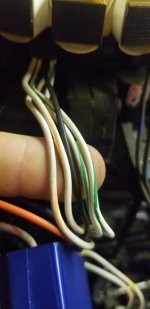
Here is what I can't wrap my head around (aside from stator testing lol!) This diagram is my engine wire for wire. BUT, this diagram shows 8 wires coming from the trigger to the board by the CDI packs. The trigger in this engine and from what I have found for sale, only come with 4. So where the 8 wires from trigger go to board terminals, then meet up with other wires from the CDI packs, I ONLY have wires from the CDI packs. Is this normal? It is very confusing to me, Not too often do I see any type of an electronic without using at least 2 wires!

_storage_emulated_0_Android_data_com.samsung.android.messaging_files_8d2a9b6d12136b7744c4e49d394.jpg
 
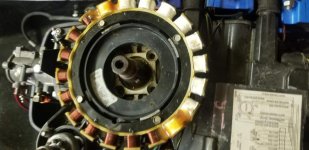
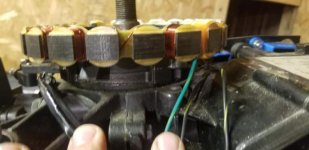
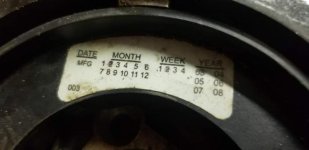
Pictures of the trigger, stator, packs and coils.
I've never seen a 4 wire trigger?
You might have the later Mercury ignition?

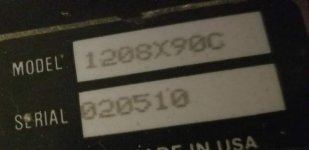
You have the Model# or Serial#
Pics of the lower unit too?
 
So the trigger has 5 wires of you count the ground. I just looked at a force 85 and it has 2 wires from trigger for every cylinder. I have a feeling this guy put a 2 cylinder trigger on here
 
That's an aftermarket trigger. CDI
They only came with 5 leads.
Looks like the stator is an aftermarket CDI too.
outboardignitiondotcom has test procedures for their parts.

NOTICE: This trigger has been redesigned to use only five wires as opposed to the 8 wires used on the original design. This allows the use of heavier gage wire, resulting in better durability. Connect the black wire to engine ground. Installation 1. Disconnect the trigger and stator wires. 2. Remove the flywheel. 3. Remove the stator – Use extra care handling the stator, due to it being very fragile. The coating on the charge winding is very easy to break (Like an eggshell). Once the coating on the charge windings is broken, the stator will have to be replaced. NOTE: At this time it would be a good idea to check the outer flywheel magnet to make sure it still tightly bonded. 4. Disconnect the trigger linkage and remove the trigger. 5. Install the new trigger and reconnect the linkage. 6. Using extreme care, reinstall the stator. 7. Connect the trigger wires. 8. Connect the black wire to engine ground. 9. Reconnect the stator wires. 10. Install the flywheel according to the service manual.
4 Cylinder Connections: Pack #1 (Firing #1 and #2 cylinders) Trigger: Orange (White/Orange) Pack: White/Orange Stripe Green (White/Yellow Stripe) White/Yellow Stripe Red (White/Red) White/Red stripe White/Green Stripe White/Green Stripe Stator: Yellow (Brown/Yellow Stripe) Pack: Brown/Yellow Stripe Blue (Brown/Blue Stripe) Pack: Brown/Blue Stripe Coil #1: White (Orange/Blue Stripe) Pack: Orange/Blue Stripe Coil #2: White (Orange/Blue Stripe) Pack: Blue/Red stripe
Pack #2 (Firing #3 and #4 cylinders) Trigger: Orange (White/Orange) Pack: White/Orange Stripe Green (White/Yellow Stripe) White/Yellow Stripe Red (White/Red) White/Red stripe White/Green Stripe White/Green Stripe Stator: Yellow (Brown/Yellow Stripe) Pack: Brown/Yellow Stripe Blue (Brown/Blue Stripe) Pack: Brown/Blue Stripe Coil #3: White (Orange/Blue Stripe) Pack: Orange/Blue Stripe Coil #4: White (Orange/Blue Stripe) Pack: Blue/Red stripe
Color Code Cross Reference FUNCTION OLD NEW
Trigger Orange White/Orange Stripe Trigger Green White/Yellow Stripe Trigger Red White/Red Stripe Trigger White/Green Stripe White/Green Stripe Stator Blue Brown/Blue Stripe Stator Yellow Brown/Yellow Stripe
Ignition Coil White Orange/Blue Stop (Kill) Circuit White (Brown) Black/Yellow
 
Wow that's good info, that ourboardignitiondotcon is super awesome.

What isn't awesome is it looks like it's all wired up properly, but still not functioning. One thing I have noticed is each individual coil being grounded in the diagram. I know on the engine they are grounded to the plate, which I then ran another ground to the engine block. Is that not sufficient? Other than that I guess I have a bad part/parts somewhere.

I will have to look around on that website and figure out how to diagnose all these electronics!
 
It's funny you said that! Last night I tested the stator and got a bad reading across a Brown/Blue and Brown/Yellow. So I pulled it out and bench tested it off the engine. All good readings. Made me curious so I put it back in. Removed the killswitch, rectifier, and tach. Started spitting and sputtering under it's own power! Pretty sure the timing is all jacked up now because it didn't sound healthy and had a backfire. I rechecked my compression to make sure I didn't blow a ring,all between 120 and 150 PSI.Problem. is now I'm pretty sure with all the cranking it burned the starter out.

I think with a new starter and timing I'll be good to get it going! Then carb adjustments and this ol thing just might live!!

Any other suggestions you can think of during the above mentioned process? Still need to find out what the problem was between kill switch, rectifier, and tach though.


Try unhooking the tach.

Usually a no spark on all 4 is the stator.
 
Ok so the newest update. This thing gets more and more weird by the night.

Got the starter situation handled. Re-assembled everything (minus kill, rectifier, and tach) and it was still wanting to start, but couldn't get there. Checked the spark, only getting spark on plug #2 now. Last time I had spark it was on plug #1. I am not sure what the deal is with that.

So far I have ran Ohms tests on both the stator and the triggers, they all come out within compliance. (Can't find a trouble shooting test for power packs or coils?!) Would my problem then be in the DVA output values? I am not familiar with this term or how to go about testing it. In the diagrams it tells me which wires I need to be testing, but I can't figure out exactly how to go about that. Do I need some sort of special testing equipment, or will my standard electric multi-meter do the trick?
 
Ok so here is what I have found.

Receiving spark on 2, I was able to swap that coil and get "little" spark on cylinder 1. Looking further into this I found that the boots of the coil boots are all rusty and loose. they do not really snap onto the connections like they should.

So I guess for now I will replace all 4 packs for upgraded ones and go ahead and eliminate that issue. Whatever happens after that I will handle it then.

My question for that is this. There are a few different options varying from 32 to 78 dollars. Are the $78 ones really worth the money??
 
Replace all 4 packs????
What packs?
Coil packs? Buy CDI if your going to replace the coils.
The cheapo's are usually just that and probably made in China and the quality from them sucks :(

Maybe post a link to the parts your looking at?

You can get new boots and connectors pretty cheap on ebay.
"spark plug boots 90degree"
 
https://www.outboardignition.com/forcesearch.asp?cat=itemname&cval=3&hval=38&val=2

Just the coil packs. I was kind of thinking if I replace them (which needs to be done anyways) that would be a good indicator of whether or not the Power Pack (https://www.outboardignition.com/forcesearch.asp?cat=itemname&cval=3&hval=38&val=6) is still good. It looks like it has been replaced about the same time as the stator and triggers.

I swapped the coil from 2 to number 1 and saw intermittent spark when moving it around on the tester. So if I am thinking of this correctly, that would mean the Power Pack IS sending power through (on the wire for #2 anyway) and I can get it to the spark plug, but only if I move the ends around.

I did not think you could replace the ends on spark plugs, That will be a good thing to do in the mean time!

Still tracking down a DVA adapter to run the other tests. I was Reading over the procedures and found this "OEM stator will read680-800 ohms (DVA 180V or more) from blue to yellow." This is where I start to get a little lost, because my stator does not have a yellow wire. It has a Green with Yellow stripe that is the power outputs that go to the rectifier, but no yellow wire.
 
Later models the colors changed a little.
The green/yellow took the place of the yellow(I think)
You can contact CDI Ignition and contact their service dept. and they can tell you the color codes.

Google DVA adaptor.

You can change the ends of the wire but not the wires.

Kinda messy: I use liquid electric tape and shrink tube to cover bad wires.
Goop it up and slide the shrink tube over the wire and heat it.
Just make sure the shrink/tape covers by the coil and connector.

The coil itself: I've only seen one go bad in 35+ years.
 
Ok so I got new ends, I will put them on this week sometime hopefully.

Also ordered the DVA adapter so I guess I am at a stand still until that comes in. Then just work backwards from plug to stator?
 
Ok Jerry (and anyone else who has stuck around through this circus thus far), it is update time!

So I did get the new spark plug boots on, no change as far as starting, but the spark "light" looks better when testing them. So that is good.

Now for the fun stuff. I received my DVA tester today, hit the webs and learned how, then followed this guide : http://www.cdielectronics.com/wp-ad...Documents/Installation Sheets/IS-116-8301.pdf and I had the 180 volts on each wire set. So this leaves the stator having passed (and re-passed again tonight) both resistance and DVA tests!

So before we go into the bad stator testing but still testing good discussion again, hear this one Jerry! I noticed on that sheet I referenced above a resistance testing for the ignition packs which I had not seen before (or had not understood anyway) So I gave that a go! If I did it correctly (white/red to white/green and white/yellow to white/orange all on the same pack) I had some interesting results. On pack 1 I got nothing. Absolutely 0 readings on anything. Pack 2 however I had no readings for my white/green to white/red, but white/yellow to white/orange it beeped for continuity and gave me a reading of something like .3Ω!!

The real kicker is that pack 1 gave me nothing, but it has cylinder 2 firing still.

I hope this information triggers something for you, I am still lost over here just googling and forum rummaging begging for an answer!!

I guess at this point I am hoping I have crossed enough stuff off to get a definitive answer of what to swap!

Thanks for your time through all of this, hopefully not too much longer lol!

-Adam
 
Contact CDI Ignition.
If a woman answers hang up and call again.
She try's but doesn't really know??
The guys are much better.

You try swapping the packs around?
You test the stator/ regulator?

You have a spark tester on all 3 or just one at a time?

Double check the grounds.
 
Alright everyone, I didn't forget you all!

THE MACHINE RUNS!!

The gentlemen over at CDI were super helpful in troubleshooting the electronics while on the phone. Replaced my #3 and 4 ignition pack and she fired within the first .5 seconds of turning the key. I have since hooked up the kill switch and rectifier and we are fully operational. I will look at the tach once I get this water pump rebuilt. Did not want to run it too long without that and be back at square one lol!

Thank you all so much for all of your help!
 
YEA!!!
When your working? test the alarm buzzer.
Key on and ground the orange lead at the terminal block.
It should make the buzzer buzz.
No? then replace the buzzer with a motorcycle horn.
Just make sure it's wired right.
 
You lost me on this one! I called that same day to get my pump rebuild ordered and the guy forgot to order it, so now I have to wait until next week, but I get married and leave for my honeymoon so she is stuck in my shop for almost 2 extra weeks now!!

Is this something I can be testing without needing to start the engine and can work on it this weekend?


YEA!!!
When your working? test the alarm buzzer.
Key on and ground the orange lead at the terminal block.
It should make the buzzer buzz.
No? then replace the buzzer with a motorcycle horn.
Just make sure it's wired right.
 
Back
Top