Logo

New (to me) Larson w/140 and Alpha One!

braol911

Member
Hello!
This forum has been a great help in deciding which way to go on a used boat! The result:

1988 Larson V175 (bowrider).

New engine about 3 years ago (two owners ago didn't winterize and cracked the original engine).

Typical sun damage to seats (new ones on order already) and engine cover vinyl.

All gauges work, lights, new fenders, oars, innertubes, life jackets, docklines, etc...

Starts right up. No soft spots. Boat was detailed and buffed last year and looks new on the outside!

The bad: Typical stuff. Idles too high and it has to be babied into gear so as not to stall/clunk into gear. I got the boat for a steal (guy getting divorced from wife, needs the cash, kids are older and don't use the boat, he wants a fishing boat instead, etc...). I also bought it prepared to spend as much as $1-2K if need be on mechanicals. Hell, a new boat is $40k, right? I'm going to measure the cables for stretch/adjustment and do my own impeller/water pump and leave the rest for the Mercruiser mechanic if need be. I'm assuming that the cables are old and/or out of adjustment. Worst case is that the cable going into the drive is bad...and the guy has had the boat for the last 4 years and has never done a gimbal or bellows. With the new engine three years ago I wonder if the whole works needs to be aligned anyways? (I guess the other worst case is that the upper drive has been clunking into gear for too long and might be bad, but let's all stay positive.) Again, while I'd rather not spend too much money I got the green light from my wife to do anything to make the boat reliable. Besides, it wouldn't be a boat without a little $$$pain$$$ right?

Any thoughts on the high idle and if that is the reason for the clunking into gear? It also stalls when going into reverse (or was it from reverse to neutral...I can't remember). It does go into gear, but the p/o really was really slooooowwww with the shifting...
 
Alpha`s always clunk into gear, that is why you shift "firmly" and not baby it . Adjust the idle speed lower
stalling when shifting "on land" is a sign of a bad lower cable or corrosion
 
...Adjust the idle speed lower...stalling when shifting "on land" is a sign of a bad lower cable or corrosion

I was afraid of the lower cable but not surprised. The local shop quoted me $1200 for cable, gimbal, and bellows job. This is what I had budgeted so no problem there. As long as I'm on the water by July 3rd I'll consider it a win.
 
and were is your location cause thats sounds a bit high now depending on how far I have travel............................ All those parts are about $275
 
I was afraid of the lower cable but not surprised. The local shop quoted me $1200 for cable, gimbal, and bellows job. This is what I had budgeted so no problem there. As long as I'm on the water by July 3rd I'll consider it a win.
You can wrench on it yourself & save a ton of money. Your call. Good luck with it.
 
You can wrench on it yourself & save a ton of money. Your call. Good luck with it.

Well, this is exactly what I'm going to do. I ordered the stuff yesterday. As an aircraft mechanic, machinist and welder (with a little blacksmithing on the side) I hope I have the skill-set to pull this off. (The DIY videos online are a big help.) My only thing is I wish someone locally had the engine alignment tool I could borrow. It is a very expensive item for a one-time use. Maybe I could just drag my boat in on the trailer and have the mechanic do that part real quick. This step may be critical because the p/o had installed a new engine 3 years ago and I'd like verify the alignment.
Speaking of online...a guy from SEI use a "wire" that he fed up through the old cable sheath as a guide to install the new sheath. Any idea what type of wire this is? I figure some narrow stiff residential wire? Why not just use the old cable as the guide? Also, I saw someone use a 9/16 spark-plug socket to loosen the cable sheath from the drive (placed another socket on the end of the spark-plug socket to get around the sheath end)...as opposed to the special socket tool. I'm going to give this a whirl and let everyone know if it really works...
 
Here is better advice,
Dont take WhiteA$$ or Mikey' s advice.

If you do not have experience and you have to ask about "what wire to use"
You are already making mistakes.

A spark plug socket wont work, its 9/16. It requires a special tool or a special length socket and Snap on or mat co that length will cost you close to $50.
I made what I needed but wont share how here right now

The short cable Must follow a specific routing and there are special considerations when assembling all the cable parts.
Then there is proper cable adjustment.
Now throw in alignment check, outdrive service (need to drain and pressure check) and the list goes on.........

Probably more to point out but this is a start.

If your hell bent on doing this yourself maybe look at Criagslist and see if there it a local independent shop/person who may assist with tools and or advice.
Otherwise you will be posting here a lot.

Where are u located. If ur near me I would tell u exactly what/how to do all the work, let you use all my special tools for a couple of 30 packs and drink em while watching you sweat!
 
Last edited:
If you do not have experience and you have to ask about "what wire to use"
You are already making mistakes.

A spark plug socket wont work, its 9/16. It requires a special tool or a special length socket and Snap on or mat co that length will cost you close to $50.
I made what I needed but wont share how here right now

The short cable Must follow a specific routing and there are special considerations when assembling all the cable parts.
Then there is proper cable adjustment.
Now throw in alignment check, outdrive service (need to drain and pressure check) and the list goes on.........

Thanks for the constructive advice! I have rebuilt several jetskis (I'm a SeaDoo 2-stroke enthusiast) and used my familiarity with that to do a pre-emptive pressure check on my outdrive already (just because I was curious). The use of a stiff wire is likely because of the special routing of the outer cable sheath (we did the opposite with A-10 attack jets, we slid a rigid tube over the flight control actuator cables so that we could route the stranded wire control cable through the proper path)...I was just asking for advice on the "wire" to use based upon other's experiences. With the engine alignment, I used to have an old Hunter sailboat with a direct drive diesel engine and a buddy of mine and I had to align the propshaft after doing a prop-shaft tube replacement...although that was with a piece of plumber's lead pipe and a flashlight, feeler gauge, and some modeling clay...and a lot of alcohol! The alignment was a piece-of-cake compared to all the fiberglass and epoxy work that went in to fabricating such a repair.

I'm going to go for it . It can't be anymore technically challenging than my Model A Ford's transmission rebuild or the VW flat-four engine I tore down that is in my homebuilt bi-plane (I haven't crashed yet). I just wish I had a loaner alignment tool. Hell, if it goes well and I have to drop $$$ on the tools maybe I'll just go into business.
 
Ok, good luck.

You are not the first with a lot of past Experinces with every type of what ever to work on marine stuff. Engines yes, outdrives not so much, cables, boots, bellows and a few other unique to marine/mercruiser....not so much

Lets see how far you get...
 
I`ll share mine, get a deep 9/16 six point socket and weld a donor deep socket to it

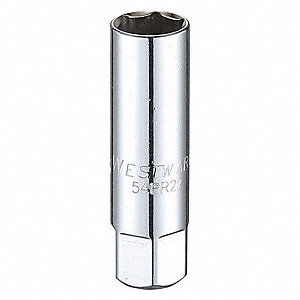
The tip I saw online was a guy using a 9/16 spark-plug style deep socket (the kind with an end that resembles a 6-point bolt head). The socket was long enough to go over the cable sheath end (mostly) and then he put ANOTHER socket over the end (don't remember what size) and connected his socket wrench to that and BINGO!
54PR22_AS01

See picture...the end can have another socket slipped over it... Work smarter, not harder.
 
I was having a lasp.
9/16,
I drilled out a 3" 3/8" extension with 1/4 drill.
Attached deep socket and welded to extension.

Deep socket Must be 6 point!!
 
I also bought it prepared to spend as much as $1-2K if need be on mechanicals.
just a second. (BWahhhahahahahahahaha!) Ok.

Before you get too excited, do a deep dive into the unfriendly areas of the boat. It is a 30 year old boat and stuff like hull stringers, tabbing and other structural elements tend to start coming apart on these older models. Soft floors are just that, and not critical hull keep-it-together items, well, at least until you put a foot through a dry rotted deck. If you can lift up access panels, hatches, beauty covers, etc and get a look, you may be catching problems that could ruin your day. If I could have a dollar for every time I found rotten wiring harnesses run in the bilge below a glassed in plywood floor...oh boy I could buy Jack a beer or two! I'm looking at you, Carver Yachts! Manufacturers LOVE to do things quick and dirty. Wiring run between hull and hull liner, plastic thru hull fittings, exposed wood on stringers and transom, zamak fittings (my personal peeve), zinc plated steel screws, foam-in-place fuel tanks, I could go on and on.
 
Last edited:
If I could have a dollar for every time I found rotten wiring harnesses run in the bilge below a glassed in plywood floor...oh boy I could buy Jack a beer or two! I'm looking at you, Carver Yachts! Manufacturers LOVE to do things quick and dirty. Wiring run between hull and hull liner, plastic thru hull fittings, exposed wood on stringers and transom, zamak fittings (my personal peeve), zinc plated steel screws, foam-in-place fuel tanks, I could go on and on.

Oh man! I know what you're saying. I've owned big sailboats since 2002 and have run across those very things several times (maybe not the glassed in plywood floor part). Sailboats have the distinction of having the interior headliner with wires run all over...plus, when you get water running through your deck fittings, you can't get in there to repair things on the back side...it's just a big dark void. I've become a pro at drilling holes "just deep enough" into foam/wood cored fiberglass and then pumping gallons of thickened epoxy into soft decks and transoms. I would add to the list deck railings with feet that are just screwed or bolted (sometimes) into fiberglass with no backing plates, same with the fake stainless screws you mentioned that just turn to powder when they get old.

I got lucky with this boat that was obviously stored inside for at least some of it's life. We got the boat on the water and...despite my shift cable that I'll start to replace this weekend...started right up, gets on plane with plenty of power, and was dry as a bone inside after about 30 minutes of fun. My wife is getting the bow cushions and the engine cover reupholstered by a friend that has a good shop, I replaced some stainless steel ladder mounts yesterday that were cracked, and I adjusted the idle down to about 700RPM (I had to adjust the throttle cable out a bit 'cause it wasn't applying any tension to the throttle cam to keep it at idle).

We'll see about any electric issues as the summer progresses, but everything works as far as I can tell. Although the HORN is LAME. We need a proper two-trumpet type because the one on there is a joke. My method for solving wire problems between deck liners has always been to clip and leave the old wires in and just run new wire along the high sides (behind any upholstry) of the boat inside small gauge PVC. Sometimes one can use the old wire as a "come along" to pull old wires through, but that doesn't solve the fact that the wires are in the bilge in the first place. (Speaking of bilge pumps, iit is my practice to rig up an engine-driven pump that I can quickly engage in the event of a REAL leak. Those stock electric pumps only work to dewater from run of the mill water seepage and rain in my opinion.)
 
Last edited:
Here is better advice,
Dont take WhiteA$$ or Mikey' s advice.

If you do not have experience and you have to ask about "what wire to use"
You are already making mistakes.

A spark plug socket wont work, its 9/16. It requires a special tool or a special length socket and Snap on or mat co that length will cost you close to $50.
I made what I needed but wont share how here right now

The short cable Must follow a specific routing and there are special considerations when assembling all the cable parts.
Then there is proper cable adjustment.
Now throw in alignment check, outdrive service (need to drain and pressure check) and the list goes on.........

Probably more to point out but this is a start.

If your hell bent on doing this yourself maybe look at Criagslist and see if there it a local independent shop/person who may assist with tools and or advice.
Otherwise you will be posting here a lot.

Where are u located. If ur near me I would tell u exactly what/how to do all the work, let you use all my special tools for a couple of 30 packs and drink em while watching you sweat!
Clown, what special tools should one use when adjusting the shift cable on an OMC Cobra, clown.

Still brush your teeth with Preparation H, clown?
 
Well, to bring this thread back to a positive place: I got the outdrive off this weekend. Not much corrosion where the shift cable goes into the gimbal housing/transom. My socket idea worked to loosen the cable sheath…speaking of which, the little clamp that attaches the rubber shift cable boot to the outer sheath was really loose and I’m sure it weeped water into the boat in small quantities. The boots are relatively firm but the bellows boot was a bit “off” where it attaches to the gimbal housing.
I brought the boat to the Mercruiser mechanic Saturday afternoon for an engine alignment check and to eyeball my work. It’ll be ready to pick up on Tuesday or Wednesday…depending on if the engine needs to be aligned or not. I figured it was cheap insurance to have the mechanic take a look, plus I really didn’t want to buy the special tool. The guy told me “So far so good…looks like you have not broken anything…yet…” Outdrive removal took me about 2 hours. But that was with 1. Never having done this before, 2. Not wanting to break anything, 3. Consulting the manual, internet, and parts diagrams over and over (see #2 above), 4. Drinking LOTS of beer with my neighbor who was VERY curious as to what I was up to.
I “made” an outdrive “cradle” with a big block of high-density foam I got from work. I put it on top of a 4-wheel dolly and put it under the outdrive. When I slid the outdrive off it “fell” straight down into place…wedging itself in the foam. This serves the dual purpose of locking the prop into position with the drive in forward gear. AS I don’t have an engine lift, I have the drive itself in the corner of the garage wedged against the wall and my wooden workbench so that it doesn’t fall down.
After lowering the unit and loosening the cable sheath with my DIY socket we called it a night. The beer was flowing and I didn’t want to ruin a good thing. Oh, in good Wisconsin Red-Neck fashion we drank beer in the boat in the driveway with the stereo on again. This time, however, we didn’t start the engine and REALLY annoy the other neighbors. (We could have REALLY been lame and practiced casting into the back yard from the boat…)
OK, so maybe I am confident now on my ability to do this repair. But to all the naysayers who commented on this forum earlier: “Suck it!” People come to this forum for advice and because they are optimistic. Dismissing someone's skills because they are not a seasoned boat mechanic is a bit snobbish. Some of the most skilled mechanics I've met are guys who not certified in that trade (antique car and old airplane restoration)...and I've seen more than my fair share of "expert" built classic car engines that had head gasket and rear main leaks fresh out of the box. Thanks to: BT Doctur, whiteside, and o2batsea for the advice!
 
You should also be aware,
The volume of new to boating who want to take on these types of jobs
Clearly dont have the skills to do this work.

Also remember, if a car/truck springs a leak, fails, breaks down you drift to side of road and call for help.

You do all the work your are refering to and it fails, you have a chance of sinking the boat.
If off shore, you could get lost as sea, have to call Boat rescue at $500 per hr.

So it is not just dismissing a NEW post and someone claiming to have all kinds of auto/truck/airplane/etc. experience.

It took you 2+ hrs to remove the outdrive, typically it takes less than 10 minutes.

The shift cable boot, use a good quality plastic tanged tie wrap. Not over tight just good and snug.
No hose clamps!!
 
Yes oem and it is steel and rusts, suposed to use special crimp pliers, cant think of the name right now.
Most shops will use the cable tie especially in salt water.

Anyway there are many things to be aware of when installing a new cable so if ur not sure ask. To much to type everything.
 
With your new rubber on the drive, you should be OK for a few seasons. If a bellows is no good it will usually show up right when you launch as that's when the drive is deepest in the water. So just as a precautionary step, take a look in the bilge before you hit the waves and see if there's any seeping/gushing and act accordingly. A bilge pump will not save a sinking boat if the water comes in faster than you can pump it out but it may buy a little time. I only put the big 3K + pumps in my boats cz, well, why not. Heck, put two in there. I also use the Water Witch solid state switch.
 
You should also be aware,
The volume of new to boating who want to take on these types of jobs
Clearly dont have the skills to do this work.

Also remember, if a car/truck springs a leak, fails, breaks down you drift to side of road and call for help.

You do all the work your are refering to and it fails, you have a chance of sinking the boat.
If off shore, you could get lost as sea, have to call Boat rescue at $500 per hr.

So it is not just dismissing a NEW post and someone claiming to have all kinds of auto/truck/airplane/etc. experience.

It took you 2+ hrs to remove the outdrive, typically it takes less than 10 minutes.

The shift cable boot, use a good quality plastic tanged tie wrap. Not over tight just good and snug.
No hose clamps!!
Hi Ace! You forgot to mention that $200 tool. BAHAHAHAHAHA
 
Back
Top