Logo

starboard motor firing order - 229 v6, 1-2-3-4-5-6?

FstaRockr Burns

Regular Contributor
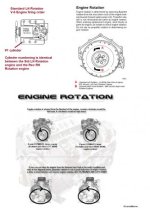
Just installed the rebuilt starboard after it was seized.. was curious - manual states a firing order of 1-2-3-4-5-6 for the 229 reverse rotation.. the whole motor turns the opposite direction ..

i have read there are variations on the cams / firing order. And i was not aware of this until after putting it back in.. SO q is - before i pull all plugs out to verify manually (which is what i should have done on the bench! & real hard cos you cant really turn the motor by hand without removing pulleys and installing a damper mounted device -

were there varying firing orders for the 229's counter rotation? this is an 84 model -

tx
 
If it is still in the Crusader factory configuration there's only one firing order, which you showed above, for the RH engines.
 
.........................
Just installed the rebuilt starboard Engine after it was seized.. was curious - manual states a firing order of 1-2-3-4-5-6 for the 229 reverse rotation.. the whole Engine turns the opposite direction ..

See images below. (I've added some firing order info to existing images)

i have read there are variations on the cams / firing order.

A few FYIs for you:

NOTE: all engine related indexing is based on #1 cylinder's piston being @ TDC C/S! (C/S = compression stroke)

The crankshaft (on either engine) is the same between the Std LH Rotation and the Reverse RH Rotation engines.
The Reverse RH Rotation engine Int/Exh valves must now operate in sync with the Reverse Rotation of the crankshaft, rods, pistons, etc.
In order to do this, the camshaft profile is designed to work in sync with the crankshaft that is now being rotated in the opposite direction.

In other words, where we would normally see #6 cylinder following #1, we now see #2 following #1, and so on right down the Reverse RH Rotation firing order.


And i was not aware of this until after putting it back in.. SO question is - before i pull all plugs out to verify manually (which is what i should have done on the bench! & real hard cos you cant really turn the Engine by hand without removing pulleys and installing a damper mounted device -
Suggestion;
Bring #1 cylinder up to TDC on the C/S
NOTE: you will be rotating the crankshaft in the Reverse RH Rotation direction!

Keep in mind that the ignition distributor rotation is the same between the two engines (i.e., RH and LH rotation) due to the oil pump rotation, of which is always standard.

Looking at the distributor cap (and knowing the rotor rotation), make sure that #2 follows #1.
Continue this right down the Reverse RH Rotation firing order.

Unless Crusader has reason for deviating from the Std LH Rotation Engine ignition advance specs...... the Ignition advance will be the same for both Engines.


were there varying firing orders for the 229's counter rotation? this is an 84 model -
I would say doubtful!
 

Attachments

  • Reverse rotation explained.jpg
    Reverse rotation explained.jpg
    23.4 KB · Views: 38
Once you are comfortable finding #1 TDC C/S, rotate the crankshaft 350/352 degrees in the same direction.
This will stop you short of #1 TDC C/S by
8 to 10 degrees.

Remove #1 spark plug cable from the #1 spark plug.
Place a known-to-be-good testing spark plug into the #1 spark plug cable boot.
Give the spark plug body good contact with the engine.

Caution..... gasoline vapors are explosive. Make sure that you have proper ventilation.

With the ignition key ON, rotate the distributor housing CCW until you see one spark event at the #1 spark plug cable/testing spark plug.
Do this several times until you are comfortable in stopping precisely when you see the spark event.
This will give the ignition system an approximate 8 to 10 degrees of BASE or Initial Advance for start-up.

Tighten the hold-down clamp bolt just enough to prevent unwanted rotation.

Fire the engine up, and immediately set the BASE ignition advance using your strobe style timing light!
Now fully tighten clamp bolt.

Next..... increase RPM and see if the ignition advance is doing what it should be doing!
(see your OEM specs for this)


Assuming that the hydraulic cam follower plunger depths have all been set correctly, you can now go out and do your break-in!


.


Back
Top