Logo

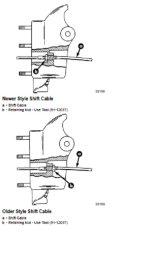
pre alpha shift cable conversion bell housing tap procudere

dptrucker

New member
hi guys, i know this has probably been addressed before but i can't find it, when running the 1/4-18 npts tap into the pre alpha bellhousing to update to the alpha one style shift cable should i run the tap in from the back side facing the transom of from the untapped side towards the transom? i can't find the service bulletin on line and my manual is too old to have it. thanks
 
When tapping the hole I try not to tap the full length of the tap.
If you keep the old cable cut it back and leave only the bronze threaded part and the hard tube.

Tap the new hole going ~ 3/4 of the tap length and thread the old cable end in to test the install depth of the threaded cable piece.

What you are trying to achieve is a nice water tight fit. The tapered threads will be the seal as with any pipe thread.

So what is desirable is ~ 1-3 threads of the bronze nut threads to be exposed when fully tight. That way it is a friction fit between the threads and the bell housing and not a "seal" at the bronze hex surface!!!!

So there hopefully will be a very small gap between the hex surface and the bell housing. ~ 1/16"

The tool needed for the cable installation is a (3/8" drive) 9/16" deep well socket and a 3/8" drive extension, the one about 3" long.
You will need to drill out the extension with a 1/4 inch dia drill bit. You may go through a couple of them to get it done. Best done on a lathe.

Unless you have a 9/16 deep socket almost 6 inches long................

Hope you understand all this.
Any question let em rip.
 

Attachments

  • shift cable.jpg
    shift cable.jpg
    42.8 KB · Views: 121
Last edited:
run the straight tap in from the aft(drive) side that is already threaded..correct? then check the fit from the other side of the housing using the old cable fitting..also correct? I've seen too many posts about ruining the housing if done wrong and want to make sure i have a complete understanding of this. i get the part about about wanting to leave a couple of threads showing on the tapered bushing. ps.. i have seen a couple of post regarding using a standard 1/4-18 npt. tapered tap and running it in short, you are talking about using the straight style tap (plug tap) correct?
thanks again guys
 
Last edited:
NO

Run the tap from the drive side about 3/4 of the length of the tap to start.

Use old bushing to test depth of thread from drive side!!!!

just like in carpentry, measure twice cut once. In this case cut the threads twice if needed to get the desired depth. If you are too short you can cut more depth if needed. Dont try to do it all at once unless you can judge the thread depth based on the tap vs the new threaded bushing!

The key here is not to leave to many threads exposed, only a couple exposed while trying not to have the hex be the seal. If to many and it leaves you like 1/8" inch gap, the cable adjustment will not be able to be done correctly.
 
i get it! drive side meaning the out "drive" unit..not the powertrain(engine side) duh!! yep yep, i was conflating "drive" side with the engine. plug style tap "ntps"..thanks, i will check the gap with a set of digital calipers to confirm 1/16 ideal gap as well.
 
Good luck. Eye ball is good calipers wont fit.

I have a full cable adjustment procedure when needed.
 
What you are trying to achieve is a nice water tight fit. The tapered threads will be the seal as with any pipe thread.

While that is correct for pipe threads it is incorrect for the mercruiser shift cable . a straight tap is used not a pipe tap. If you are converting to a new style start the tap from the transom side and tap all the way through
 
Jack,only the VERY experianced people should use a pipe tap and is using one its best to grind away 3 - 4 threads off the backside to remove the taper
 
perfect guys! i had already ordered a straight tap and would have done it incorrectly. thanks for finding the relevant service update as it eluded my searches. this is my first go around with marine drives but i am reasonably skilled with other motors and systems. One thing is for sure after reading all these posts..i gotta get my sense of direction right when discussing this project..lol.. i keep getting it backwards.
 
Last edited:
Jack,only the VERY experianced people should use a pipe tap and is using one its best to grind away 3 - 4 threads off the backside to remove the taper

Agreed

I did not have access to a straight from the very first time. I learned the hard way...........Never looked back.

Thanks!
 
Back
Top