Logo

Pull Cord Replacement on 1982 4.5 hp Evinrude E5RHCNR

Troyzee

Member
Hello,

Our pull cord broke for the last time the last piece came out yesterday. I know the recoiler has a large spring so I never wanted to pull it apart unless I had to. Is there a way that a new cord can be installed in place without pulling the assembly off? Otherwise it looks like it may come apart without disrupting the spring. Looks like the replacement cord is 61" part number I see is 32236 seems long. Is it a special cord or can a person buy it from a hardware store?

The original pull cord handle broke it was replaced with a larger one, is that a concern for the cord failing? Thinking it may generate more torque maybe its oversized.

Thanks
 
Last edited:
Those starters were never considered to be robust.-----If the book says 61 " long the that is what it is.------Starter cord is different than stuff found at the hardware store.
 
Get the correct pull handle... those makeshift ones make the engine look cheezy!

Part numbers are 6 digits.... don't know where you got that 5 digit one.

The nylon cord can be purchased from your dealership or a hardware store.... Dealership is best! It is normally cut to length from a 100' roll. Make sure you get the right size diameter and stated length.

********************
(Manual Starter Cord Installation)
(This pertains to the vertical type of Manual Starters such as the 9.5hp and later 4.5/6/8hp models etc)
(J. Reeves)

1 - Have a pair of vice grips handy set so that they will grab the top of the starter spindle tightly but will not damage it.

2 - Using a large screwdriver inserted into the top of the starter spindle, wind the starter in a counter clockwise direction 12 to 14 turns, stopping so that the cord locking slot is facing the away from the engine.

3 - Lock the spindle in that position with the vice grips, letting the vice grips lay against the flywheel.

4 - Insert the cord as needed and make sure it is retained properly at that slot.

5 - Feed the cord out the starter cord hole at the front of the engine and attach the handle.

6 - Grip the cord tightly so that the spindle cannot spin around rapidly, then release the vice grips.

7 - Allow the cord to be withdrawn slowly around the spindle.

********************
 
Racer..... Yes, you are correct. I had glanced in the book previously and the 7.5 is included along with the 4.5... and I picked the 7/5hp M/Starter in error. I corrected as follows. Your notice is appreciated.
********************

(Manual Starter Cord/Spring Installation)
(This pertains to the side mount type manual starters such as the 4.5hp models)
(J. Reeves)

Have the rope/cord wound around the starter pulley in the proper direction and tuck the end of the cord under itself to lock it in place.

Assemble the manual starter to the engine, having the inner sping loop inserted over the related pin, BUT leave the starter spring UNWOUND and simply hanging thru the slot of the manual starter housing with the long length of the spring out side of the manual starter.

Now, using your ingenuity, rig some kind of device to force that plastic gear up into the flywheel teeth, jamming it so that it will stay engaged in those teeth.

It is now simply a matter of putting a wrench on the flywheel nut and turning it in the proper direction to pull that spring into the manual starter housing which will properly rewind it. After the spring has been pulled in completely, continue to crank it further until sufficient pressure is upon the spring. Usually three turns of the flywheel is enough.

Now, keep a firm grip on that small plastic gear so that the starter does not rewind. Using a sharp pointed scribe, pick the loose end of the starter cord free and run it out its proper exit, then attach the handle to it. That should do it.

********************
 
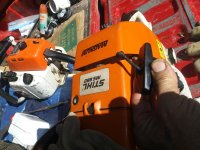
Right, Racer......these are temperamental units. I get them in for repair quite often. High performance cords can be purchased in bulk at your lawn and garden equipment retailer. I run a giant saw in my firewood business.....Stihl 880 magnum. It uses not only a decompressor but also an "elastic/rubber" end in the pull grip. The standard nylon cord supplied with the saw is inadequate for continued starting. Our local saw/garden/lawn equipment retailer offers an improved starter cord which is black and blue woven reinforced nylon. It is almost indestructible. This is my cord of choice for stubborn outboard recoils.
 
I have looked at some alternatives for starter cord.------But most of them stretch too much !-----Best get the factory stuff or from a quality small engine place.----They know the difference I hope.
 
Racer..... Yes, you are correct. I had glanced in the book previously and the 7.5 is included along with the 4.5... and I picked the 7/5hp M/Starter in error. I corrected as follows. Your notice is appreciated.
********************

(Manual Starter Cord/Spring Installation)
(This pertains to the side mount type manual starters such as the 4.5hp models)
(J. Reeves)

Have the rope/cord wound around the starter pulley in the proper direction and tuck the end of the cord under itself to lock it in place.

Assemble the manual starter to the engine, having the inner sping loop inserted over the related pin, BUT leave the starter spring UNWOUND and simply hanging thru the slot of the manual starter housing with the long length of the spring out side of the manual starter.

Now, using your ingenuity, rig some kind of device to force that plastic gear up into the flywheel teeth, jamming it so that it will stay engaged in those teeth.

It is now simply a matter of putting a wrench on the flywheel nut and turning it in the proper direction to pull that spring into the manual starter housing which will properly rewind it. After the spring has been pulled in completely, continue to crank it further until sufficient pressure is upon the spring. Usually three turns of the flywheel is enough.

Now, keep a firm grip on that small plastic gear so that the starter does not rewind. Using a sharp pointed scribe, pick the loose end of the starter cord free and run it out its proper exit, then attach the handle to it. That should do it


Thank you so much for he response everyone.

Mr. Reeves,

Just so that I can understand more clearly. The end of the rope does not attach to the pulley at all? There is no slot that you feed the rope through and tie off with a knot?

The way I read it is that you wind it around the pulley and the pressure/ tension of the remaining rope keeps it on the pulley? Would you happen to have a drawing or photo showing this? Do
I understand this correctly?

It looks like I will have to take this side recoiler assembly off let the spring tension off then wrap the rope around the pulley a few times then install assembly on the engine then lock the plastic gear in place and rotate flywheel until the remaining rope is wound all on to the pulley. Is this correct?

It foes not appear that the handle mskes a difference other than looks is that correct?

Thanks for all your help
 
The cord part number I found was 322236 missed a digit earlier

It makes sense to get the right quality of cord

The evinrude part number does not specify the cord size the remaining old cord seems worn down it would be great if a person could get the cord size.

Its hard to find free service manuals especialy for this one it would be great if you could send a link if yiu have one.

Thanks all

Troy
 
Mr. Reeves,

Just so that I can understand more clearly. The end of the rope does not attach to the pulley at all? There is no slot that you feed the rope through and tie off with a knot?

The way I read it is that you wind it around the pulley and the pressure/ tension of the remaining rope keeps it on the pulley? Would you happen to have a drawing or photo showing this?
Do
I understand this correctly?

It looks like I will have to take this side recoiler assembly off let the spring tension off then wrap the rope around the pulley a few times then install assembly on the engine then lock the plastic gear in place and rotate flywheel until the remaining rope is wound all on to the pulley. Is this correct?

It does not appear that the handle makes a difference other than looks is that correct?

Thanks for all your help
 
Thanks fellas got her done!

now I have to look into my tell tale water is dribbling out most water s coming out the exhaust block? Any ideas to clean it up? Took quite a bit of calcium build up aleady.
 
Maybe the blockage is right at the pee hole area or elbow back on block.
1020181219_resized.jpgNow, here is the best starter cord available. It will start this animal of a chain saw. 124 cc and over 10 hp.
 
Back
Top