Logo

04 175hp waterpump discharge directional piece either fell off

TheBrain

Regular Contributor
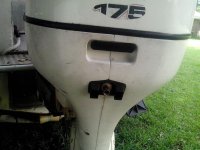
I didn’t run the engine much at all because the waterpump discharge directional piece either fell off or someone thought they needed it more than I did, guess I'm lucky I still have cowl.

Result water not peaing but pouring out also the water temp red light was on I was not in a good mode after traveling 220 miles to find out I could possibly over heat the engine.

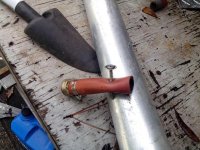
I rigged what I could a garden hose male and a piece of hose squeezed in hope of minimizes discharge.

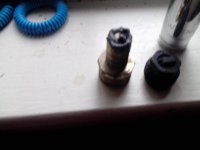
At retrieval I lifted the cowl and found the tube for watertemp at the cylinder head that was broken was easily fixed (maybe from not properly reinstalling cowl correctly caused this).

Main question can I continue w/ my homemade discharge tube?
Thanks TB
 

Attachments

  • waterpump discharge1.jpg
    waterpump discharge1.jpg
    58.5 KB · Views: 37
  • waterpump discharge2.jpg
    waterpump discharge2.jpg
    85.3 KB · Views: 34
I'm not seeing the tell tale in any of the diagrams, either for the hood or the lower engine cover. Isn't the factory hose maybe 5/16" ID? I'm not sure where the telltale lead comes out of the cooling system, but if it's designed to have a restriction at the outlet and you're using 3/4" garden hose that could be a problem.

I'll have to look at my 150 to see how big the outlet is on my telltale. At minimum measure the ID of the original hose that led to the tell tale. Now, go to your local hardware and get a hose barb adapter that will step that down to maybe a 1/8" hose. Get that fitted up and try the engine again. If the restriction helps then that points you in the right direction.

Hopefully someone can post the OEM part # so you can get a replacement.
 
Okay, I did a little more searching and now I know what's going on here. I did find a little info that said back pressure is important.

I watched this video: https://www.youtube.com/watch?v=yO82jnVPZJs

Now I see that the telltale just threads into the port, and when removed is effectively your fresh water flush port. I got it now.

Here's the easy thing. Go to your local hardware store and get something like this nylon male thread RV plug. https://www.acehardware.com/departm...ries/propane-tank-hoses-and-accessories/89612

You can get cheap nylon 3/4" NPT plugs, but I don't believe NPT thread and hose thread are the same pitch. So, whatever you get, it will have to specifically be a male hose thread fitting.

This RV hose plug should fit right into that threaded port. Cut the lanyard nub off the end then drill a 1/16" hole in the end of the plug. That should act as your telltale and give you proper back pressure on the cooling system. If the engine runs too cool, drill it out to 3/32" and try again. You might have to go up to 1/8". I'll measure the telltale on my '96 150 tonight.
 
excellent advice as usale about the RV plug drilled at angle. to bad the orginale didn't have a lease the originale part is probably a couple hundred $s.

I've had problems w/ reinstalling the telltale the PO cross threaded the threads making the telltale aim difficult, if not aimed lower than 3 & 9 O clock position discharge would shoot water about7' all over the place last time I accidently sprayed some folks on the other side of dock.

I've sean the video why would he rinse twice? and why doe's he store the engine in the trailering position?

when I cruise the GOM Destin/Ft.Walton BCH, FL (there are virtalley no gas stations in the vicinity w/ water connection what happened to full service) I use the male garden hose attached to a couple feet of hose to a 96ounce juice container for a quick rinse. 96ounces probably isn't enough but is better than salt deposits?
Thanks TB
 
Last edited:
excellent advice as usele $15. that's worth having the correct part. I'll also need the piece it screws into remember earlier I wrote PO crossthreaded.

last trip to local Lake w/ the cylinder heads water pressure ports tube repaired the red warning light on gauge was turned off.

the homemade discharge tube worked fine however if using multiple rods because it stuck out 2" it was a nuisance w/ tangling fishing line.

plan to proceed w/ RV plug plan. can you be so kind to size, gauge/size the discharge hole maybe slide a drill bit into it's hole.

edit: where is the cylinder heads water pressure ports tube connected to? I thought this physical water tube was suposed to be connected to the water preasure gauge (currently don't have the water preasure gauge connected, I need to run a tube from engine up to the gauge).?

so the red light (when the tube was broke) must have been a overheat signal from the cylinder heads sensor correct?
Thanks TB
 
Last edited:
I'll also need the piece it screws into remember earlier I wrote PO crossthreaded.

plan to proceed w/ RV plug plan. can you be so kind to size, gauge/size the discharge hole maybe slide a drill bit into it's hole.

edit: where is the cylinder heads water pressure ports tube connected to? I thought this physical water tube was suposed to be connected to the water preasure gauge....

so the red light (when the tube was broke) must have been a overheat signal from the cylinder heads sensor correct?
Thanks TB
Oh, so the threads in the port can't be recovered? That's a bummer.

Yes, the red light was an overheat condition because the free flow out the indicator reduced cooling system pressure and did not deliver enough cool water to the engine.

It's called the Exhaust Relief Grommet Assembly. Part# 0439953. http://www.marineengine.com/newparts/part_details.php?pnum=OMC0439953
$25 from this site + shipping. It's #54 on the parts diagram.
discharge_grommet.JPG

I've never had mine out so I couldn't tell you exactly how it connects. I do know for certain that the 1/4" tube for the water pressure gauge comes directly off the starboard head....at least on my '96 150 it does. However, I don't think there's much difference between your engine and mine, so I'll bet yours is in the same location.

I've been pretty busy lately but I'll try to get a chance tonight and measure the ID of the overboard indicator and post back. Even if your assembly has boogered threads you might be able to make the RV plug work with enough teflon tape applied to it.
 
the threads are cross threaded good tip on teflon
Here's one trick you can try. If you have an old male end of a garden hose you can use that as a thread tap. This will work best if you have a cast brass fitting rather than the cheap stamped male ends. The hose end you pictured above looks like the right type to use.

Take a triangle file and in 3 or 4 places around the circumference of the hose end use the edge of the file to cut into the threads to create a groove. By doing this you're making the hose like a self tapping screw (picture below). The edge you cut will bite into the messed up threads and clear out the material as it threads into the plastic. Be sure to get it started in square and be patient threading in. Run in until it gets tight, back off, then thread in again. Iv'e done this successfully many times when I've had bolt holes with bad threads.

If it works you'll eventually be able to easily thread all the way in and out and possibly save your grommet assembly. Granted the new assembly is only $25, but it would be nice to not spend the extra money and time taking out the old and installing the new.

selftap.JPG
 
Last edited:
It looks like the ID of the overboard indicator measures 3/32". I don't know that I would bother with trying to drill the hole at an angle because the you're not guaranteed to get the plug in the same position the next time you have it off. I'd probably just drill it straight and call it done.

If you're going to get the exhaust relief assembly you might as well buy the insert too. But, if you want to save some $$, first try re-tapping the threads like I explained above and if that works then go ahead with the cheap plug idea. If re-threading doesn't work, order the OEM stuff and have it done 100%.
 
good news is that I found the originale tell tale (it was in a box of misc. stuff dam I need to get more organized) bad news is now I remember why I didn't reinstall, the female threaded section is cocked so much I couldn't thread it in then I must have forgot about it and it never got reinstalled..

the extended piece of garden hose enabled me to thread in the HM tell tale

I guess I'll be disassembling to realign the female part. the contingency plan, I was able to thread in my home made tel tale (round piece of aluiminun w/ a hole glued to hose end) will test it out next week when I stabilize the fuel for winter.
 

Attachments

  • waterpump discharge found.jpg
    waterpump discharge found.jpg
    29.3 KB · Views: 32
Last edited:
Back
Top