Logo

BF40 won’t go into gear

Quick summary: motor has been running and working fine. During an uneventful day of fishing I went to crank it up to move but it would not shift into forward or reverse. The handle moves easily but the characteristic “clunk” is missing when I attempt to put it into gear.

I get home to inspect the linkage connection and action. Everything looks fine: the linkage at the front of the motor moves through what looks like a full range of motion.

Ideas?

Thanks!
 
It's likely one of two possibilities.
Either the connection/adjustment nut for the shift rods has backed off and allowed the lower shift rod to separate from the upper shift rod. Find where the lower rod exits the top of the front of the gear case and follow it up to where it should be connected to the upper rod at the front of the extension case. You may need to lie down on the ground to see both rods. There are two nuts, one long and one short. The long one links the two rods together and is also used to adjust the shifting "action".
The short nut simply jambs up against the long one to keep it from moving.

If that looks ok, imagine where that upper rod goes up through the power head and protrudes up to the linkage under the engine cover.
The rod engages the shifting linkage at it's upper end. There is an "eye" on the end of the rod that fits into a clevis on the linkage. The rod and clevis are held together with a small pin with a cotter pin through it. It's possible the pin has fallen out and the shift rod is disengaged.

If you slowly move the shifter a small distance and watch the linkage movement at approximately the center top of the powerhead, you should be able to locate the rod eye and clevis.

And remember NEVER SHIFT THE TRANSMISSION WHEN THE ENGINE IS NOT RUNNING UNLESS TURNING THE PROPELLER AT THE SAME TIME.

The movement allows the internal clutch to engage without binding.
If you need more info, just ask.
Good luck.
 
Last edited:
Thanks so much for your detailed reply.

Dumb question but nothing on the motor has been taken off except the cowling. I should be able to see the connecting but without taking anything apart, just lying on my back?

im going to check this out ASAP, and get back to you, with pics if needed.

Thanks for the help!
 
Last edited:
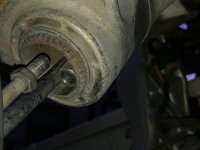
This is what I found this morning... the NE corner of the pic is going toward the top front of the motor and the SW corner is going down toward the prop. This is looking from underneath where we can clearly see the upper shift rod is detached from the lower shift rod, just like you said:

IMG_5212.jpg

(Sorry for the small pics... I don't know if this site limits the size of pictures we can post, but these were normal size when I uploaded them.)

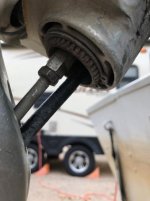
A couple of minutes later, I had the rods realigned and the nuts snugged down:

IMG_5214-a.jpg

I was working solo so I couldn't move the gear shift and spin the prop simultaneously, so I will have to wait til after work when I have time to put the muffs on, crank it up, and put it in gear. But this certainly seems like it should fix it.

jgmo, I can't thank you enough for taking the time to post a solution and to do it so thoroughly! Hopefully this helps someone else down the line.
 
Last edited:
Alright! Good job!
Now you need to make sure that the adjustment is correct.
You do need to turn the prop while someone else selects REVERSE gear. You do this because the shift rods move DOWN for reverse and this gives you the best access to the adjustment and jamb nuts.

The initial adjustment is done by turning the long nut so that it climbs UP the upper shift rod and AWAY from the smaller jamb nut.
When the long adjustment nut is on the verge of releasing the lower rod OR, when the two rods are uncoupled, adjust the jamb nut up or down until it is approximately 8mm (3/16") from the upper end of the lower shift rod. Lastly, turn the long nut down to meet the jamb nut trying not to change the 8mm dimension you set. When the nuts are in contact with each other, firmly snug them together using two 10mm open end wrenches.

Test the adjustment by slowly turning the prop as you move from reverse to neutral to forward gear. The prop should firmly lock in one direction. Then, repeat this while turning the prop and selecting reverse. The prop should lock in both directions. If this is how it "dry shifts" with the engine not turning, it should shift well when in actual use. If you can check it in a can full of water, that will allow you to make a "fine tuning" adjustment without interrupting an outing.

If it does need to have additional adjustment because it grinds in one gear or another, remember that if it doesn't go all the way into forward (grinds), you need to engage a little more thread on the lower shift rod by turning the long nut down. This will allow the shift linkage to slightly raise the lower shift rod for better forward engagement. Likewise, if you find she grinds in reverse, raise the long nut slightly and the linkage will push the lower shift rod DOWN for more positive reverse engagement.

On shifting in general, always change gears when the engine idling. If in forward and going to reverse, pause briefly in neutral. Do the same going from reverse to forward.

When going from the neutral pause position shift the transmission with a swift, firm motion so the transmission sort of "snaps" into gear. Slowly selecting a gear so that you can hear a chattering noise is not recommended. This will cause premature wear of the clutch.

Hope you got all that and

Good luck.
 
Last edited:
Yes, I can follow all of that. Thanks for the detailed explanation!

This morning I just tightened them randomly. Now I know I need those two nuts in certain positions. I will adjust them as you outlined and report back.

Thanks so much!
 
It's working just fine now!

I followed the instructions above and wanted to report back on my experience. I started with positioning the jamb nut 8mm from the top of the lower gear shift bar and tightened the longer nut down onto the jamb nut. (NOTE: Definitely rotate the prop and put the shifter in reverse so the shift bars move downward, exposing those two nuts. Otherwise, it's basically impossible to get a wrench on the top nut.)

This left some grinding (strangely, in both forward and reverse, but moreso in forward). So I just kept tweaking the position of those two fasteners up and down the rod by two threads at a time and kept testing it until I got a clean "clunk" in both forward and reverse. Interestingly, the position which achieved this had the pair of fasteners pretty high up on the rod. I believe that sitting this high made it easier for vibrations over time to make the two come apart, which caused the problem. This is a 2000 model motor and gets used often.

One final question: would it be okay to put some loctite on these to help prevent them from coming loose? Do I need to do anything more substantial? I will, of course, make sure I check the tightness of those fasteners as part of my monthly standard maintenance going forward.

I cannot thank you enough, jgmo, for your helpful replies and very clearly explained, detailed explanations. I hope that or someone else can be as helpful to you when you need it!
 
TexasAUtiger,
Thanks for the good wishes.
I see no reason that a dab of Loc Tite couldn't be used here. Probably a very good idea.

It's quite possible that the upper shift rod is bent and that has necessitated that the nuts be moved up to obtain a decent adjustment.

The rod gets bent when the outboard is "dry" shifted without turning the prop. Or, it can happen when the clutch "dogs" don't mesh during a shift and get bound against each other while, at the same time, the skipper attempts to force the shift to happen anyway by leaning hard on the shift lever.

A tight quarters maneuver near very expensive yachts coupled with a momentary increase in "pucker factor" as thousands of beautiful blonds (3 or 4 really) watch can contribute to this happening.

Not much to worry about as long as she shifts nice and doesn't jump out of gear and your Loc Tite keeps everything in place.

Glad to be able to work with you on this and I hope you have a great season this year.

Cheers Mate!
 
Further update: got her back on the water Saturday and she is shifting smoother than ever. Thanks again for all the help.

Next time I need to do a water pump, I'll lean you guys and do it myself. ;-)
 
Great texasAUtiger!
Although Im a life long AGGIES fan (College Sta. High)....
I was rootin' fer ya all the way!

Yep, do that pump yourself, do it RIGHT by doing the complete kit and drive key and save some $$$ in the process!
 
Back
Top