Logo

Mystery Evinrude Issue- Expert Assistance Greatly Appreciated!

I have a 1976 (V4 Crossflow) Evinrude 115 in which I have invested many hours..

I did a routine water pump overhaul a few months back after it stopped pumping. It was a success & went back to pumping as normal.

After this however, issues with a low idle started. RPM was much lower than it should be with the warm up lever right up and the engine would die as the lever was depressed (and if not, at the point of being put into gear).

After much tinkering with throttle cables (as I had taken them out for better access during water pump overhaul) the problems persisted. Sometimes I could get it running adequately running in a tub but as soon as I got it into the water with the extra back pressure the issues were there. Now the difference in back pressure doesn't seem to be making any difference either way.

I thought it may be a carburetor issue so rebuilt them (although upon taking them apart they looked fine).

I finally took it to a mechanic for assistance. He set the timing to the proper specs and adjusted throttle cables. He also repeated basic compression tests etc that I had. The screw that advances the timing is now all the way in. Frustratingly, it seemed to run OK in his tank and would shift into gear without issue.

I got it back in the water and the same problems appeared.

It has:

-Good compression (almost 140 across all cylinders and none of them are dropping out)
-‎Good spark all round (plugs are also brand new)
-‎A new fuel filter/pump and internal fuel line (I have tested the fuel flow and everything is in order)
-‎Rebuilt carburetors

The fuel is also fresh and mixture accurate.

I'm guessing it's something in the fuel system and the water pump overhaul may have been a coincidence but it is odd that the problems started as soon as I had the leg off and back on.

The mechanic seems now to be out of ideas.. as am I.. I've exhausted the troubleshooting ideas offered by the manual.

For what it's worth here is a link to a video of it starting up with the warm up lever up and then eventually dying as it is lowered.

https://www.youtube.com/watch?v=xQNY_RBnano

Any advice would be very much appreciated!
 
I have a 1990 Johnson 115, mine has the push button electrical choke at the key switch, where when you push the key in it injects fuel directly into the carb. Does your engine have that type of choke? If so, when the engine starts to slow down inject it and see if it speeds up. If it speeds up it is a fuel issue. I think you need to check the link & synch adjustments. Get an Evinrude manual for your engine year and model on Ebay, and follow the instructions exactly as the manual says and I am certain it'll fix the problem. I have a feeling your mechanic did not do it properly, if at all. Are you in Miami? The video's look like Miami to me.
 
Last edited:
​If it overheated, it likely has burned some head and exhaust gaskets, and is now squirting water into a cylinder. Just an educated guess. Further diagnosis required.

EDIT: I just looked at the video. It doesn't look like it has been severely overheated. But the idle RPM is too low. Is it running on all 4 cylinders?
 
Last edited:
Does it run well in gear at higher rpm, higher boat speeds? Is it just a idle speed problem?

No it didn't run well in any situation until today. Before today, on the odd occassion I could get it into gear without it stalling, it didn't power up to high RPMs and would sluggishly move along at very low engine speed.

However, today I managed to get it into gear and the RPMs soared as I engaged the throttle. This was the first time it has behaved like that so I was quite puzzled. The prop was barely spinning though and once I got it out of the water I discovered that it wasn't engaging in forward gear (reverse was fine).

I suspect I damaged something last time I had it out and got stranded. I may have tried to jam it quickly into gear too many times.

So now I've got another issue on my hands. Should've mentioned that in my original post.

I can't understand why it wouldn't power up to high RPMs when the gear was engaging properly (not even close) but it will now with no engagement...
 
Thanks for your suggestions. My choke is a little switch under the key but it doesn't function in the same way. I've played around with it a bit but it doesn't make any difference. Originally I had similar thoughts to you. I've already had a good look at the adjustments referring to the manual. They all seem fine but it may be a good idea to go back over it all.

I'm in Melbourne, Australia. We're in the middle of prime boating season here so it's a frustrating time to be out of action!
 
The water pump stopped pumping water through when I was just doing a test in a tub. I noticed straight away as there was no tell-tale. No warning horn sounded. It was only run very briefly and luckily I picked it up quickly.

Compression test was done once straight after water pump replacement and then again a few weeks later by my mechanic after problems persisted. Once when engine was cold, once when it was warm. Good numbers both times.
 
No, there was no overheating whatsoever luckily. I noticed it wasn't pumping water immediately when running a tub test. Yes, it hasn't dropped any cylinders. It's all a bit puzzling
 
No it didn't run well in any situation until today. Before today, on the odd occassion I could get it into gear without it stalling, it didn't power up to high RPMs and would sluggishly move along at very low engine speed.

However, today I managed to get it into gear and the RPMs soared as I engaged the throttle. This was the first time it has behaved like that so I was quite puzzled. The prop was barely spinning though and once I got it out of the water I discovered that it wasn't engaging in forward gear (reverse was fine).

Again, it sounds to me like your link & synch is not set properly, now your shift cable is not set properly too. They go together, it sounds like your mechanic does not know what he is doing. Get a manual and do it yourself.
 
The water pump stopped pumping water through when I was just doing a test in a tub. I noticed straight away as there was no tell-tale. No warning horn sounded. It was only run very briefly and luckily I picked it up quickly.

The telltail on some engine models takes a few seconds to get going, specially if you are using a tank rather than a flushing device.
 
On my 115 the cowling (engine cover) would disconnect the spark plug wires when I would put it on. It drove me nuts for a short time, because I had everything set perfectly with the cowling off and when I would put it back on to test the engine on the water, it would only run on 1 to 3 cylinders. I looked at the setup and found that the prior owner or mechanic had put in the coils backwards and they stuck out more than normal. I turned the coils around and set the wiring up to not stick out as much and then I duct taped the parts of the engine cover that were catching the wires.
 
Your original problem was probably due to removing the control cables, having the adjustable trunions readily available to all your helpful friends... spin, spin, spin, a few turns of the throttle trunion.... a racing engine or a dead low idle! However...................

The "Full Spark Advance Stop Screw"... the one with the rubber cap! When you say, and I quote you here "The screw that advances the timing is now all the way in." If screwed in means having the rubber cap closer to the flange it's screwed into, that would have the spark advanced too far and to a point where you will most assuredly cause the pistons to MELT! If screwed in the opposite direction... a larger space between the rubber cap and the threaded flange... the engine would never hit its full power or top rpm. The timing on that model can easily be set as follows:

(Timing At Cranking Speed 4°)
(J. Reeves)

NOTE: If your engine has the "Fast Start" feature", you must disconnect/eliminate that feature in order to use the following method. The "Fast Start" automatically advances the spark electronically when the engine first starts, dropping it to normal when the engine reaches a certain temperature.

The full spark advance can be adjusted at cranking speed,"without" have the engine running as follows.

To set the timing on that engine, have the s/plugs out, and have the throttle at full, set that timer base under the flywheel tight against the rubber stop on the end of the full spark timer advance stop screw (wire it against that stop if necessary).

Rig up a spark tester on the #1 cylinder plug wire. Hook up the timing light to the #1 plug wire. Crank the engine over and set the spark advance to 4° less than what the engine calls for.

It's a good idea to ground the other plug wires to avoid sparks that could ignite fuel that may shoot out of the plug holes. I've personally never grounded them out and have never encountered a problem but it could happen.

I don't know the full spark advance setting your engine calls for, but to pick a figure, say your engine calls for 28°, set the timing at 24°. The reasoning for the 4° difference is that when the engine is actually running, due to the nature of the solid state ignition components, the engine gains the extra 4°.

If you set the engine to its true setting at cranking speed, when running it will advance beyond its limit by 4° which will set up pre-ignition causing guaranteed piston damage! You don't want that to take place.

No need to be concerned about the idle timing as that will take care of itself. The main concern is the full advance setting.

A fellow member from one of the various marine forums suggested having water supplied to the water pump (flushette or barrel) simply to provide lubrication to impeller. A worthwhile suggestion I thought, and entered here.
**********************
The four high speed jets located in the bottom center portion of the float chambers... clean them carefully with a piece of single strand steel wire if you have not already done so.

Hopefully you or nobody else has changed the measurement of the linkage rod between the vertical throttle arm of the engine and the metal cam that slides against the throttle roller. If it has been moved, you'll need to reset the idle timing.

**********
Synchronization...... Have the roller backed away from the metal cam upon which it slides. Make sure that the linkage between the carburetor throttle butterflies is set so that there is no tension on it, making sure that both butterflies are closed. You DO NOT want one butterfly closed and one ever so slightly open. They must start to open at the same time and fully close at the same time.

Now, Adjust the roller so that the throttle butterflies just start to open when the scribe mark of the cam aligns dead center with the roller. That's it if the idle timing is ad it should be.
**********

Compression of nearly 140 on all four cylinders would be excellent. When you have time, we'd appreciate having the exact separate psi readings of the individual cylinders.

If you're unaware of how the cylinders are numbered, standing in back of the engine, facing the spark plugs, the cylinders are numbered as follows:

2.....1
4.....3

The spark... Remove all of the spark plugs when during a spark test in order to obtain the highest rpm available. The spark, at cranking speed, should jump a air gap of 7/16" with a strong blue lightning like flame... a real SNAP! Does it? NOTE that the 7/16" gap is important... nothing else will do!

Spark plugs should be Champion QL77JC4 plugs gaped at either .030 (long life) or .040 (Strong spark).

If running on a flushette, have the hose on full blast for proper cooling. The idle setting when on a flushette should be set to the following depending on the engine's shaft length. The idle, due to back pressure, will drop to normal when in the water...... 20" = 1000 rpm..... 25" = 1200 rpm

You might want to check with the boating buddies you'll encounter to obtain references of other mechanics.
 
Hi there - from the boating season in New Zealand!

Not sure if this helps or not - but when you pulled the lower unit off, was it the first time you've ever done it?

The reason I ask is that last season I replaced my impeller on my 1977 115... it was the first time, so I was learning.

When I pulled the lower unit off, I discovered that the shift rod connector was really loose - so I dutifully tightened it right up. This the other shaft coming from the lower unit - long and thin.

I happy put the leg back on, and was bemused (well, actually another mood to be honest) to find I was unable to shift properly - can't remember exactly which way round, but neutral wasn't neutral anymore, and I couldn't change into either forward or reverse at all - I only had one direction.

Potentially something similiar has happened to you - when your control is in neutral, your gearcase may be actually slightly in gear - enough to load the motor, but not enough to move the boat forward, and the other direction is unobtainable.

The only solution is to remove the lower unit again and set the shift rod connector to the correct height, workshop manual specifies the exact distance required, and yes, it seems like it is loose when in the correct position. It is a very sensitive adjustment - one turn the wrong way will result in a problem. The problem cannot be fixed by adjusting the throttle linkages.

Potentially you could leave the lower unit on and try and make the adjustment by disconnecting the shift lever from the shift rod, but I found trying to this very tricky and just pulled the lower unit off. It took me a few goes to get it right.

You can probably test such a scenario by putting the control into neutral (all with the engine off) - and try spinning the prop. It should be completely free. Then put the control into forward, and try spinning the prop in the forwards direction - it should be locked tight. And then the same in reverse....
 
Your original problem was probably due to removing the control cables, having the adjustable trunions readily available to all your helpful friends... spin, spin, spin, a few turns of the throttle trunion.... a racing engine or a dead low idle! However...................

The "Full Spark Advance Stop Screw"... the one with the rubber cap! When you say, and I quote you here "The screw that advances the timing is now all the way in." If screwed in means having the rubber cap closer to the flange it's screwed into, that would have the spark advanced too far and to a point where you will most assuredly cause the pistons to MELT! If screwed in the opposite direction... a larger space between the rubber cap and the threaded flange... the engine would never hit its full power or top rpm. The timing on that model can easily be set as follows:

(Timing At Cranking Speed 4°)
(J. Reeves)

NOTE: If your engine has the "Fast Start" feature", you must disconnect/eliminate that feature in order to use the following method. The "Fast Start" automatically advances the spark electronically when the engine first starts, dropping it to normal when the engine reaches a certain temperature.

The full spark advance can be adjusted at cranking speed,"without" have the engine running as follows.

To set the timing on that engine, have the s/plugs out, and have the throttle at full, set that timer base under the flywheel tight against the rubber stop on the end of the full spark timer advance stop screw (wire it against that stop if necessary).

Rig up a spark tester on the #1 cylinder plug wire. Hook up the timing light to the #1 plug wire. Crank the engine over and set the spark advance to 4° less than what the engine calls for.

It's a good idea to ground the other plug wires to avoid sparks that could ignite fuel that may shoot out of the plug holes. I've personally never grounded them out and have never encountered a problem but it could happen.

I don't know the full spark advance setting your engine calls for, but to pick a figure, say your engine calls for 28°, set the timing at 24°. The reasoning for the 4° difference is that when the engine is actually running, due to the nature of the solid state ignition components, the engine gains the extra 4°.

If you set the engine to its true setting at cranking speed, when running it will advance beyond its limit by 4° which will set up pre-ignition causing guaranteed piston damage! You don't want that to take place.

No need to be concerned about the idle timing as that will take care of itself. The main concern is the full advance setting.

A fellow member from one of the various marine forums suggested having water supplied to the water pump (flushette or barrel) simply to provide lubrication to impeller. A worthwhile suggestion I thought, and entered here.
**********************
The four high speed jets located in the bottom center portion of the float chambers... clean them carefully with a piece of single strand steel wire if you have not already done so.

Hopefully you or nobody else has changed the measurement of the linkage rod between the vertical throttle arm of the engine and the metal cam that slides against the throttle roller. If it has been moved, you'll need to reset the idle timing.

**********
Synchronization...... Have the roller backed away from the metal cam upon which it slides. Make sure that the linkage between the carburetor throttle butterflies is set so that there is no tension on it, making sure that both butterflies are closed. You DO NOT want one butterfly closed and one ever so slightly open. They must start to open at the same time and fully close at the same time.

Now, Adjust the roller so that the throttle butterflies just start to open when the scribe mark of the cam aligns dead center with the roller. That's it if the idle timing is ad it should be.
**********

Compression of nearly 140 on all four cylinders would be excellent. When you have time, we'd appreciate having the exact separate psi readings of the individual cylinders.

If you're unaware of how the cylinders are numbered, standing in back of the engine, facing the spark plugs, the cylinders are numbered as follows:

2.....1
4.....3

The spark... Remove all of the spark plugs when during a spark test in order to obtain the highest rpm available. The spark, at cranking speed, should jump a air gap of 7/16" with a strong blue lightning like flame... a real SNAP! Does it? NOTE that the 7/16" gap is important... nothing else will do!

Spark plugs should be Champion QL77JC4 plugs gaped at either .030 (long life) or .040 (Strong spark).

If running on a flushette, have the hose on full blast for proper cooling. The idle setting when on a flushette should be set to the following depending on the engine's shaft length. The idle, due to back pressure, will drop to normal when in the water...... 20" = 1000 rpm..... 25" = 1200 rpm

You might want to check with the boating buddies you'll encounter to obtain references of other mechanics.

Joe, your time and expertise are extremely appreciated. I can't thank you enough for your considered and detailed response.

I will go through the steps you suggest but to quickly respond to some of your points:

- after looking up the specs, the mechanic set my timing to 28° with a timing light whilst the engine was running. (Whilst I have learnt quickly, this sort of stuff is unfortunately still a little beyond the scope of my ability but I'll give it a go)

- I have put in new QL77JC4 plugs and tested the spark as you have outlined. The desired result was achieved beyond any doubt.

- High speed jets have all been carefully inspected and cleaned

- To the best of my knowledge the measurement of the linkage rod hasn't been altered.

- I've inspected the synchronisation and it seems to be in order.

- I will perform the compression test again and post the results.

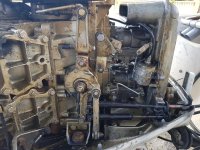
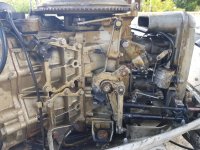
- I have included two pictures below, one with the warm up lever in the up position, one down. Perhaps there might be some immediate visual clues as to where I have gone wrong in putting everything back together.

- Here are two videos showing what takes place- firstly when moving the warm up lever up and down, and then shifting into forward gear to throttle and back through to reverse.

https://www.youtube.com/watch?v=iUQ-6IkOJYs

https://www.youtube.com/watch?v=KzJzboc3jgQ
 
Hi there - from the boating season in New Zealand!

Not sure if this helps or not - but when you pulled the lower unit off, was it the first time you've ever done it?

The reason I ask is that last season I replaced my impeller on my 1977 115... it was the first time, so I was learning.

When I pulled the lower unit off, I discovered that the shift rod connector was really loose - so I dutifully tightened it right up. This the other shaft coming from the lower unit - long and thin.

I happy put the leg back on, and was bemused (well, actually another mood to be honest) to find I was unable to shift properly - can't remember exactly which way round, but neutral wasn't neutral anymore, and I couldn't change into either forward or reverse at all - I only had one direction.

Potentially something similiar has happened to you - when your control is in neutral, your gearcase may be actually slightly in gear - enough to load the motor, but not enough to move the boat forward, and the other direction is unobtainable.

The only solution is to remove the lower unit again and set the shift rod connector to the correct height, workshop manual specifies the exact distance required, and yes, it seems like it is loose when in the correct position. It is a very sensitive adjustment - one turn the wrong way will result in a problem. The problem cannot be fixed by adjusting the throttle linkages.

Potentially you could leave the lower unit on and try and make the adjustment by disconnecting the shift lever from the shift rod, but I found trying to this very tricky and just pulled the lower unit off. It took me a few goes to get it right.

You can probably test such a scenario by putting the control into neutral (all with the engine off) - and try spinning the prop. It should be completely free. Then put the control into forward, and try spinning the prop in the forwards direction - it should be locked tight. And then the same in reverse....

Thanks for your advice Nick, I hope boating season is treating you well across the ditch!

Yes, it was the first time I had taken off the leg to replace the impeller and it proved a steep learning curve. Fortunately my shift rod seemed to be snug and sitting as it should. I didn't touch it at all so didn't have to re-set it to the correct measurements when I put the leg back on. I managed to re-connect the shift linkages and upon testing, to my relief, it appeared to shift out of neutral into both forward and reverse gear as it should. On carrying out a simple test by hand all seemed to be in order.

Recently however, I was stranded out on the water (I was able to shift into gear and then after a sluggish 100 metres or so the engine died completely). In my efforts to get it back to the nearby ramp I fear that I may have put too much strain on the gearbox by trying to quickly shift into gear and that the multiple clunks may have done some permanent damage. When in forward gear now, the prop doesn't engage. It can be freely spun by hand (there is some mild resistance but almost nothing).

I know nothing really about diagnosing gearbox issues and was hoping someone in the know could give me suggestions on this new issue too..
 
Again, it sounds to me like your link & synch is not set properly, now your shift cable is not set properly too. They go together, it sounds like your mechanic does not know what he is doing. Get a manual and do it yourself.

Yes, I think you may be right. As Joe has suggested I am working through it all again.

The telltail on some engine models takes a few seconds to get going, specially if you are using a tank rather than a flushing device.

I always run it with a flushing device as well. I submerge the prop in a tub so as to deaden the sound. I have nothing against roar of a big old two stroke but my neighbours unfortunately don't share my passion.

On my 115 the cowling (engine cover) would disconnect the spark plug wires when I would put it on. It drove me nuts for a short time, because I had everything set perfectly with the cowling off and when I would put it back on to test the engine on the water, it would only run on 1 to 3 cylinders. I looked at the setup and found that the prior owner or mechanic had put in the coils backwards and they stuck out more than normal. I turned the coils around and set the wiring up to not stick out as much and then I duct taped the parts of the engine cover that were catching the wires.

Thanks for the suggestion, fortunately I don't have this issue with my cowling.
 
Are you sure ​it is running on all four cylinders? Having spark on all four does not necessarily mean it is running on all four.
 
Are you sure ​it is running on all four cylinders? Having spark on all four does not necessarily mean it is running on all four.

Do a cylinder drop test on it and you'll find out if it's running on all 4 cylinders or not.

Thank you for prompting me..


I return with my tail between my legs..


After further investigation it appears that the bottom two cylinders are not running. Despite good compression, good spark all round (plus new plugs), rebuilt carbs and a seemingly impressive mechanic who assured me that he had tested all cylinders and could confirm that none were dropping out, I have now established that I am only running on two cylinders. Upon removing the bottom two plugs whilst running, there is no change whatsoever in engine RPM..


I apologise to those who spent time assisting me troubleshoot what has now proved an obvious issue and have learnt my lesson on taking the word of mechanics as gospel. It seemed too much of a coincidence that the problems started as soon as I had the leg off and throttle cables etc out, but there you go.. (Unless I messed up some linkages in the process causing starvation of bottom two cylinders..?)


It now appears that my problem is fuel related. Both carb butterflies seem to be opening properly and in unison as they should (linkages seem fine..). Am I right in concluding though that there must be some sort of issue with the bottom one if cylinder compression and ignition system are functioning as they should? I will obviously go back and check the spark again to confirm all is well.


Any tips at this point would be great. Looks like I'll have to rip out the carbs again at any rate..


Save for any damage that I may have done to the bottom cylinders, the gearbox may well be my main issue now. Hopefully it proves a bit more robust than I fear. Again, any tips here would be fantastic.


Thanks again to those who have assisted for their time and willingness to share their knowledge with a newcomer. I have learnt an enormous amount in the process.
 
Fortunately my shift rod seemed to be snug and sitting as it should. I didn't touch it at all so didn't have to re-set it to the correct measurements when I put the leg back on.

Yes... On that model, the shift rod attaches to the lower unit via a "step" arrangement on the rod to a groove within the lower unit setup rod.... There is no measurement to make.

However, the top barrel shift connector that screws on the top of the shift rod must be screwed all the way down, then backed up only to where the vertical portion of the barrel faces forward.... No Further!

Also... The small white nylon bushing/bearing MUST be inserted in the hole of that barrel or it will be impossible to adjust the shift for proper operation.

Thanks Joe, I've made adjustments and it appears all is fine after a hand test. Forward and reverse gear is now engaging.

My other issue turned out to be due to a kink in the new fuel line which was installed. As a result, fuel was not getting to the bottom double throated carb and so cylinders 3 and 4 were out of action..

Thankfully it appears no damage was caused. At least they haven't drastically lost compression..

I fixed the line and cylinder 3 is now working again as it should but cylinder 4 is not running at all. As spark and compression are good (both re-tested) I can't work out why this is. Fuel is now getting to the carb that feeds both it and cylinder 3.

Any ideas would be great..
 
Back
Top