Logo

Honda BF90A which hasn't run in 10 years

jrude

Member
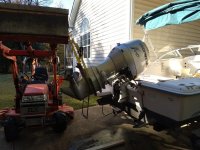
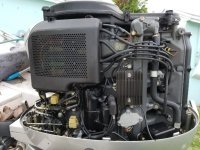
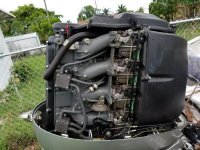
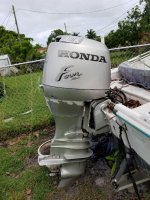
Hello all, I recently bought a boat which has a 1998 BF90A on it. The boat and engine have not run in about 10 years. I purchased it from a friend so I believe I know an accurate history of it. He had some major medical issues back in 2006 and the boat has gone unused since. I went out with him in the boat in 2005, and it ran great in 2005, and I believe that trip (from Ft Lauderdale to FL Keys) was the last time the boat was actually used.

I believe that the engine/boat has less than about 200 hours on it total, but no hour meter. There is virtually no corrosion on the engine, everything appears to be in good shape. I have not run it yet, I need to sort out some of the issues below before I try to start it.

Knowns:
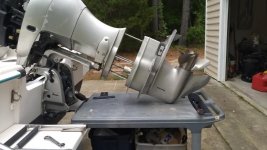
1) Mercury lower unit
2) Carbs need to be rebuilt
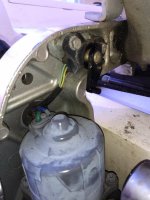
3) Tilt/trim needs fluid and possibly seals

Speculations?:
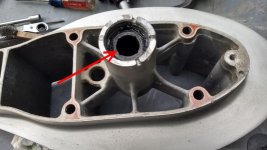
4) Water pump needs replacing?
5) Timing belt/tensioner check/replace?
6) Plugs etc?

I have already ordered the shop manual from Honda via Amazon.

What else would you recommend on an engine that has sat this long? I can do pretty much all the work myself, however, this is the first outboard engine I've worked on, so I realize it's going to be a little different than a car/car engine.

Also fuel tank needs a cleaning but that's not really a Honda maintenance item.

Thanks.
 

Attachments

  • en1.jpg
    en1.jpg
    75.2 KB · Views: 247
  • en2.jpg
    en2.jpg
    81.6 KB · Views: 239
  • en3.jpg
    en3.jpg
    89.6 KB · Views: 223
Use a heat gun to heat up the block and completely change the oil and filter.
Use a heat gun on the lower unit, replace lower unit oil.
Drain and flush the fuel tank.
Completely flush the fuel lines and change ALL fuel filters.
If the boat doesn't have an external fuel/water separator, install one. If it does, replace the filter element.
Yes, rebuild the carbs.
Yes, replace the water pump - not just the impeller, but the whole pump.
Yes, check timing belt and tensioner. Replace as necessary.
Yes, replace the plugs.
Once it starts up, balance the carbs.
 
Thanks for the reply. My reply is a but long but I'm trying to go through the plan so others can critique it. My wife says I over-do everything, so criticism is welcome. :) Saving time by not over-doing would be great.

We took delivery of the boat on 11/4/17 I'd like to run it in the lake sometime next month just the check out everything before the spring.

When you say replace the whole pump not just the impeller, do you mean to use the kit with the pump plate and stainless pump housing? I see that Honda 19021-ZW1-003 is the whole kit, but it is obsolete, although I can get old stock on ebay for about $100-$120. The Sierra impeller kit 18-3214 with all gaskets and seals is only about $28. I suppose the more expensive kit is cheap insurance.
http://www.boats.net/parts/detail/honda/H-19021-ZW1-003.html

Planning on replacing the fuel lines and bulb.

Boat has a fuel filter, not sure if it is a water separator combo, I need to pull it off and check the p/n on the filter.

Timing belt: Is the tensioner replaceable without removing the flywheel? Is this engine an interference engine? Is the crank bolt re-usable or is it TTY? Any reason I should NOT use an impact gun to remove crank bolt?

Fuel tank was drained/pumped out two years ago, but that was after about 35 gallons of fuel had already sat in it for nearly eight years. I do need to remove the tank because some Scouts have the fuel tanks break loose, and this one has had that happen (one screw came out so I'm going to pull the whole tank and check). I'm expecting to, worst case scenario after removing tank:
1) dissolve out the dried fuel residue with acetone (5 gallons, rotate the tank on it's sides and leave for a day on each side)
2) stick a pressure washer nozzle in through a hole if hole exists where the nozzle fits
3) pressure wash and pump out
4) rinse with alcohol
5) let it dry for a few weeks (plenty of time over the winter)

If I can't get the pressure washer in to get it clean enough, my plan is to cut a hole in the top, pressure wash well, and then TIG a cover over the hole. This is my last choice option assuming all else fails. This is also about the time where the boss rolls her eyes and tells me I'm over-doing it.

From searching this site, I believe I need the following and everything else is cleanable. Any others?
http://www.boats.net/parts/detail/honda/H-14510-ZW1-004.html
http://www.boats.net/parts/detail/honda/H-17384-ZW1-000.html
http://www.boats.net/parts/detail/honda/H-17151-ZW1-000.html
http://www.boats.net/parts/detail/honda/H-16010-ZV4-005.html


Thanks

Jared
 
I've never owned a 90. Hondadude (Mike) is the expert on this site.

Yes, the impeller kit. Can't comment on the Sierra kit, but would stick with the OEM kit, at least the first time through.

I think the tensioner is replaceable without removing flywheel. It is on the 175/200/225. But not definitively sure about the 90. Your Helm shop manual will give you the procedure for removing.

Fuel tank cleaning procedure sounds fine. Maybe a little overkill. Let the acetone sit in the bottom for a while before tilting. You should have access through the hole used by the fuel pickup tube. They're usually covered by an oversize plate, but not sure on a Scout.
 
What chawk said.

I would urge you to also invest in the HONDA MARINE CARBURETION MANUAL available on Amazon. If you want to rebuild and sync the carbs yourself and have it come out right THE FIRST TIME, this publication is invaluable (about $40 actually).

When you receive your workshop manual I believe you'll find using an impact on the flywheel bolt is not recommended.

Good luck with your project and pleasing the BOSS :>)
 
Always listen to Professor Jimmy. He always knows what he's talking about. And if he doesn't know, he'll tell you that, too.
 
I agree with using the whole water pump kit. As far as the Sierra kit vs. the HONDA one I don't know what the difference would be but I sure would like to! That is a BIG price difference and I might be tempted to try the Sierra. But, the HONDA kit works so well you KNOW up front you'll likely get 2 to 3 seasons of flawless operation.

Thanks for the kind words chawk_man. You do a pretty good job helping people your own self sir!

jrude, we are pulling for your complete success with your new baby and are eagerly awaiting to here how GOOD it's going!
 
Hey everyone, thanks for the help. I was not able to work on it much this weekend because my son had a Cub Scouts event which took up most of Saturday, and then Sunday was packed as well, and then it was dark at like 4:30pm. :(

Service manual has arrived, looked at it a bit. Will order the carburetion manual as well.

I did look at the fuel filter, it is a Mercury 35-802893T, which is a fuel/water separator filter combo. I also started making a list of items I know I need to buy.

For the tilt/trim unit, the tank appears to be empty and the fluid I could wipe out is clear, so it looks like ATF hasn't been put in it yet in a top off scenario. I have about 3 gallons of Kubota Super UDT left over from a tractor fluid change, I'm going to fill the reservoir with that to see if I can bleed it well enough to put off cylinder rebuilds for a few months.

Will update again later. Thanks.
 
I was able to work on it a little bit this weekend. Got the tilt/trim working. All I did was add a lot of hydraulic fluid and bleed the system by lifting the motor up and down with the tractor bucket. Basically I would lift the engine with the loader while holding the switch to run the motor in the up position, and then drop the engine with the manual bypass valve without touching the button. Had to cycle it up/down maybe 15 times. It's fast with the tractor, I can't imaging anyone doing that with a floor jack, it would take all day. :)

The pump seems a little loud but I don't really know how loud it should be, so I made a video and put it on youtube for some feedback.
https://www.youtube.com/watch?v=MSezzW3LeJU

When the hydraulic cylinder for the tilt circuit gets all the way to the top, it will occasionally stick and not come back down. Sometimes it comes back down, sometimes it does not. It only seems to stick if I let the tilt cylinder travel all the way up to it's end of travel, allowing the cylinder to stop and load the pump at end of travel. After it sticks, if I crack the manual bypass valve very slightly so the pressure bleeds out, and then close the manual valve, it will then come back down by pressing the down button on the cowling. Any ideas? Still needs to be bled more? Normal (doesn't seem so)?

Also, there is a rotary switch on the mounting bracket which does not move on it's own. Looks to be a sensor for up/down tilt/trim position. I can move it with my hand, and after adding a drop of oil, it freed up quite a bit, but still does not move on it's own. I haven't had a chance to find it in the manual yet. Anyone know what it is? Picture attached.

Thanks.
 

Attachments

  • switch.jpg
    switch.jpg
    58.1 KB · Views: 113
  • bleeding.jpg
    bleeding.jpg
    78.2 KB · Views: 103
Sounds like a normal Honda T/T operation to me. They are a bit loud.

The mechanism in the thumbnail pictures is the trim sensor arm. It is spring-loaded and should keep pressure on the tilting base until it hits the stopper. Unbolt it. You probably will not need to unplug the wire harness (which is usually up in the cowling) and work the lever up and down using liberal amounts of WD-40 until the arm freely swings up and down. Then grease where the arm rotates on the spindle and the spring mechanism and re-install. I wouldn't let it soak in lubricant because it's likely the seal to the sensor may not be in very good shape.

Assuming you have a trim gauge installed, test if it's working by having someone work the lever and with the switch on. You should see the changes on the trim meter as the lever is moved up and down.

See item 4 at: http://www.boats.net/parts/search/H...0A5 JRTA/STERN BRACKET SWIVEL CASE/parts.html
 
Thanks for the reply. Am I correct to presume that it only drives a gauge on the dash? That's a pretty spendy part, so if all it does is drive the dash gauge, I'll try to take it apart and make it operational before I spend the $100.

Thanks
 
You can usually loosen them up with a little work. Last one I worked on it took about an hour playing with it to get it working smoothly.

Properly trimming your boat while underway is pretty important in terms of comfort and fuel economy. Before trim gauges were prevalent, the typical process was to trim up until the boat started to porpoise, then trim down until it just stopped. With a trim gauge, you can do that once, note the trim gauge reading, and get back to that same position without having to play with the trim every time. Of course all that varies with sea conditions.
 
Thanks for the help to date. I'm not done with this project but it is not dead either. I did not work on it through Christmas or in Jan because either we were busy or it was cold. I've ordered and received all the engine parts.

Last week I removed the fuel tank, it's a mess inside. Will begin cleaning this weekend. Also have pulled the deck scuppers and am going to replace the transom thru hulls, but they aren't really Honda engine related.
 
So I have finished the hull. It's a taken a couple months, but I have replaced all the thru hulls, fixed the accessory drains so they no longer drain between hulls, traced wiring and re-wired some of the switch panel, replaced the deck scuppers, replaced all bilge hoses, bilge pump, aerator pump, cleaned pressure tested and painted the fuel tank, prepped for new fuel line and filters prior to tank install (already have them), replaced the broken windshield, and fixed/bled the hydraulic steering. Good news is that the tilt trim still works great since that work was completed many months ago. I'm sure there is something else I forgot.

Today I pulled the lower unit off and began to replace the impeller. I bought the Sierra impeller kit for $28 rather than the Honda impeller kit for $120. I figured I would gamble. So far I like the Sierra kit, but I need a few more parts which I did not plan for when I ordered previously.

Things I need which are not on boats.net:

http://www.boats.net/parts/search/Honda/Outboard Engine/1998/BF90AW LRTA/GEAR CASE ASSY/parts.html
Items 2 and 9:
Basically the c-clip in the intermediate case and the bushing / seal which the c-clip retains. The washer is item 7 I believe, and my washer looks fine. Boats.net does not list items 2, 7 and 9, and I have not searched Google for them yet, I am about to after I post this. The c-clip corroded and broke when I was removing it. I destroyed, or completed the destruction of, the seal and bushing while I was trying to remove the extension case from the shaft. I imagine I can order one of the c-clips from McMaster Carr, but the seal / bushing has me at a loss.

I also figured I would buy number 11, which appears to be the seal between the water pump output and extension case coolant tube.


http://www.boats.net/parts/search/H...LRTA/WATER PUMP VERTICAL SHAFT (1)/parts.html
It appears as if number 15 is the other end of the extension case coolant tube to the mid section coolant tube? Correct or no?

I also do not understand numbers 32, 27, and 29. On my engine, item 6 only has a single seal pressed inside where the shaft goes through. This seal is shot on my engine. I also did not improve the seal condition, while I was cleaning it. The seal surface actually looks fine and it is very flexible still. The problem is that there is junk built up inside where the springs are, and the spring on the bottom is broken, while the top spring is not broken.


NOTE:
After I typed all this, I realized I do NOT have a JRTA engine, I have an XRTA engine. I decided to leave the text above in hopes it helps someone else figure that out more quickly. It's apparently taken me hours...

The water tube which comes out of the water pump and through the separator extension has some rust on the end. How much is too much? I can feel it with my fingers, but it doesn't really scare me. I figure I can put a very thin film of RTV on the end before installing the seal and that will take care of any leak. However, I would even just buy a new tube since it's apart, but I also did not find that one on boats.net. Alternatively, I have a 5/8" diameter 316 SS tube from another project which looks to be exactly the same diameter. I am thinking I can just cut it to length and it will work (?).

Thanks.
 

Attachments

  • split.jpg
    split.jpg
    52.9 KB · Views: 109
  • what pn for bushing - seal.jpg
    what pn for bushing - seal.jpg
    47.5 KB · Views: 100
  • water tube.jpg
    water tube.jpg
    30.6 KB · Views: 94
Last edited:
Update, swapped the impeller with the Sierra kit, had zero problems with re-using the original stainless impeller housing (so far).

Replaced the bronze busing in the intermediate housing, pressed them in and out with a very carefully used H Frame press and very large diameter sockets.

Swapped the thermostat and cleaned the water flush check valve. If you need orings for the check valve housings, you can buy them from Ace Hardware, they are 1.25" ID by 3/32" thickness.

Flushed the cooling system forwards and backwards, not much came out, which is a good sign. There is really not much corrosion on the engine at all, it was not used much and was flushed after uses, according to my friend from whom I bought it.

The oil was a little sludgy at the bottom of the oil pan where the oil drain bolt was. Once I cleaned the sludgy part out with a screwdriver the oil flowed out OK. I am going to flush the oil tank with some diesel fuel and prime the oil system with engine oil using a remote pump and filter bypass kit while spinning the engine over by hand, prior to starting. I believe the filter uses a M20x1.5 thread but need to confirm, I'd rather not spend $50 on a relocation kit, and have it not work.
http://www.marineengine.com/boat-fo...ilter-thread-size-M20x1-5&p=610927#post610927

Engine spins over easily by hand. Have not rebuilt carbs yet, I am going to spin it over with the starter first.

IMG_20180526_123532317.jpgIMG_20180526_123120260.jpgIMG_20180526_114952905.jpgIMG_20180610_154856408.jpgIMG_20180610_160416877.jpgIMG_20180610_161334242.jpg
 
I had slowed down on this project a lot until recently because of kids stuff and school, etc. Lately my five year old daughter started watching a show on Netflix called Chasing Monsters. Now my wife and seven year old son are both watching it also. All of the sudden according to the boss it is a great emergency to get the boat done..

I got out the mini camera and took some pictures of inside the cylinders and in the crankcase as best as I could. There's a couple spots where the walls are not perfect, but for the most part the cylinders look really good. I can only get a picture of the backside of one of the pistons, but also it looks pretty good. After the diesel is done dissolving the sludge I am going to drain it and let the crankcase dry for a couple days with the plugs and filler cap out. After that I am going to put in some sacrificial oil to absorb the diesel and drain. From there I am going to hook up my external oil pump to the remote filter and circulate oil through the bearing system for a while while I spin the motor over by hand. Once that is done I will crank it with no plugs for a bit and just let the oil pump start to flush itself. From there I will change the oil again, and swap on a new filter.
 

Attachments

  • tmp_16397-20180612183222155164818.jpg
    tmp_16397-20180612183222155164818.jpg
    34.4 KB · Views: 78
  • tmp_16397-20180612183111636507327.jpg
    tmp_16397-20180612183111636507327.jpg
    12.3 KB · Views: 82
  • tmp_16397-20180612182859784953475.jpg
    tmp_16397-20180612182859784953475.jpg
    20.6 KB · Views: 90
That shot of the connecting rod and inside of the piston has a real clean look.

If you're looking for maximum protection for your first start, put some Lucas Oil Stabilizer in your pre lube oil. That stuff will adhere well to the metal and provide some "cushion" for the rod bearings, cam bearings and mains when she goes BANG for the first time in years.
 
I flushed the oil tank with diesel and let it sit overnight last month. Drained it the next day, filled it with oil, and ran the engine with rebuilding the carbs. Ran lousy but it ran, no connecting rods where they shouldn't be. :) Then I spent three weeks traveling for work. :(

Rebuilt the carbs this week, installed new fuel hoses and engine fuel filter and fuel disconnect, and fired it up. Ran lousy again. :( Did the cylinder balance, set the idle up a little higher by ear since my tach is not working, and it runs very well.

I'm thinking my fuel pumps are weak because after idling for a while the engine would start running lousy again, but squeezing the bulb 25-30 times real fast made the idle improve greatly.

Tomorrow I'm putting the lower unit back on and am going to run it on the impeller. As of now I've been running it off the garden hose clamped to the water pump tube.

Also need to figure out which tach to buy. I think it is 37250-ZV5-950AH but my frame number falls out of range?

Thanks.
 
One other thing, I was intimidated with regard to rebuilding the carbs because I figured they would be complicated. LOL, nope, I was very wrong... The hardest part of the hole job is figuring out the plastic intake box does not come off by itself, it comes off with the carbs.

If you can rebuild the carb in a Briggs & Stratton, you can rebuild your Honda carbs. I did not buy or use or look at the carburetor manual, I'm sure it has good info but I don't think I needed it in hind sight. Maybe it would have helped with the the plastic intake box. :)

If you want to clean out the tiny holes in the metering tubes, I used .023" stainless steel MIG wire for most, and an unknown diameter twist tie core with the paper pulled off it for the smallest holes.

Also, in hind sight, if I ever do this again, I will spend some time to find small diameter fuel hose that fits the carbs. The off the shelf fuel hose from the auto parts stores is very large diameter compared to OEM and it is harder to install for that reason.
 
Yesterday I pulled apart the impeller and re-greased it so it spun more easily. Did not use enough grease the first time and I could barely turn the input shaft with both hands. After re-greasing all impeller surfaces with a lot of grease, it all spins easily now with one hand.

Put the lower unit on and the it would not shift out of forward and the control handle was binding. Removed and adjusted and re-assembled 4 or 5 times with no luck. Began looking for how to repair a broken lower unit shift rod and was pretty discouraged. Then I found this thread, and specifically post#2. Works perfect now. Thank you Chris1956 where ever you may be...

https://forums.iboats.com/forum/eng...ith-shift-shaft-all-the-way-counter-clockwise
 
Had the boat on Falls Lake this morning. Went 31 mph at 5900 RPM with the engine trimmed down. Went 31 mph at 6400 RPM with the engine trimmed up. Went about 29 mph at about 5600 RPM. Boat is 1900 lbs without fuel (I weighed it on race car scales last month) + 400lbs of people + 6 gallons of fuel. I ran it on a temporary fuel tank for the time being. It's a Scout Dorado 185.

I was able to fix the trim angle sensor. The trim angle sensor spring had cut a groove in the bottom of the plastic lever arm. I filled that slot in the lever arm with cable ties stacked on top of each other, and ta-da, it works again. :) It's a cheap temporary solution.

It think it needs fuel pumps. It runs fantastic at high RPM, but if it idles for several minutes it starts to stumble. If I pump up the fuel ball the stumble goes away. At 3500+ RPM it never runs out of fuel.

https://www.youtube.com/watch?v=G5ESbKiFi_E

Appreciate the advice, thanks.
 
That's really outstanding. Lots of good work and good diagnostics. Hopefully that engine will serve you well for many years.
 
Thanks, I hope so also. However, in the two months we have been using it, the boss has already said "you know this boat is really small..." Then one time she pointed at a big IO cabin cruiser that was like 30 feet long and said "that looks really nice, does it have a place to go inside?" Ugh... My response was "we need to buy a $35k truck to tow that". It worked, but honestly, I would not mind buying a bigger boat in a couple years. I need to get at least a couple years out of this boat though, and I need to be able to tow it with my Frontier (5400lb tow rating).

One thing that I still am not sure on what to do is, the boat goes 31mph, and that is it. Bimini up, bimini down, engine trimmed up, engine trimmed down, trim tabs up, trim tabs down, at 5800 RPM, at 5900 RPM, at 6400 RPM (my tach may be off?), it goes between 30 mph and 31 mph. If I trim the engine up so the trim gauge shows level (center) the prop cavitates a little and there is no speed change. It actually runs the best with the engine trimmed about half way down. I have never trimmed the engine up past prop cavitation.

I'm thinking I may want to drop a hole on the engine mount. It's at the top hole. The prop is a Mercury stainless Vengance 13" diameter, 18" pitch. I'd rather not buy a new prop, especially if we are upgrading in 2 years. The anti cav plate is a about couple inches above the keel when checking with a level, but I did not take an actual measurement.
 
Bigger boats are bigger headaches! IMO.

If you do decide to upgrade, look at the Parker 2520 XL cabin boat with outboard(s) on a 30"motor extension. Just enough cabin to get the family out of the weather, and room for a port-a-potty in the lower cabin, and enough deck space for four adults. The I/O's tend to be too heavy in the back end.

If you drop the engine so the the anti-cavitation plate (actually, it's an anti-ventilation plate) is dead even with the very bottom point of your transom, then you SHOULD get better performance. (This assumes the the engine is mounted directly to the transom, and not on an extender.) When at WOT, the anti-ventilation plate should be just skimming the top of the water coming out from the transom.
 
Thanks. I have perused CL for the last several months just looking, and the pilot house boats to me are very attractive. In general I like functional stuff rather than the luxury type stuff. However, I also don't want to buy a replacement tow vehicle, we have a Nissan Frontier that will tow either 5400 or 5600 lbs (don't remember) and the 4WD will pull up the ramp pretty easily if needed. We bought it new in 2012 so I'd like to get as much use out of it as possible.

Realistically I think I can get a boat in the 23-25 ft range so long as it is somewhat spartan, no heavy console or seats or tower, etc. Basically an open hull with bean bags while under way and folding camping chairs while at rest.

Not really sure what I will do. I already told the boss that if I find a good deal on a larger boat I will buy it, and she was OK, she just said "don't buy something you are going to work on for 6 months..." With my intended budget, not sure I can make that happen. :)
 
Understand about the towing vehicle. I think a Parker 2530 will be too muc. Here is a link to the spec sheet.
http://www.parkerboats.net/wp-content/uploads/2017/01/2520SC_F300-XCA-1.pdf

Just a caution. After this huge hurricane Florence, there will likely be a lot of boats that come onto the market. There are a bunch of unscrupulous folks out there that will recover these boats, clean them up, get them running, ship them all over the US and sell for apparent bargains.

Any boat you seriously consider, check and double check the boat's history, pay a qualified surveyor to go over it, and take it to a reputable marine repair shop and pay them to go over the power plant in detail. Pull every electrical connector you can find on the engine to look for corrosion.
 
Back
Top