Logo

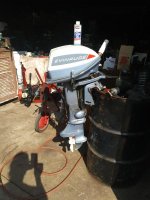
1967 cd-24 seems to have dead spot in fire at mid rpm

My 1967 cd-24 6 hp is giving me trouble. It runs decent; however, at mid throttle it seems to have a dead spot in the fire, top cylinder worse than bottom but both will cut out. When idleing it hits on both seemingly well but once you go to rev it up the top cylinder almost completely cuts out (the spark test shows very very fair spark)and doesn't come back until high rpm and even then not entirely. While the bottom cylinder is what is keeping the thing running. I have replaced coils, points, condensers, wires, and plugs. I have swapped all of these things with multiple ones to see if any were faulty it did the same
thing with all, I thought ground issue so I ran a wire from one ground screw on coil to the other so they are both using same ground. I cleaned all surfaces good, I set points as good as possible. What am I missing ? Weak magnet ? Bent crank perhaps ? Please any advice would be great I have videos for examples. I have checked comp and reeds it all checks out.
 
Last edited:
Hi, try grounding the stator plate with another test wire. Sometimes they won't ground out properly through the hub and/or linkage at certain throttle positions. However, this will affect both cylinders of course.
 
Last edited:
Okay I bolted a wire down to the motor and while it was running I touched the wire to the plate I didn't bolt it I just used my finger will that make a difference does t need bolted ?
 
Grounded mag plate with separate wire silk acting up. What about a warped flywheel ? It has tiny bit of wobble but not much. It will idle down to so slow you can actually see the finish in the top of the flywheel but just wrote wide open it bogs. Been through carb reed plate put head and new head gasket. Even compression at about seventy psi.
 
Gotta be a restriction in the main jet at base of carby. Clean it good with the right size welding tip cleaner and acetone. It likely looks open, yet the orifice is too small because of a thin coating of green slime. Sounds like its starving for fuel. A lean condition will affect the top cylinder first, before the lower cylinder on this motor. Primer bulb help the starvation if you pump it at mid and high speed?
 
Did you pull the points plate when you replaced the coils? Is there any wiggle up and down on the points plate? Especially on those smaller motors it is best to use a timing light or the special to adjust the points. .020" is a field adjustment to get you home it is allways better to use the special tool and a ohm meter or you can use a timing light.
 
I have cleaned and re cleaned the carb I used special aircraft bits that I used on antique tractorcarbs (I didn't bore them) pumping the bulb doesnotbing I did test this.
there is some pay in mag plate it can move side to side a little which I imagine is part of the problem..while onmy lake test yesterday I learned if I put pressure on the mag plate on fuel pump side while it's at hi rpm it makes it pickup a little but still nothing near what it should be which i assume to be a gap issue. I used the flywheel to time it with multimeter it starts and idles amazingly but again primarily one cylinder mid and hi rpm I have held the little ruler can down to keep carb butterfly open and it doesn't miss until I move the throttle back and forth. My next idea was to try adjusting points at different gaps to see if I could correct any play in mag plate at at least full throttle so I could get around with it
 
Also I have ordered new armature plate and cam for points from eBay so I hope if it's a play issue these will help (cam has the tiniest bit of play on crank)
 
You should have said something first all you need is the mount bracket and ring you plate is probably fine. Hopefully you get the two good parts with the plate? I will get the part numbers.
 
I already have a new plate the actual brass bracket is the only thing I haven't replaced it I tapped 4 evenly spaced dents unit to take out any up and down slack which it did so it feels good just hasside to side movement. Both parts I ordered are brand new.
 
well I haven't got all the parts in yet but literally everything will be brand new to include plate and cam support bracket and aluminum mounting plate and of course the coils and everything aforementioned. How do you time with a light on this motor ?
 
On the side of the plate is two marks and on the flywheel is two marks 180 degrees out. Connect the timing light to any battery and shine it at the two marks on the plate. The single mark on the flywheel need to be inbetween the two marks on the plate. With the gearbox removed and the spark plugs out you should be able to spin the flywheel by hand while checking the marks put the plugs in the wires and ground them with a wire from the engine. Once you get the timing correct then you can torque the flywheel before you give it fire. allways torque it to spec before starting. The two marks on the flywheel is for each plug wire.
 
You're in the process of doing the following from what I understand.
********************
(Magneto Armature Plate)
(J. Reeves)

If the armature plate has a a loose fitting, wobbling motion (the plate that the points, coils etc are attached to), it is usually caused by a slightly worn support ring. This allows the point setting to change erratically as the armature plate turns.

The cure is to remove the armature plate so that the support which is attached to the powerhead with 4 screws is visible. Then, with a screwdriver and hammer, or some tool of your choosing, and looking straight down at the support ring, make a slight indentation at what would be called the 12, 3, 6, and 9 O'clock positions. Install the armature plate and check for a smooth turning wobble free movement.


You may need to do that procedure a few times to obtain the proper fit (not too tight, not too loose), but it's worth the effort.

Use a small amount of anti corrosive grease between the aluminum ring and the brass support plate and also on the brass bushing of the armature plate when all is well.
********************
Also do the following.
********************
(Point Setting Of Magneto Models)
(J. Reeves)

Note that there are other ways to set points such as using a ohm meter or timing light... however, the following will result in a setting so close to being exact that one could not tell the difference.


Make sure that your feeler gauge is absolutely clean so as NOT to transfer oil/grease to the points.

Set the points as follows. Have the flywheel key aligned with the fiber rubbing portion of the ignition points. Adjust the gap so that a .020 gauge will pass thru but a .022 will not. Should there be any question of the points being dirty (touching the contact with your finger would cause them to be dirty), clean them with a small brush and acetone or lacquer thinner.

NOTE 1: Should the operating cam have a small portion on it with the word "SET" imprinted, align this portion with the fiber rubbing portion instead of the flywheel key.

NOTE 2: Should the cam have the word TOP embossed on the top of it, that is a cam that could be installed upside down and this is simply telling you which side is up. It is not a position where one would set the points.
********************
Unlikely you have a carburetor problem as carburetors do not come and go as you describe... if they're bad, they stay that way. However, since they can be adjusted improperly, do the following if you're not already doing so.

(Carburetor Adjustment - Single S/S Adjustable Needle Valve)
(J. Reeves)

Initial setting is: Slow speed = seat gently, then open 1-1/2 turns.

Start engine and set the rpms to where it just stays running. In segments of 1/8 turns, start to turn the S/S needle valve in. Wait a few seconds for the engine to respond. As you turn the valve in, the rpms will increase. Lower the rpms again to where the engine will just stay running.

Eventually you'll hit the point where the engine wants to die out or it will spit back (sounds like a mild backfire). At that point, back out the valve 1/4 turn. Within that 1/4 turn, you'll find the smoothest slow speed setting.

When you have finished the above adjustment, you will have no reason to move them again unless the carburetor fouls/gums up from sitting, in which case you would be required to remove, clean, and rebuild the carburetor anyway.


So mine says TOP on it should I use the key as the timing mark?
 
So mine says TOP on it should I use the key as the timing mark?

Set the points as follows. Have the flywheel key aligned with the fiber rubbing portion of the ignition points. Adjust the gap so that a .020 gauge will pass thru but a .022 will not. Should there be any question of the points being dirty (touching the contact with your finger would cause them to be dirty), clean them with a small brush and acetone or lacquer thinner.
 
Turns out my armature plate had too much side to side play so it would change my point gap. Bought new one for 42 dollars and put it on there adjusted idle screw runs like a top did seem to wannaslow rpm and die in the barrel
when I put motor cover on after several minutes of running with same water so I assume it was a heat issue
 
The motor will choke on its own exhaust in a barrel with cowling on. Takes longer for 40 gallons of water to get hot to be a factor.
 
Last edited:
I was probably only using about ten gallons in a 30gal barrel. Just enough to cover the cavitation plate and a few more inches. Thank you for the info, it makes sense that it would choke itself out in a barrel. The lake test is today but I feel confident it will be a success.
 
They will work just fine. If you do alot of trolling be sure and take spare plugs and tools with you the champions do foul after a while especially at slow speeds.
 
I run J6C's at 64:1 on Amsoil and have since the late s 70's. Here is the motor that I started guiding with in Ontario back in the 60's. It has well over 3000 hours on it and I still use it yearly. I change spark plugs once a year, whether it needs them or not. That's what works for me. This carb has never been apart or cleaned. Non oxy only.
 
My little '65 Evy.jpgHere is the Fisherman I have used since a child. 2nd water pump impeller, 2nd ignition system and original paint, prop, skeg, and all seals.
 
About how fast will it run your boat and what is your boat. Ihave mine on a 57 14ft v bottom Jon boat and itsonly doing about 5 mph average doesn't seem like it's getting to top rpm . Could've a worn out type thing but also thinking maybe carb I'm not certain but I think my idle screw has to be all the way In for it torun correctly(. Saynit certain cause the metal facia may be obstructing my ability to turn it all the way in). I'm about 90 percent sure it is thoigh. It runs fast with no load or on barrel but otherwise just doesn't seem to be getting up there.
 
Back
Top