Logo

mercruiser stuck in fwd gear - no movement on upper cables / questions

FstaRockr Burns

Regular Contributor
Hi there, sorry for my lack of knowledge - knew to mercruisers and not familiar with these systems..

Finally got motor running nicely - very responsive too.. anyway I noticed my prop spinning with engine speed, after shutting her down pokes at prop and its stuck in fwd.

After poking around a bit and googling on my phone i see the 2 cables mounted on the rear of the motor, one comes from the from / helm and other goes down to stern unit.

On the outside I located the shift cable coming thru into the rear section and it seemed quite stiff - no play at all, so i assume its still engaged on the unit?

I did remove the furthest end on the engine bracket and slid the cable as far as i could in both directions.. not much seemed to be changing on the prop rotation.

Im a little familiar with my mariner outboard and the cables look similar.. Im hoping not to remove the rear section but if I do have to go and replace the cable is there anything else while im down there?

Oil feed line inspection
Impeller
Shift cable
O-ring for water
Gasket

Thanks
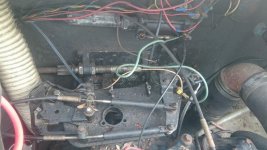
DSC_0370.jpg

This is the current setup I have - there is also two open brass fittings on that thing in the back.. there are two small hydraulic hoses in the cabient that look like they go in there, plus I have NO clue where to put the gas in this thing!

One side has a water plug and other side says waste but this boat has no bathroom - could the waste be the gas??
 
Ayuh,.... Whatcha workin' on,..?? Looks to be a 1970 something,....

If ya push/ pull the lower shift cable, the drive should shift,...
If not, pull the drive, 'n see why it don't,....
 
Further Bondo... If you're stuck in FWD, you should not have been able to start the engine. Disconnect the cable in the picture (engine off) that goes to the helm and shift it Fwd...N...REV and see if the cable moves @ that juncture. If cable does not move, look @ the back of the helm control ( usually require dismounting it) and see that the shift arm ( there are two, throttle and shift) moves. Make sure the "mode" control button or widget @ the helm is set for normal, i.e., throttle and shift operation. In one mode, the lever only moved the throttle on the engine, in the other mode, for the first 45 ish degrees of movement, the throttle on engine does not move, but the shift cable should, and after that 45ish degrees, the throttle should move and not the shift.

Most likely PO lost gas cap and scrounged a "waste" cap. Also, do you have a sink??? Would not trust makings on either cap at this point.

What kind of boat???
 
Hi guys - tx.. boat is a 1976 seary 220 with ford 351w -

Yes I tried moving the cable going to rear section - it did move however the prop seemed to stay in position.. ill re check now when I go to the boat.. Surely i should feel a kind of a click shifting by hand thru Fwd / N / Rev?

Off it was starting tho - not sure if anyone tinkered with this thing. Mercruiser manual came last night - but will try some manual inspection - guess its not too hard removing the rear unit, lock pin and 6 bolts - might be worth checking out before hitting the water anyway.. Then I can at least install a new impeller too while its off and check the oil lines and orings -

Watched some vids yesterday on how to remove it.. is this an alpha if its 1976? and does alpha mean the model 1 in manual? ie first?

Sorry for these dumb questions!

Will pull waste cap and take a sniff. yes it has a sink but the PO told me it drains straight out to ocean.. will have a look there too -

wife is working today so wont have an extra hand so will be jumping up and down :) give the beer belly some work!

And what about those 2 open hydraulic looking holes in the black thing at the top of the pic.. one is on the left side and other right pointing left at an angle - should they be connected surely?

Thanks again!
 
so i removed the rear unit.. cleaned it all up and replaced all orings including the missing one from the shaft.. shift cable works fine - however after playing aronud with it (pulling it manually) it seems its popped out again :(

any ideas?

reason is did is because the long helm cable seems to have jumped out so i was manually adjusting it from fwd/n/rev - worked fine for a bit
 
Jumped out??? These cables are normally very much clamped down. At both ends the "jacket" is supposed to be clamped/locked down and the center (moveable) parts are usually held to their actuators by cotter pins.
 
Does this set up Have a Jack Shaft?


I would pull that unit back off, and change all the bellows and shift cable. Set it up right and then move on to the control box. Post a picture of your control box.
 
hi - what is a jack shaft? there is a white nylon tube sticking out with a block on the end and it connects into a round ball on the unit which shifts the motor via the downshaft..

going back there no to remove and re inspect - i thought the round wheel just sits in the coupling -

mine looks just like this:

mcshift.jpg


I re-engaged the pivot into the bracket and installed.. seemed to work ok for about 30 mins shifting between gears. on idling i did notice a little rattle coming from the drive unit while in neutral an backed off the neutral position about 1/4" and it went away - i guess finding the sweet spot is what its about on these.

to repeat i was manually pulling/pushing on the bracket (main shift cable from helm was disconnected) - thinking maybe i pulled a bit hard on it?

Will double check everything today and NOT rtv until its working!
 
Replace that crappy looking shift cable. Make sure a the upper shift is free. DO NOT COVER ANYTHING IN RTV!

Hi - thats not mine, its s sample pic - mines ALOT cleaner and shifting very smoothly - I found the cable had popped out in the steering/control box (whats it called here in the US?)

And the main shift cable running from the helm was REAL tight, we dribbled wd40 down it for a while and now its much much better - I am now on the hunt for the plastic bushes that sit on the inside of the control box around the small steel bearings.. any idea what they are called?

The white plastic bit on the outside - this one is broken in half:

plastic-steering-bush.jpg


not sure why it popped out - maybe because cable was a bit seized from standing -

I had a look and lo and behold I did move the lower shift cable too far when operating it by hand.. pushing it too far int the fwd position would def allow the cable to unhitch from the grommet in the gear case -

Once I get the plastic bushes from somewhere and put the box back together Ill have another test and see -

apparently the switch is supposed to cut the motor out briefly between shifting gears to take power off from the motor? anyway once its all together ill do some more inspection and see -

thanks so far
 
Last edited:
Here are the instructions I spoke to you about.

Trim out drive up 2 inches from all the way down.
Take keys out of ignition!!!!!!!!!!!
Have a second person stand at the prop.
You, remove the short shift cable from the shift bracket.
After the cable has been removed, push the plastic cable end all the way in and hold in place while prop is being spun C’Clockwise..
Have second person rotate prop counter clock wise until the prop is fully engaged and wont turn anymore. Maintain light effort on shift cable plastic end pushing it to keep forward engaged.

Measure the distance from the center of the brass trunnion to the center of the round mounting hole in the plastic end. Adjust trunnion to make that distance 6 inches. No more no less! In cases where the shift cable is old but still works well you can adjust this dimension to 5 15/16”. NO MORE.

Put shift control handle in forward FULL throttle position.
Remove the control shift cable from shift bracket at this time.

Install short shift cable back onto bracket at this time.

Take the shift control cable and adjust the trunnion so it fits perfectly back into the shift bracket.
Before installing it, turn the brass trunnion 4 complete turns away from the plastic end and reinstall into shift bracket.

Now put shift control handle in the neutral position.
Have second person spin prop, it should spin freely.
Put shift control into the forward detent position at ~ 10:00 position. NO FUTHER.
Have the second person rotate the prop counter clockwise. You should have solid engagement with no ability to continue to turn the prop.

Now shift back into neutral. Prop should spin freely with no clacking or clunking.

Now shift to reverse to the 2:00 o’clock position detent NO FURTHER!!

Have the second person spin the prop clockwise.

If you have positive engagement with no clunking or jumping out of engagement, you are done.

If it does not fully engage into reverse than look at the shift bracket where the short shift cable mounts and there is a slot. Loosen the 7/16 hex that is touching the bracket and move the stud so you are pulling the short cable. Move the stud about 1/8 inch at at time and re tighten it each time and check for reverse engagement by repeating going to neutral, then to forward and back to reverse while second person is rotating prop in appropriate direction, each time you adjust.

Try this and retest in water under load.

Anyway there are tests that would tell you if the cable is stretched/worn out.

Shift control cable measurement test.

If you remove the shift control cable from the shift bracket at engine, shift the control handle to full forward/wide open throttle and make a mark on the cable core where plastic end stops Now go full reverse and repeat making mark with black marker on core where plastic end stops. Measure distance between marks, (2 7/8" to 3 1/8") anymore and replace the control cable.

Short cable measurement test.

Remove short cable from shift bracket, push all the way in and spin prop by hand CCW until full forward is made. Make a mark on shift cable core where the plastic stops over the metal.
Now with someone holding the prop to keep it from spinning pull the cable end out with two fingers, as soon as resistance is felt mark the inner cable where the plastic cable end ends. Now measure between the marks,
The measurement should be if I remember correctly 1/2 " to 9/16". Any greater than 9/16 then either the cable or linkage at gimbal housing or shift spool in lower unit is bad.
 
Last edited:
awesome man thanks! will prob run motor today and check compression and fuel psi to determine the leaky rochester situation as well :) will keep u posted
 
Back
Top