Logo

Johnson 6 HP 1968 Model CD-25C how to replace broken shift levver

cocktail racer

New member
How to I replace a broken shift lever on my 1968 Johnson 6HP model CD-25C motor? I have been told that I have to remove the powerhead, but I would like to not have to do that. That process seems complicated and open for failures in replacing all parts. Is there an easy way to replace the shift lever?

And if I have to remove the powerhead, how to I do that and what pit falls await me? The motor runs well and the shift lever works with the help of pliers to shift from neutral to forward and to reverse. But I would like to fit it with a manual shift mechanism and I cannot as the current broken shift lever is too short to get any purchase without pliers.

Thanks in advance.

Fred
 
You may want to get an OMC Factory Service Manual for it to do the job. The power head will have to come off. Other wise just clamp a small vice grip on the part sticking out and use it that way.
 
There is no way around it you need to pull the engine.
http://www.marineengine.com/parts/j...manufacturer=Johnson&section=Lower+Unit+Group
You want to shoot a little grease in the zert just prior to putting in the new lever and replace the O ring also. Then give it another shot of grease for good measure. I would get a new gasket for the base of the engine so you have it when you go to put it together. Just remove the bolts and with a wood block and a hammer smack the powerhead side to side until it breaks loose. they get welded on there pretty good sometimes it just takes a little coaxing. Clean the old gasket off on both surfaces and use gasket maker on both sides of the new gasket with a light coat so you dont plug up the water inlet port from the tube to the powerhead.
 
Thank you both. I have an old service manual but many pages are missing. I'll get a better manual and the parts mentioned and will let you know how it goes in a few weeks.
 
Thanks for the encouragement. Not something I've ever done before but secretly looking forward to making it work. Just looking for a short cut but not to be!
 
They are quite proud of those shift levers.--------Find a used one.------------Unless it is a salt water motor it is an easy project.--------------Inspect the importany mechanical seal parts at the top of the driveshaft too.
 
I purchased the motor at an auction on the Eastern Shore of Maryland for $200. Due to this location I have to think it has been used in salt water. I changed the thermostat and the water chambers had a lot of salt deposits. The impeller was not so bad so maybe it had been changed more recently. I also purchased a used shift lever for $49. I have seen it listed for $150 or more so I have a leg up hopefully on total cost until I run into more problems. But with a few dollars I have it running in a water bucket. Now just trying to get it closer to being more usable for my little racer.

Please give me some hints of what I might find due to salt water usage. Thanks in advance.
 
The first problem to be expected with salt water is bolts and screws corroded in place, making it a bear to work on. Sounds like you have already removed some and we haven't heard any cuss words yet.
 
Get a jug of salt-away and run it in a bucket with the saltaway in it that should clean the water circuits good. I found some salt-away at walmart here. make sure the water is about five inches above the water pump and run it until the water gets warm. Use a timing light to adjust the points will make it super easy to start. On the side of the points plate is two marks and the flywheel has two marks 180 degrees out. shine the timing light at the plate and the mark on the flywheel needs to be in between the two marks on the plate. Point gap is ignition timing. There is a mark on the throttle cam from slow advance the throttle while watching the mark the butterfly on the carb should just begin to open as the mark passes center of the follower. Attach a straight paper clip to a alligator clip and clamp it to the throttle shaft in the carb that tells you exactly when the carb begins to open. I believe you adjust the position of the throttle cam to make the sync adjustment. I will check.
 
On your engine the throttle should just begin to open when the mark on the cam is lined up with the right side of the follower. Just make that adjustment if necessary any time you remove/replace the carb when the engine is not running. Loosen the two bolts holding the cam on to adjust the cam position.
 
Thanks. A lot of things to get right once I get the parts mentioned and the manual with all its pages (hopefully). The salt-away did clean the chambers around the thermostat very well. Now we'll see about the bolts.
 
When removing any bolts, before you exert any force, use a propane torch and some patience to thoroughly heat the area surrounding the bolt. The aluminum expands more than steel and eventually, if heated thoroughly, the bolt will loosen. Broken bolts can ruin the "fun factor"
 
I beg to differ breaking a bolt is part of the learning curve. It in some cases is unavoidable heat and a few drops of power steering fluid and time are all your friends. If you break a bolt putting it back together that is called too tight. The small 1/4 20 bolts will break if you try and apply torque spec unless you replace them but you still risk stripping the threads also. On all cover bolts snug is all thats necessary and put a light coat of permatex aviation gasket maker on both sides of of any gasket that is not pre coated. I would pull the head now as well and lightly surface it and the block and install a new head gasket. That gives you a good look inside the water jacket and cylinder walls. Then pull the head down slowly to spec in a center out pattern.
 
It's funny how each family has their own solution for loosening bolts and nuts that are frozen. We used equal parts kerosene and automatic transmission fluid. Whatever solution I think, in hind sight, time was the biggest benefit to getting these bolts loosened. Where do you get the permatex aviation gasket maker? I don't believe I've seen that in our local stores. When I changed the thermostat, I did pull the head off, changed the gasket and cleaned some salt deposits from the water chambers that I could see. I used a gasket sealer I had but I don't remember its name. The bolt tightening procedure was taught to me to be center out as you state. I always learn from others who have done something and found a problem later. I appreciate the sharing of ideas!
 
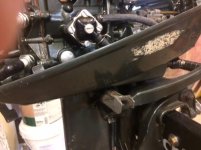
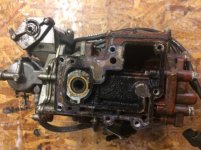
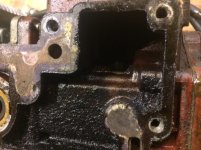
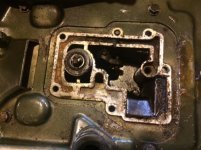
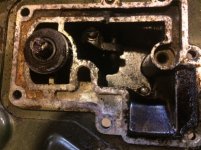
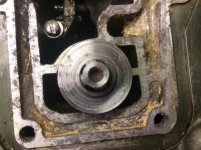
I thank you all for your contributions to my removal of a powerhead for the first time. It went so well I'm ready to do more. In less than 45 minutes, everything in the removal process was complete. No heat. No forcing bolts. No liquid needed for frozen bolts. I feel like someone was here before me and did all thepowerhead removal.jpgpowerhead.jpgpowerhead a.jpgpowerhead b.jpgpowerhead c.jpgpowerhead d.jpg dirty work. I added some photos so if you see something I need to be concerned about, I'd appreciate your input. Now I have to wait for parts to put it back together.
 
They should have the permatex aviation at most any auto part store.
http://cgi.ebay.com/ebaymotors/PERM...753418?hash=item5d6654360a:g:DacAAOxy4M5R8oHX
A little jug goes a long way just dress the mating surfaces up with a large flat file and brush a light coat on both sides of the gasket. Never put sealant on a head gasket they come pre coated. I use a wood chisel to scrape the old gasket material off just be careful not to gouge the surface. Then take a large fine flat file to clean it up.
 
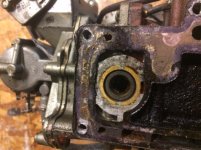
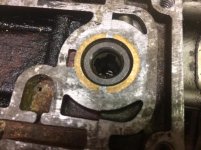
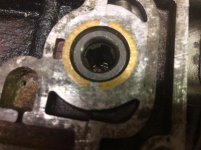
I'm not sure to what you are referring. There is a washer on top of the shaft entering the lower unit. It sits on top of a bearing which is on top of a spring. Is that what your comment is concerning?
 
The arrangement at the top of the driveshaft is a mechanical seal.----A critical piece to keep water out of the engine.--------Picture seems to show something stuck in the crankshaft
 
The shiny silver washer on top of the crankshaft (I believe I'm using the correct term for this shaft coming up from the lower unit) has a lip on its surface that will face the powerhead that appears to fit into the bottom of the powerhead to make the mechanical seal you describe. The depth of the slotted hole is about one inch and I don't see anything in it but grease. On the bottom of the powerhead the brass colored ring is part of the block. I do not see what makes this so bright. Maybe part of thebottom of powerhead a.jpgbottom of powerhead.jpgtop of lower unit.jpg new gasket covers this area.
 
Make sure you assemble this correctly.--------The gasket faces the motor block.----Shiny part of that washer faces the carbon of the mechanical seal.-------------------Do you have a manual ??
 
I have a manual I downloaded. I must be missing something however. WhT I have before me looks straight forward. When I put the new gasket on it appears all I have to do is slide the parts together. I assembled the parts dry without the gasket and everything seemed to fall in place easily. What am I missing? Sorry but I have to go to Mass now. Will respond in an hour or two
 
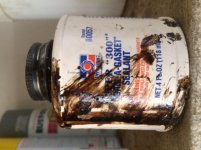
After starting the motor, the gears shift easily and it seems to work very well. I thought I was home free, but then the next morning under the motor stand was about an ounce of black liquid that had dripped from the exhaust opening. It appears like the gasket material I used. I was never able to find the aviation gasket product but I did not realize I already had another Permatex product that I used. I am guessing that the gasket material is leaking into the exhaust at this time. I only put a small amount with my fingers on both sides of teh gasket so I don't think I used too much.

I loosen all the bolts and using a torque wrench again I tightened the bolts again. But this time, one bolt would not tighten. It just kept spinning. I removed it and the bolt was ok and not broken, but there was pieces of thread from the block on the bolt. Now it just slides with a bit of resistance in and out of its spot in the bkock. I have a tap and dye set at another location so I am waiting to tap this spot and try again.
gasket.jpg
 
You will need to install a helicoil in the damaged thread.------------Is the black liquid exhaust oil or something else ??-----------That is the correct gasket sealer for your motor.-------Same as aviation stuff !----Doubt that you smeared an ounce of it to cause such a " leak " of it.
 
The liquid is oily but less viscous than motor oil or the engine oil mixed in the 2 cycle gas. It is very black, about the same color as the gasket material and seems to be mixed with water. I don't believe I put too much on, but that is possible. With the helicoil repair needed, I will take things apart and see if I can locate the problem. At the same time I'm going to remove the lower unit and replace the impeller so I should be able to see more of the lower part of this motor to determine the source of this black liquid.

I'll make a different post concerning the need to put a kill switch on this motor to accommodate the rules of the cocktail class wooden boat racing association. I'll look for articles in this forum about adapting a kill switch, but before I do, is there any hints as to the process to do this?
 
Back
Top