Logo

'75 850 Merc intermediate and WOT issues... flooding?

centerline

Regular Contributor
I need some Ideas from mechanics who have lots of "top end" experience with these older motors.

I have an 85hp merc that starts and SEEMS to run fine on the muffs, but will not accelerate when its on the lake... it does run rich at times and floods easily during start up, but the carbs have been went thru without any change in performance..

I have had it into the merc repair shop and he double checked the carbs then did a compression test. all 4 cylinders read about 140psi (all within 3lbs of one another). the spark plugs looked fine and all even, but it seemed like the motor was still running a bit rich, so the tech changed the plugs and re-checked the tune of the carbs and the timing, and claims it should run great now.... but it doesnt.

after three trips into the shop, the mechanic thought it might just be me expecting too much from the motor, so he went with me to the lake to see what I was complaining about... and he finally agreed that there is something seriously wrong, but he has absolutely no idea what to look for next, other than tear it down and do a rebuild of the motor.
while we were on the water, he pulled the plugs to look for water, and the plugs showed no side of water in any of the cylinders.

he said the motor has some top end noise, but again, has no idea what it could be, as the compression is good (we rechecked it to make sure the first readings were correct, and he also looked into the cylinders with a bore scope, and it checks out good....

on the muffs it accelerates quickly and seems to run normal, although sometimes it seems to want to flood when starting, but most times it starts and idles immediately....
on the water, it will increase rpms VERY slowly only if you move the accelerator slow... if you move the lever too fast, the engine will start to load up and you have to back out of it to keep it running... any quick "hole shot" acceleration will flood the engine and kill it.


even though its a 1975 motor, it looks nearly new. it's very clean and the original paint is still shiny, and without any corrosion whatsoever.
the only history I have about it is that the motor sat for several years without running, and then when it was sold, the new owner (who I got it from) could never get it to run right... after tinkering with it himself he got tired of it and just replaced it with a new 4stroke motor.

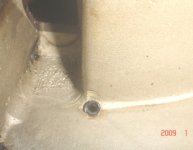
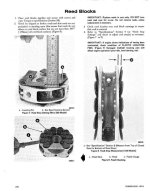
I am not familier with the reed valves in an outboard, but I am wondering if they could be stuck or broken causing this, and if so, why couldnt the merc tech suspect this....

any suggestions as to what else could cause this issue or where I should look....

I have some advanced mechanical skills, and even though I have had a few merc engines before, I an not an outboard mechanic.... the mercs I have owned in the past always started quickly and had no problems. so i dont really know what to look for here.
Thanks for any help or suggestions
 
Hi. Way to check reed valves, get bottom dead center on piston.. Blow alot of cigarette smoke or other from plug hole. U shd not see any smoke coming from carb side (remove carbs).

Not familiar with that model but check the output of your stator at cranking. Build yourself a homemade dva adapter for 2 dollars.. Check timing.

Mine is a 80s model and there is a low speed and high speed wire.

Your air screws on the carbs might be rich.. Is one plug rich?

Lack of or no spark could also foul and indicate rich symptoms.

Make sure all plugs are firing at idle and also at fast idle.

Write down your findings to keep track :)
 
I had a similar problem with an 85hp Merc. It wasn't flooding though, it was starving for gas. It turned out to be my fuel line from the ethanol gas, collapsing when I did a hole shot. I have a long length of fuel line because my built in tank sits more in the middle of the boat. Start up and idle were usually good. Sometimes it would flood at start up if I pumped the ball too much. The carbs were rebuilt with no change. Then I did the fuel pump with little change. Did the fuel line and ball, and all was well. The gas station nearby has since offered non-ethanol, and that's what is used exclusively in it and all my small engines. Had a full year of no problems.
 
Is gas pouring out of the carbs when it's "flooding"? Because if it ain't, then it ain't flooding! More likely it's too lean and the "flooding" you're experiencing is actually bogging.

What you can try on the water is to hit the choke button for just a "blip" and see if the engine picks up. If it dies upon being choked, it's too rich. If it accelerates, too lean.

The most common "bog upon acceleration" problem is due to having the idle mixture adjustments too lean. You cannot get them set right operating on a flusher. There is no load on the engine when it's out of the water.

Best you can do there is to put the motor in a 40-50 gallon barrel full of water.

Then you should be able to carefully run it in gear, adjusting idle mixture and idle speed. Don't rev the engine up because all the water will go out of the barrel!

From what I recall, a '75 85hp should still have a distributor. The only issue there is if the distributor isn't properly advancing when the throttle is advanced.

You can do a cursory check of this without running the motor, by shifting in gear, and advancing the throttle while watching the movement of the distributor and throttle butterflies.

The distributor should move until it contacts the "spark advance" screw. The throttles should start opening as the distributor is turned. Advancing the throttle beyond the "spark advance" point will cause the "economizer" collar on the distributor to rotate and open up the carb butterflies, ultimately all the way. If the linkage isn't advancing properly, you'll need an adjustment or repair.

Back to the idle mixture. Best way to set is with the engine idling in gear, warmed up in the water. Before doing so, without the engine running, turn each idle mixture screw in (lean-CW) until it bottoms out. Back the screw out (CCW-rich) about 1-3/4 turns. That's not perfect but it's a good setting to start with.

With the engine warmed up, idling in gear, in the water, adjust one idle mixture screw back and forth. The engine should speed up as you turn it CW until it goes too lean, then it'll slow down. Turn the screw CCW and it'll speed up again, a little more it'll start to run "lumpy" and may stall as you turn it more CCW.

"Slightly Lumpy" is about right. If you try to lean 'em out too far, they'll run nice 'n "crisp" but won't accelerate. These carbs have no accelerator pump and the 2-stroke engine needs to be a bit on the rich side for good takeoff.

So, once you have both carbs adjusted this way, try to accelerate. If you get a "bog", turn each idle mixture screw about 1/8 turn CCW.

Try to accelerate again and see if that's better or worse. Make a few more adjustments if it's still bogging.

Note that after the first time, if it gets worse going CCW, try adjusting it leaner (CW).

One last thing on the carb adjustments; once you've set both mixture needles initially, be sure in that any subsequent adjustments you turn both needles the same amount, and in the same direction.

Hopefully that'll do the trick. If not, and you find it is actually flooding, you may need more work in the carbs. Common problems are gas-soaked floats, leaky needle/seat assy, maladjusted float level.

A ruptured fuel pump diaphragm will cause fuel to be sucked into the crankcase and this'll make it run very rich.

There can be other internal issues to prevent it from running but it doesn't sound like we're there yet.

HTH & G'luck with the troubleshooting......ed
 
Excellent advice with one additional comment: Tie the boat to a dock, or leave it on the trailer, so the adjustments are more obvious. Much clearer that way.

Jeff

PS: If you do it on the trailer, trim the motor vertical.
 
Is the throttle pickup adjusted properly? Engine sync between spark advance and throttle opening could be your issue. It must be checked and adjusted every time the carbs are removed.
 
i dont know... I am assuming the mechanic checked this when he checked the timing... but as I am going ot have to do it all over myself just to see if he did anything at all. i will recheck it.....


there was a time when I had more time than money, and I didnt mind working on my own stuff.... but now im at the point in my life where I have more money than time and I find that a person cant even hire it done, and be absolutely certain it was done right.... such poor craftsmanship theses days.
 
Engine sync is real simple just bring the engine up to normal temp in gear in the water and aim the timing light at the flywheel marks. You want the carbs to just begin to open at 3-5 degrees before TDC you can then check max spark advance is at 27 degrees before TDC. Makes it nice to do it on smooth water and another real simple adjustment. Just aim the timing light at the flywheel and throttle up until the distributor stops moving and adjust the stop screw to 27 degrees. The max timing almost never needs adjusted unless it was tampered with. Oh yea make sure the carbs open at exactly the same time.
 
Is gas pouring out of the carbs when it's "flooding"? Because if it ain't, then it ain't flooding! More likely it's too lean and the "flooding" you're experiencing is actually bogging.

What you can try on the water is to hit the choke button for just a "blip" and see if the engine picks up. If it dies upon being choked, it's too rich. If it accelerates, too lean.

The most common "bog upon acceleration" problem is due to having the idle mixture adjustments too lean. You cannot get them set right operating on a flusher. There is no load on the engine when it's out of the water.

Best you can do there is to put the motor in a 40-50 gallon barrel full of water.

Then you should be able to carefully run it in gear, adjusting idle mixture and idle speed. Don't rev the engine up because all the water will go out of the barrel!

From what I recall, a '75 85hp should still have a distributor. The only issue there is if the distributor isn't properly advancing when the throttle is advanced.

You can do a cursory check of this without running the motor, by shifting in gear, and advancing the throttle while watching the movement of the distributor and throttle butterflies.

The distributor should move until it contacts the "spark advance" screw. The throttles should start opening as the distributor is turned. Advancing the throttle beyond the "spark advance" point will cause the "economizer" collar on the distributor to rotate and open up the carb butterflies, ultimately all the way. If the linkage isn't advancing properly, you'll need an adjustment or repair.

Back to the idle mixture. Best way to set is with the engine idling in gear, warmed up in the water. Before doing so, without the engine running, turn each idle mixture screw in (lean-CW) until it bottoms out. Back the screw out (CCW-rich) about 1-3/4 turns. That's not perfect but it's a good setting to start with.

With the engine warmed up, idling in gear, in the water, adjust one idle mixture screw back and forth. The engine should speed up as you turn it CW until it goes too lean, then it'll slow down. Turn the screw CCW and it'll speed up again, a little more it'll start to run "lumpy" and may stall as you turn it more CCW.

"Slightly Lumpy" is about right. If you try to lean 'em out too far, they'll run nice 'n "crisp" but won't accelerate. These carbs have no accelerator pump and the 2-stroke engine needs to be a bit on the rich side for good takeoff.

So, once you have both carbs adjusted this way, try to accelerate. If you get a "bog", turn each idle mixture screw about 1/8 turn CCW.

Try to accelerate again and see if that's better or worse. Make a few more adjustments if it's still bogging.

Note that after the first time, if it gets worse going CCW, try adjusting it leaner (CW).

One last thing on the carb adjustments; once you've set both mixture needles initially, be sure in that any subsequent adjustments you turn both needles the same amount, and in the same direction.

Hopefully that'll do the trick. If not, and you find it is actually flooding, you may need more work in the carbs. Common problems are gas-soaked floats, leaky needle/seat assy, maladjusted float level.

A ruptured fuel pump diaphragm will cause fuel to be sucked into the crankcase and this'll make it run very rich.

There can be other internal issues to prevent it from running but it doesn't sound like we're there yet.

HTH & G'luck with the troubleshooting......ed

I appreciate the replies that were sent regarding my post about the problems with my motor. I am hoping you and others can help me further along with it...

due to what the authorized Merc "mechanic" said about this motor being noisy when running (in addition to the original problem of it not being able to get above 21-2300 rpm) I decided to tear into it myself and see if there is anything obvious that would cause it to be noisy... in addition, I have read elsewhere that if the gaskets in the reed valves go bad, it can cause noise.

you may remember, this is a 1975 850 4cylinder, which is an "original design" block....

so where im at now with it is I have the powerhead removed from the drive unit... I have the exhaust covers and intake covers removed. (but not the carbs or distributor)
so far, everything looks good and reasonably clean inside, and not much carbon deposit in the exhaust, although 1 & 3 pistons are black with carbon, but no deposit buildup. numbers 2 & 4 are a light brownish gray.... im not sure if cyls 2,4 run off of 1 carb and cyls 1,3 run off the other???

due to what I believe to have been flooding, It has been suggested that I check the intake drain restrictors... in this block there is a #24 hole drilled inside at the bottom of each chamber, but there are no restrictors in them. but I have a QUESTION... outside the intake chambers, at the very top top and the very bottom, there are small brass nipple fittings with a hose connecting the two. what are these for?......
they appear to be check valves, but they were both impassible by blowing or sucking thru them. I got the top one working as a one way check valve but the bottom one will now pass air either way, even though it looks as if it should be a check valve also... does it need to be replaced?


without removing the pistons, I have done my best to check for stuck rings, and they all seem to be free on the pistons.

#1 has very light scuffing down the intake side of the piston, but no visible scoring on the cylinder wall. the WORRYSOME part is, when #1 is fully at TDC, I can see in the lower part of the intake port what appears to be a crack in the piston skirt, as it is a "scratch" runs radially around the piston... due to the scuffing, I believe it to be a crack, which warrants further teardown.

there is also excessive end play in the crankshaft... about 1.5mm as measured with a dial indicator...

also, others have mentioned to check the timing, which the mechanic said he checked... something seems off with it. there is an indicator mark on the timing belt wheel for the distributor, and when this mark is perfectly aligned with the mark on the housing, the flywheel mark is at a perfect 8 degrees BTDC, whereas the seloc manual calls for 2-4 BTDC... it does look as if someone has had the bolts on the flywheel loose at one time..
so I will have to index the crank to the flywheel, to insure where TDC really is and reset the timing as needed... AFTER the teardown to check out the broken(?) piston skirt.....

is there anything that I should know as I proceed that is not in the manual... or advice?...
I have been into single cylinder 2stroke motorcycles and chainsaws, as well as gas and diesel engines, so I have an advanced understanding of the procedures, but due to the way this multi cylinder outboard is built, so to me its very different.... Thanks.
 
Top carburetor feeds # 1 and # 2 cylinders and only # 1 and # 2 except for a small balance tube maybe.-------------Bottom carburetor only feeds # 3 and # 4.-------------------Find out if you have a broken crankshaft !--------1.5 mm is way too much end play !!---And there are no gaskets on the reed valves in this motor !
 
after further teardown here is the update.... all the bolts were easily removed except for two in the head/waterjacket cover, which twisted off and were easily removed after removing the cover.
the crank and piston assembly is removed from the block and there is NO cracked piston. the motor had sat for quite some time and the radial mark I seen thru the port was a trace of the intake port on the piston where it had sat several years....

the lower ring on number 4 piston is stuck in one spot, but not sure why as there are no marks. I can easily free it up.

no scoring in any of the cylinders.... reed valves are in good condition. the seals all looked good but the lower bearing is rough, so im changing both upper and lower bearings....

how would I tell if the center bearing or rod bearings needs replaced? all i know was there was no measurable movement in the pistons vs the crank before disassembling it.
AND, before disassembling the motor, I indexed the crank to the flywheel with a piston stop, and at piston TDC, the flywheel shows 2degrees ATDC...

the carbs were clean on the inside, and the main and vent jets are in there proper places (.076main, .092vent), but I havent checked the air/idle jet passages yet to make sure they are clear...

all the fuel lines are in good condition without any signs of interior or exterior degradation... any other things I should inspect before reassembly?...
 
Inspect the labyrinth seal surfaces on inside of reed blocks and mike the cylinders especially around transfer ports...
 
Inspect the labyrinth seal surfaces on inside of reed blocks and mike the cylinders especially around transfer ports...

what are the labyrinth seal surfaces?.. I inspected the reed valves very closely looking for cracked or bent reeds, and they all seem to be in good shape without any corrosion or other issues...

I was looking at the parts diagram and I see there are bleed restrictors... what do these do, and where would they be located on my block?
 
The labyrinth seals are the machined grooves in the i.d. of the reed blocks. This forms a seal with the fuel/air mix, note that it's not totally air-tight but seals enough to isolate the charges to their particular cylinder.

The machined areas where they contact the crankshaft o.d. should be sharp, and well-defined. If they are mushroomed, then they are worn beyond repair and the reed block must be replaced. Worn reed blocks can cause hard-starting and poor idle.

On the bleed restrictors, they are under the transfer port covers and help idle quality by limiting the amount of pooled fuel that is sucked back into the cylinder. Missing restrictors can cause a poor idle.

See the attached pic for exact location.

Note that you can replace a missing restrictor but you have to be very careful about installation because the plastic restrictors are easily damaged. One way to dispense with that is to peen over the hole, finish with a flat punch, then use a #60 (.040") drill to drill a permanent bleed hole.

2nd method is to thread the restrictor-less bleed hole with a tap, to fit a small Allen set screw. Install the set screw with Loctite Red. Drill the small hole thru the center (you can also drill before installation if you make a jig). Permanent install, it'll never fall out!

HTH..........ed
 

Attachments

  • Bleed Restrictor.jpg
    Bleed Restrictor.jpg
    68.6 KB · Views: 45
The labyrinth seals are the machined grooves in the i.d. of the reed blocks. This forms a seal with the fuel/air mix, note that it's not totally air-tight but seals enough to isolate the charges to their particular cylinder.

The machined areas where they contact the crankshaft o.d. should be sharp, and well-defined. If they are mushroomed, then they are worn beyond repair and the reed block must be replaced. Worn reed blocks can cause hard-starting and poor idle.

On the bleed restrictors, they are under the transfer port covers and help idle quality by limiting the amount of pooled fuel that is sucked back into the cylinder. Missing restrictors can cause a poor idle.

See the attached pic for exact location.

Note that you can replace a missing restrictor but you have to be very careful about installation because the plastic restrictors are easily damaged. One way to dispense with that is to peen over the hole, finish with a flat punch, then use a #60 (.040") drill to drill a permanent bleed hole.

2nd method is to thread the restrictor-less bleed hole with a tap, to fit a small Allen set screw. Install the set screw with Loctite Red. Drill the small hole thru the center (you can also drill before installation if you make a jig). Permanent install, it'll never fall out!

HTH..........ed

the bleed restrictor holes in this block have nothing in them, they are drilled to #31, and it would seem that peening and redrilling for size #40 would be the best method to restrict them. I will do this, although the lower one will a bit more of a challenge due to the angle it is drilled thru the casting.

the labyrinth seals are not mushroomed at all, and still look factory fresh, but they may have as much as 1/16" of side play on the crankshaft....I dont know what is normal.

another question I have concerning the reed valves... when looking at them with a magnifying glass, I can see some that are slightly open, and when I touch them they will close, but will spring back open just a hair.... is this normal or does it matter much?
Im thinking there may be some dust/debris at their base that is holding them open, but im not sure how important it is to have them all perfectly closed at rest, or if they do their job fine as they are... Thanks
 
If it's just a bit of a wiggle, that's OK. Invariably if they're badly worn the i.d. will be mushroomed.

It's ok for the reeds to be off the block just a hair (factory spec is .007"). They will still close against the reed block at the appropriate time.

What you don't want is a reed that's bent and forced into the block, because they won't open properly. Caution DO NOT flip any reeds over because they are guaranteed to break. The manual says zero preload is desirable, but also says a very small amount of preload against the reed block is acceptable. Sometimes residual oil will make the reed stick to the block. You could clean all that out with carb cleaner spray. If you gently press against the back of the reed you can get a pretty good idea on how much spring there is, back into the reed block.
 

Attachments

  • Reed Blocks.jpg
    Reed Blocks.jpg
    88.7 KB · Views: 54
If it's just a bit of a wiggle, that's OK. Invariably if they're badly worn the i.d. will be mushroomed.

It's ok for the reeds to be off the block just a hair (factory spec is .007"). They will still close against the reed block at the appropriate time.

What you don't want is a reed that's bent and forced into the block, because they won't open properly. Caution DO NOT flip any reeds over because they are guaranteed to break. The manual says zero preload is desirable, but also says a very small amount of preload against the reed block is acceptable. Sometimes residual oil will make the reed stick to the block. You could clean all that out with carb cleaner spray. If you gently press against the back of the reed you can get a pretty good idea on how much spring there is, back into the reed block.

none of the reeds are bent away from the block, and even gently blowing on them will close them against the block, so im sure they are fine...

concerning number 4 piston... the lower ring was stuck in the groove, on the opposite side of the ring opening... I gently removed both the upper and the lower rings, and both ring grooves had some carbon build up in them with the lower groove worse then the upper. on the other 3 pistons the rings and grooves are absolutely clean... what would be your guess as to why number 4 would be so dirty?.... the exhaust ports dont show any more carbon on one than any of the others, although the baffle plate and water jacket cover did have some gummy deposits that were easily scraped away...

I mic'd the cylinders and pistons in every direction possible, and they are evenly round and without any measurable wear, so im now waiting for the gaskets to arrive... Thank you for all the help.
 
you can replace a missing restrictor but you have to be very careful about installation because the plastic restrictors are easily damaged. One way to dispense with that is to peen over the hole, finish with a flat punch, then use a #60 (.040") drill to drill a permanent bleed hole.

2nd method is to thread the restrictor-less bleed hole with a tap, to fit a small Allen set screw. Install the set screw with Loctite Red. Drill the small hole thru the center (you can also drill before installation if you make a jig). Permanent install, it'll never fall out!

HTH..........ed

I have just re-read this... I see thet the restrictor holes should only have a .040 opening, which is a #60 drill size.. thats a LOT smaller than the manufactured port opening of drill size#31, and also much smaller than the #40 that I had originally thought I read in your reply.

ive tried the peening technique, but as the aluminum block seems to be a harder alloy than an automotive block, its tough to peen.
I think what i will do is open the hole slightly so it will snugly accept a 1/8" brass rod... then bore the #60 hole thru the brass rod on the lathe, and cut the rod into short plugs that i can insert in the 1/8" holes... and peen the aluminum to insure the brass will never come out..
 
That would probably work, too. I dug further into my archived material and found that the person who did the mod used an 8/32" stainless allen setscrew with the hole drilled in the middle.

If you make a machined insert, be sure to secure it with Loctite Red or other hi-strength Loctite such as Bearing & Stud Mount, as well as peening over. The Loctite will make a sure seal between insert and block.
 
Back
Top