Logo

Trouble after rebuild

burls

Contributing Member
[FONT=Lucida Grande, Trebuchet MS, Verdana, Helvetica, Arial, sans-serif]Spent the last couple of months rebuilding a 5.0 merc in a regal 2100[/FONT]

Unfortunately went for start today and no noise.

It does motor over
But
1. No noise from fuel pump so guess it's not working
2. No spark fro plug and no power to coil positive

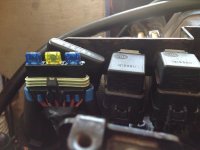
I guessing l have a power supply issue, l get power to the engine plug, power to the fuse panel.

Where should l go to next ?
 
It has to be somthing simple just take your time and give the wiring a complete once over with a good schematic. A cheap test light will normally get you there is this a TBI or FI motor or carbed? Model?
 
If I recall from your other posts you have an efi ?

http://www.boatfix.com/merc/techbk/96/96hgd4.pdf

page 4D-37 (page 39 of the file) outlines the system/ignition relay. I would check the 10 amp fuse coming off J1-11 from the ECM looks like it feeds the coil and the fuel pump relay, and the system/ ignition relay. I don't know where this fuse is but would think it's near the ECM

I would think wi the ignition on terminal 86 on the relay should get 12 v to close this relaybut im not sure if this supplies power to the coil once the starter kicks off.
 
Make sure all the grounds are connected. Assuming it is fuel injected the fuel pump and computer relays should have key on hot to the red wires.
 
on the port side around the coil you will find the main system ground and a small 16 Ga wire that I beieve is just hanging loose.
 
S/N is OL541750 according to what l can find it is a 1999 ,5.0 EFI

l found a switch at the rear near the dissy( it was hidden)- the blue wire was not connect. I am unsure what this switch does and unfortunately after connecting it l still had no joy.

l will continue as time permits to search for the elusive wire causing my grief
 
The schematic shows a dark blue wire to the knock senser could be what thats for? Probably a good thing you taking a real close look at everything anyways. There are two relays I would focus there. Check for 12 volts at the red wires with the key on at both of the relays. If both relays dont click when you cycle power from the ignition switch your probably missing a ground to the computer.
 
Yeah, I am surprised I missed this one, I have been very careful to mark all the loose components and wires with Lime green masking tape. This one was hidden under the fat engine loom near the dizzy. Unfortunately it did nothing when connected. Thats not to say the sensor is working, if I could work out what it is I could prob test it - it looks like px switch to me).

I dont think it is the knock sensor as by the parts cats I looked at the knock sensor is down at the sump pan level on the RH side of the block (that unit is there and is connected) This is at the rear of the block just behind the valley cover.

The relays you talk of, are they the ones on the side of the riser with the 3 fuses and the interrogation plug?
 
Just follow the path of power you should be able to nail it down with a cheap test light. Does the ignition relay click when you turn the key on? I am voting for a ground wire not connected. All black wires should be connected to engine ground.
 
I had a look over it this morning no parts missing and no disconnects. I buzzed out the engine loom and they appear to be good up to the ECM loom

l have 12v to the 2 outside fuses next to the relays on the side of the riser but nothing on the middle one

is the ignition relay one of these?

and now l can
 

Attachments

  • IMG_1354.jpg
    IMG_1354.jpg
    45.2 KB · Views: 32
Last edited:
Did you try swapping the relays? Take all the connectors apart and spray with electrical cleaner and put back together with dielectric grease to protect from moisture. One relay is for ignition and computer power and the other is for the fuel pump.
 
Well between the storms and Christmas shopping l believe l have found my problem. So first prob was the oil px switch not connected. When it was not connected l tried the run switch with no joy. So thinking that it didn't matter the run switch was inadvertently left off. After reconnecting the px switch and lots of wire chasing all the way back to the run switch. Ha ha what a goose. Anyway will know for sure tomorrow when we set it up for a run

Thanks all for your patients and input, on the bright side l now know a lot more about mercruiser electrics.

l shall post up tomorrow the outcome
 
It is normally something simple and easy to overlook. It is allways a good idea to go through everything, out on the water you are the mechanic. I allways keep a couple sets of jumper wires for emergencies. That way you can jump a faulty switch and make it back safely. Hopefully you got it nailed down be sure and give the engine the proper break in procedure to seat the new rings.
 
Some good advice there.

made some noise today, very big smile on my face that's for sure. It ran great once started no hiccups or strange noises, l was not happy about how much water was coming out the exhaust so shut it down after about 30 seconds, thinking later l prob didn't have it up to temp for the thermostat to open.
second start was no so successful, it turns over and tried to fire up but just didnt get there. I might check the plug gaps tomorrow as I thing they are set at 25 thou not 45
none of the instruments seem to be working properly either so more work with my electrical hat on as well
 
Some good advice there.

l was not happy about how much water was coming out the exhaust so shut it down after about 30 seconds, thinking later l prob didn't have it up to temp for the thermostat to open.

none of the instruments seem to be working properly either so more work with my electrical hat on as well

re: water flow... If FWC, water flow is independent of t'stat, just RPMs. If not FWC, water flow still not dependent on T'stat. Open or closed T'stat just apportions water flow between jacket and elbows. When cold almost all water flow (after jacket fills) out is direct thru elbows, if t'stat is open, water runs in/and then out of jacket and thence out via elbows. Initially for the first few seconds in a RWC engine, water flow is low as jacket fills up for the first time, then independent of t'stat. In a FWC engine, water typically comes out elbows after HE is filled, usually just a couple of gallons. On my FWC rig, 2 1/2 gallons in, then I see it out transom ports ( my exhaust is thru transom, not thru drive and is via a pair of shorty fiberglass mufflers).

re: instruments... if none of them work likely +12V common feed to gauges is missing/not cconnected. If grnd is ng, then gauges will all have funky action.
 
Last edited:
So for water flow when l have the muffs hooked up and water on l should eventually get flow back out through the prop? This doesn't appear to be happening so l may have a blockage

definately an earth issue with the instruments, so fun will be had under the dash today
 
If your pulling all the other accys grounds off of the engine harness just add another separate ground wire directly from the battery to under the dash same with the hots for the accys just pull a separate heavy guage wire directly from the battery to the fuse block. Be sure and fuse it at the battery with a master power switch for the fuse block. Now would be the time to install a larger fuse block with a grounding bar to make it easy to add accys.
 
Water flow seems ok now, l have power etc to instruments but looks like the oil px sender is dodgy as when hooked up (engine not running) it goes full scale. Doesn't look like water temp is working either
Earth seems to be the word at the moment. If only people would take care of their gear!!!!!
 
At least your taking the time to work out the bugs. Better now than out there here is a good simple schematic for your house and guage wiring. Keep all of the engine and guage hots separate from the house hots. check you have battery voltage at the sending units with the switch on run.
2012-08-16_152412_instrumentpanelwiring.jpg
 
Still having trouble
its starts first time the first time of the day (old or charged battery) after you bring it off the idle and give it a bit - not too much, it starts to splutter and then dies with black smoke out the exhaust. Any retries to start seem futile and just waste the battery.
 
Go back to the basics. Check for true TDC on the #1 cylinder with a piston stop tool. The damper pully possibly slipped on the harmonic balancer giving you a false TDC timing referance. You can make one out of a old spark plug just bust out the center electrode and porcelan and thread it with a long bolt rounded on the end so you dont damage the piston. stick your finger in the #1 plug hole and rotate the crank by hand until you feel compression then line up the timing mark and just turn the crank about 18 degrees. Install the piston stop tool and screw the bolt down to touch the piston and make a mark on the damper at the pointer. rotate the crank until the piston touches the stop again and make another mark. True TDC is right in the middle between the two marks. Confirm your timing marks are correct before you even put a timing light on it.
 
I charged up the battery and started first time, l let it idle a lot longer this time in a hope to settle the computer or something. This appeared to work to some degree. It is blowing a lot more blue smoke out the exhaust for my liking but I'm not sure what you should see straight from a rebuild and until the rings bed in.
Problem I see now is the the lack of cooling in the risers and smelt burnt rubber when I shut it down. I'm only running on muffs at home and there is water coming out the exhaust
 
Keep an infrared temp. gun handy,I read in your post temp. gauge was iffy,check heads, risers, Not a fan of running on muffs, a drum is much better,quicker warmup,just keep a steady supply with running garden hose. keep that oil topped off,Pull a couple plugs to see whats happening internally
 
Exactly how did you set the timing? It is real common for the harmonic balancer will slip giving you a false base timing adjustment. Until you get it correct the computer will go all goofy. Black smoke is fuel blue smoke is oil and white smoke is water. You need the scan tool to properly adjust the timing you cannot just use the timing light. Connect the scan tool and put it in test mode, if it doesnt automatically set the rpm at 1200 use your controls and after it is fully warmed up at 1200 rpms set the timing at 8-DBTDC then disconnect the scan tool and the engine should idle normally. If necessary disconnect the throttle cable and adjust it to properly fit the TB. Engine idle is controlled by the computer if you messed with the throttle butterfly take the time to look up the proper procedure for adjusting the butterfly properly. On my jeep You needed to crack the throttle far enough for the idle air control to fully close and unplug the idle air control then adjust the butterfly for 600 rpms, plug the IAC back in and the computer takes over the engine idle then adjust the throttle cable again to fit.
 
Back
Top