Logo

Honda B100 ( not BF100 )

Hi

I have a Honda B100 and am trying to change impeller

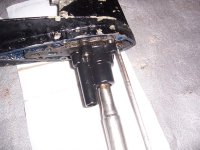
I have dropped the gear case but cannot remove the impeller housing as the housing will only move about 1/4 inch and the drive shaft widens to make it impossible to replace impeller without removing drive shaft

I have been using perpetrators for some time but the drive shaft will not budge

any help would be appreciated , particularly with what force I should use to disconnect shaft from pinion , as only tapping at the moment100_1640.jpg
 
Last edited:
Is the join between the drive shaft and the pinion 'visible' between the small 1/4 gap I have between the impeller housing the the gear casing

Wondering where penetration oil will be best directed
 
The shaft slides over a square shaft (pinion shaft) that protrudes from the gear case. Yes, the vertical shaft should slide off and back on.....so it's frozen.

First, you need to be patient. Get some PB Blaster and do your best to try and spray it up into the joint where the shafts slide together. Using a hair dryer to heat the joint will help to get the penetrate to "creep" up into the joint. Take care not to heat the water pump housing....although you should probably be replacing it anyway on one that's jammed up like this.

The longer you can take to keep applying the blaster, the better. But if you want to move on you can either use a slide hammer with a slotted, hooked tip to engage the bottom of the shaft "stop" at the top of the shaft. I made my own slide hammer adapter.

If you don't have one of those, you can fashion a "slip hammer" by cutting a 6 inch section of pvc pipe lengthwise so that you can fit the two halves under the shaft stop and then hold them together over the vertical shaft while sliding them up to bang against the bottom of the stop.

If you have problems holding the pvc pieces while sliding and hitting the stop, then you might need use hose clamps or even rubber bands to hold the halves together.

There's probably 50 other ways to do this but that's my approach.

Good luck.
 
Last edited:
The shaft slides over a square shaft (pinion shaft) that protrudes from the gear case. Yes, the vertical shaft should slide off and back on.....so it's frozen.

First, you need to be patient. Get some PB Blaster and do your best to try and spray it up into the joint where the shafts slide together. Using a hair dryer to heat the joint will help to get the penetrate to "creep" up into the joint. Take care not to heat the water pump housing....although you should probably be replacing it anyway on one that's jammed up like this.

The longer you can take to keep applying the blaster, the better. But if you want to move on you can either use a slide hammer with a slotted, hooked tip to engage the bottom of the shaft "stop" at the top of the shaft. I made my own slide hammer adapter.

If you don't have one of those, you can fashion a "slip hammer" by cutting a 6 inch section of pvc pipe lengthwise so that you can fit the two halves under the shaft stop and then hold them together over the vertical shaft while sliding them up to bang against the bottom of the stop.

If you have problems holding the pvc pieces while sliding and hitting the stop, then you might need use hose clamps or even rubber bands to hold the halves together.

There's probably 50 other ways to do this but that's my approach.

Good luck.


Well , I live in Bulgaria ,

Took it to a garage to see if they had some strong penetrant and before I knew it he had hit it with a hammer , similar to what you suggested and the pinion came out

I guess I can work on more penetrant from now as the edge of the impeller , which is siezed is visible

I diod not let him work any more on it :)

The pinion will go back in , but there was water in gear oil , so guess that means new seal there also ?


Just bought this boat and am thinking that a nice BF10 may be in order , but I would like to get this back working if possible

I am thinking I will need

new impeller gasket
Pinion seal

Is there a seal in the impeller housing , as it look ok and even impeller looks ok

Will take my time now with penetrant but hard to pry now with pinion out
 
There are three critical seals for keeping water out (and gear oil in) of the gear case. One is located under the water pump, another is at the prop shaft and the third is for the shift shaft.

Typically, when I'm servicing a unit that has experienced water intrusion, I replace all three. That is because there is NO reliable way to identify which seals are leaking and which ones are still ok. So putting in new ones is like buying cheap insurance.

You also have to keep in mind that the transmission isn't vented. So, as heat builds up in the case and gear oil as the gears are driven, pressure builds inside. Because of the pressure build up, you SHOULD pressurize the case with a regulated amount of shop air to ensure that the seals will hold.

BUT....it doesn't stop there. Because, just as pressure builds in the case as it heats up, a NEGATIVE pressure (vacuum) can occur when the unit cools down. So, accepted practice is to introduce a very slight vacuum inside the case to be sure the case COMPLETELY seals and will not be "sucking in" water.

It's just the nature of the beast and ANY mechanic that works on outboard motors should be equipped and able to do this procedure or he's not the guy you want to be paying to work on your stuff.


Thanks for that , will probably do all three , interesting comments about pressure though thank you
 
That's what they are called in the United States. Its right on the front of my Honda shop manual.......BF 100.

If you want to pressure test your gear case, you will need an adapter. I never could find one for sale. I'm sure Honda sells them but I made one by drilling and threading an extra drain/fill plug.

Good idea

The seal you mention for the prop , do you mean the one around the edge ?

The pinion seal and gear linkage seal , how do they come out?
 
Look at the link below. The prop shaft seal is item #18 and yes, I forgot to mention the case Oring which is item #19

http://www.boats.net/parts/search/H...F100D LA/PROPELLER SHAFT PROPELLER/parts.html

In the link below is the shift shaft seal, item#24....along with it's holder, item#6..... and the holder Oring, item #25. All three of which I replace anytime I open one up.

http://www.boats.net/parts/search/H...EXTENSION CASE GEAR CASE SHIFT ROD/parts.html

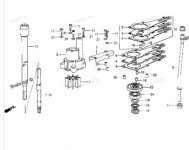
The link below depicts the pinion shaft, item #9 and water pump assembly, items 1,2 and 5.

Then there is item #3, the badly named "impeller cover". I say badly named because it sits UNDER the impeller. It is sandwiched between the two gaskets, item #4.

The cover gives the impeller a smooth metal surface to ride on but it also acts as a retainer to keep the pinion shaft held down. The area that the impeller rides on should be lightly smeared with marine grade grease during assembly for a smooth initial start up. The cover must be removed to get the pinion shaft out. Note that when the shaft is slid upward and removed, the pinion gear will likely fall into the gear case. Because this happens it is wise to have the prop shaft removed so the pinion doesn't get wedged inside and make things just that much more difficult.

Item #17 is the seal that rides the pinion shaft to keep the case sealed. The pinion shaft must be replaced if the area the seal lip contacts is worn.

Also, note items #14 and 15, collar A and collar B respectively. It is necessary that these be properly placed so that the water pump sits correctly on the "cover" and forms a tight seal. These collars are frequently installed incorrectly and cause pump leakage and efficiency problems.

http://www.boats.net/parts/search/H...F100D LA/WATER PUMP VERTICAL SHAFT/parts.html

When I do one of these, I completely disassemble and inspect all the parts of the transmission. More often than not, many parts are worn out and need to be replaced. This includes bearings and gears. These old outboards are just that, OLD. In some cases they are in fine condition due to low hours of usage. But in the majority of the ones I've had the privilege to work on, they have been relied on to power small boats and large for hundreds of hours and with little to no maintenance at that.

If you take your time and get the old girl back up to snuff, you will be rewarded with one of the most reliable and rugged outboards ever produced.
 
Last edited:
Look at the link below. The prop shaft seal is item #18 and yes, I forgot to mention the case Oring which is item #19

http://www.boats.net/parts/search/H...F100D LA/PROPELLER SHAFT PROPELLER/parts.html

In the link below is the shift shaft seal, item#24....along with it's holder, item#6..... and the holder Oring, item #25. All three of which I replace anytime I open one up.

http://www.boats.net/parts/search/H...EXTENSION CASE GEAR CASE SHIFT ROD/parts.html

The link below depicts the pinion shaft, item #9 and water pump assembly, items 1,2 and 5.

Then there is item #3, the badly named "impeller cover". I say badly named because it sits UNDER the impeller. It is sandwiched between the two gaskets, item #4.

The cover gives the impeller a smooth metal surface to ride on but it also acts as a retainer to keep the pinion shaft held down. The area that the impeller rides on should be lightly smeared with marine grade grease during assembly for a smooth initial start up. The cover must be removed to get the pinion shaft out. Note that when the shaft is slid upward and removed, the pinion gear will likely fall into the gear case. Because this happens it is wise to have the prop shaft removed so the pinion doesn't get wedged inside and make things just that much more difficult.

Item #17 is the seal that rides the pinion shaft to keep the case sealed. The pinion shaft must be replaced if the area the seal lip contacts is worn.

Also, note items #14 and 15, collar A and collar B respectively. It is necessary that these be properly placed so that the water pump sits correctly on the "cover" and forms a tight seal. These collars are frequently installed incorrectly and cause pump leakage and efficiency problems.

http://www.boats.net/parts/search/H...F100D LA/WATER PUMP VERTICAL SHAFT/parts.html

When I do one of these, I completely disassemble and inspect all the parts of the transmission. More often than not, many parts are worn out and need to be replaced. This includes bearings and gears. These old outboards are just that, OLD. In some cases they are in fine condition due to low hours of usage. But in the majority of the ones I've had the privilege to work on, they have been relied on to power small boats and large for hundreds of hours and with little to no maintenance at that.

If you take your time and get the old girl back up to snuff, you will be rewarded with one of the most reliable and rugged outboards ever produced.

Hi jgmo

That concise procedure was very much appreciated thank you.

I decided that I had to destroy the impeller housing in order to get some force on the joint.

Took it to local garage and he had if off with a bit of heat in 10 minutes

Corrosion went right to the end

Time now to order up parts gaskets , seals , housing and impeller pump

I will of course grease all critical points but wonder if there is more I can do to prevent corrosion between those two points again , I plan to strip down each year anyway , but is it worth coating with anti rust paint or something
 
Spoke to boats.net and they said they could not confirm my serial number matched these diagrams

To me they look the same but they could not confirm the part numbers

Is there anywhere where I can verify dimensions etc for the parts like gaskets etc

some of the ones I want are (I think)

Impeller Pump19210-881-003
Impeller Housing19220-881-305
Impellar steel gasket plate 19231-881-840
Impeller Gaskets x 2
19232-881-306
Seal under water pump91252-935-004
Prop Shaft Seal91251-935-004
 
These outboards are known for going decades with little to no maintenance. I don't know of a better deterrent to corrosion than flushing with fresh water after salt water outings. If someone had produced a coating that would be effective against aluminum oxidation, I think it would be in world wide use and I know that I would pay a premium to get my hands on some. No, fresh water flushing is the best I'm aware of.

You have to keep in mind though that even "fresh" water can accelerate oxidation and every body of water will have it's own unique chemical "profile". Some water is more alkaline. Some is more acidic. The minerals that tend to suspend in bodies of water can vary widely even where the proximity is very close. I believe that flushing with treated municipal water will be your best bet for keeping oxidation at bay and limiting mineral deposits.

Have you visited the inside of the thermostat housing yet? I would be concerned about how things look in there knowing how bad things are down at pump level. I encourage you to take a look in there, if you haven’t yet, before completing your parts list. Shipping is usually less expensive if you can do everything in one order.

Good luck and please keep us updated on your progress.
 
You slipped in your parts question while I was typing my previous post. :)

The good news about the older twins is that MOST were built on the same platform and few changes were made over the years. The bad news is that you live in Bulgaria and own what I believe is either a Japanese or Euro model. I have never seen either one. I still think that those would be on a par with the USA motors but I can't tell you for sure.

I think you will probably have to source your parts based on approximation. If you have a rough idea about the year model and you can identify the extension case correctly IE: S=short or standard......L = long......or XL = extra long (used a lot on sailboats).....you should be able to source most of the things on your list.

The extension case ID is important primarily because the water pump housing and impeller can be different on the XL case equipped motors.

There are, of course, other differences like mainshaft length and diameter along with accompanying parts....camshafts....ignition types and carburetors. But for the purposes of what you're up against now, you shouldn't be too concerned with those.
 
Spoke to Boats.net today and gave them my model on engine plate and serial Honda 4 Stroke B100 - 1013374

But they were not able to tell me what diagrams I should be looking at for parts

Without dimensions of extensions not sure how I can determine what extension i have

When I spoke to Hinda themselves they did not know, and could not help
 
Last edited:
Looking at the digram for the 100F LA

It has what they call an impeller cover , item 7 , the gasket beneath this has two holes , but the numbers are not on the parts list

My gasket has two holes here also

But the impeller cover anyway is shown as obsoletegrabilla.ae9664.jpg
 
Last edited:
Well, there is a simple way to tell (I think). I have always jus "eyeballed" it but I had an advantage in that I started off with these outboards by obtaining a short shaft and a long shaft together in a package deal. So, you have me looking at the specifications in my trusty old workshop manual. Which, by the way, you should invest in if you intend to go "deep ".

The book gives the overall length of the BF 100 SHORT as:
1,010mm (39.8 in.)

The LONG shaft is:
1,160mm (40.7 in.)

They do not list the XXL shaft and I don't have one to measure. I'm pretty sure that they exist but I can't prove it at the moment. So, if you measure anything taller than 1,160mm it's an XXL.
 
spark plugs go to a black cylindrical component

/ coil , one black wire from that goes into the housing under the smaller cog on motor , cannot see where the others go
 
Last edited:
Ok, we know that it's a long shaft. I asked about the ignition because it would be a good indication of approximate age.

The one wire going under the cam sprocket tells me it's a CDI. That would put it as probably being at least a 1977 and later. Just an educated guess though.
 
Looks like I was wrong. If you have one single black wire going under the cam wheel cover, it will likely have points.

If there is a two wire harness going under the cover it is CDI.

So, that could put the year model of your outboard pre 1977 .

What is your serial number?

You might want to just take the cover off and have a look.
 
Another clue to age sometimes can be the fuel pump. The older pumps were mounted under a metal cover. Although, if the pump has been replaced with the newer pump, the metal cover has likely been discarded.

Just going through my manual trying to get you something that you can use.
 
Looks like I was wrong. If you have one single black wire going under the cam wheel cover, it will likely have points.

If there is a two wire harness going under the cover it is CDI.

So, that could put the year model of your outboard pre 1977 .

What is your serial number?

You might want to just take the cover off and have a look.


serial number is 1013374
 
pre 1977 would make sense , as Honda just cannot locate this model and serial , or point me in the direction of a service manual.

apart from the two holes on the impeller cover ( not housing ) gasket , the diagram you linked to all seems the same
 
Back
Top