Logo

Lower unit damage, how bad??

quarkiegal

New member
I have a 1986 Bayliner Ciera 2450 with a Volvo Penta AQ225 and either 280 or 290 Sterndrive. We bought the boat used a few years ago and have been battling electric and transmission issues so I'm fairly familiar with manuals & repairs. Most recently, I adjusted the reversing rod on my own (with help from this forum) after getting a $3000 quote from our local boat repair.

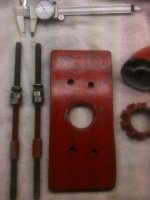
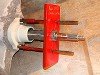
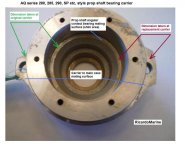
We recently bottomed out pulling up to the dock before loading on the trailer. There was significant damage to the prop but it worked fine to get it loaded and the next time we took it out. However, when we last launched, the propeller wouldn't engage on forward or reverse. The engine was running fine and I could feel the gear shift catch when I moved it to F or R but got no movement in the water. We ended up needing help from others to manually maneuver it back onto the trailer.

Upon further inspection I found additional damage to the housing unit behind the propeller. It looks like it was turned or twisted when the prop hit. However, I'm not certain what consequential damage I could be facing. For example, would damage like this impact the propeller shaft?

I've attached some pictures to illustrate the damage. I hope that someone with more expertise can give me some guidance.

IMG_0186.1.jpgIMG_0185.1.jpgIMG_0184.1.jpgIMG_0189.1.jpgIMG_0183.1.jpg

My question is.. is this easily fixable? Is it something I could do myself? Is it something which will cost too much and, essentially, totals my boat?

Thanks for your help!
Tricia
 
The fastener flanges for the propeller shaft bearing carrier have broken.
This has allowed the driven gear, bearing carrier and prop shaft to move AFT!

If no damage to the shaft or gears, you could simply replace the bearing carrier and perform only one aspect of the required shimming procedure .

If you sustained gear damage, it quickly becomes cost-ineffective to rebuild.

In which case you may as well look for a good used 1.61:1 lower gear unit.
If you replace the lower gear unit, re-shimming of the vertical shaft tapered roller bearing race is imparative.


.
 
Thank you! That's very helpful!

Sounds like my next step should be taking it apart and determining what internal damage there is. According to my guide, I'll need a special tool to remove the bearing housing, 884161. Any suggestions how/where I could find one of those?

Also, I've read over the shimming procedures and I'm only 60% confident that it's something I could do. It specifically says "This is a value of experience," which I take to mean, this procedure takes a skilled technician.

Is this something you think a novice could do with a workshop manual? It's pretty detailed but I'm cautious about dealing with gears and gear lengths.

Also, would it be Ok to send additional pictures of the internal pieces if I'm unsure if they are damaged?

Thanks again for all your help!
Tricia
 
Tricia, the carrier is already partially out of the main gear case..... you should not need a puller tool.

Also, the over-shimming procedure is for a transmission replacement.

Yes..... post more photos once you get the carrier out!

You will also want to check the propeller shaft for "run out".


.
 
Last edited:
Perfect! I'll pull it apart this weekend and get shots of all the parts. Can you elaborate on "run out?" What exactly should I be looking for? Is that water in the propeller shaft?

Thanks for all your help!
 
........................................

.............. Can you elaborate on "run out?" What exactly should I be looking for?
A good straight propeller shaft will run "true", without any wobble, whereas a propeller shaft that has undergone an impact may become bent or un-true.
"Run-Out" refers to any "wobble" or "Un-True-ness" that has resulted from an impact.


Run-Out can be checked with a dial indicator at/near the AFT most area of the shaft. The shaft would be turned on it's axis while the indicator will show of the amount of Run-Out.
MAX allowed Run-Out for your shaft would be approx .003".


Thanks for all your help!
You are very welcome.


By the way, I am not aware of any specific puller tool that Volvo Penta has to offer for the AQ series lower units.
A slide hammer affair has been suggested..........., but I will not do that.
With necessity being the mother of invention, I designed a puller tool years ago.
It works for both s/p and Duo Prop drives.

It is simple.... and does the job very well.


Attachments

  • Prop shaft carrier puller tool 1.jpg
    Prop shaft carrier puller tool 1.jpg
    48.9 KB · Views: 68
  • Prop shaft carrier puller tool in use .jpg
    Prop shaft carrier puller tool in use .jpg
    4.3 KB · Views: 2,096
Last edited:
http://www.tugnuts.com/viewtopic.php?f=5&t=5533
This shows the tool for checking shaft runout. I would do that first just push the bearing carrier all the way in first. Like ricardo says pay close attention to shims when you take it apart they can be real thin and easy to damage. There should be a plate on the upper gearbox up by the helmet mount with the model number of the drive. Real important to know what your working on and a good OEM manual is a must. Pics are allways good!
 
I was able to take some of the lower unit apart this weekend. I'm not sure I can check the runout, I need the puller tool for that, right? The problem is that there is nothing securing the drive shaft to the housing. the damage seems to be with the housing unit that holds the shaft in place. I've attached several pictures...

IMG_0844.jpgIMG_0846.jpgIMG_0847.jpgIMG_0851.jpg

I also have some videos I pieced together here: (note: I edited out a lot of the time consuming work like loosening screws and some of these shots were also for me to document how I was taking it apart so I could reference them when I put it back together)

What was also concerning was that there were 2 screws missing where the directions said they should have been when I was taking it apart LOL

I'm traveling until Thursday so I hope to be able to take more pics of the gear shaft this weekend.

I'm anxious for your initial impression.
thanks again for all your help!!
 
Your lower unit is a 290. I would need a picture of the suspension fork in order to tell you if the entire drive is a 290.

Yes, the propeller shaft bearing carrier is broken beyond repair .
You will want to lower the drive down and get all of the water out of there ASAP!

Spray everything with WD40 (moisture displacement).

I will look and see if I have an extra bearing carrier.


The right person, with the right precision instruments, would be able to take precision measurements (at both the bad and new carriers) and get this back together using the same dimensions as prior!


.
 
Last edited:
Look close at the pinion gear for damage, with the control in neutral you should be able to spin the pinion for inspection. I doubt that when the damage occured the slinger was able to pump water into the upper gearbox. Get a can of WD and spray a bunch down the dipstick hole with the drive down and let it drain good in a drip pan. If the driven gear looks good just get a new bearing carrier and swap it out being real careful of the shims they can be paper thin and damage easily.
http://www.ebay.com/itm/Volvo-Penta...ash=item1a17537649:g:e3AAAOSw9ZdXKtcz&vxp=mtr
This one looks to be in real good condition you will need new seals and O-rings. Your gonna want to replace tha anode as well.
http://www.ebay.com/itm/VOLVO-PENTA...ash=item48826579d8:g:S6gAAOSw3ydVzzgM&vxp=mtr
 
Kim, we cannot swap one carrier for another without going through the procedure for gear pattern check and re-shimming...... not unless both carriers are side by side with special unorthodox measurements having been taken and used.


.
 
Just use this method put the pointer on the propshaft and pull out on the shaft and lightly move it in both directions you should be able to tell if there is enough lash just put the upper gearbox in gear to hold the verticle shaft from moving.
http://************/lib/library.html
volvopenta 280-DP manual pages 94-96
 
OK..... before Tricia (or before someone whom she hires) makes an expensive mistake...... let's add some clarity as to what can and must be done.

First...... get that moisture out of the gear cases..... both lower and upper transmission.

Secondly..... I would make dang sure (that whoever you have helping you) has excellent AQ series experience. If their experience is limited to the SX or DP-S Gimbal suspension type stern drives, I may keep looking.

Thirdly...... I would not use the OEM codes as shown in the e-Bay carrier photo. These codes worked well for the original factory assembly.


Kim....... yes, if it wasn't for the two carrier fastener bosses having been broken off, the original carrier w/ prop shaft, driven gear, main angular contact thrust bearing, etc, etc, could be re-installed and a back-lash reading could be aquired.
If she could find a method for securing the carrier firmly into the main gear case, I suppose that this could be done!

If possible, the prop shaft, driven gear, main angular contact thrust bearing, etc, etc, could then be transfered over to a new carrier, and an adjustment to the shim pack could be made given the NOW different back-lash measurement that would be aquired.


However, all we need is the precision measurement for the depth from where the shims rest (these shims are directly AFT of the angular contact bearing) to the surface whereby the carrier mates to the lower unit gear housing.

Do the math........ make an adjustment to the Original Shim Pack Value...... and there ya go!

NOTES:
Replace the two back-to-back propeller shaft seals while in there.P
erform the gear pattern testing with carrier O-rings removed.
Do not re-use O-rings..... none of them.
Examine the die-cast slinger pump impeller and drive pins.
This drive requires 30W Engine oil....... NOT heavy gear oil!!!!!!
 

Attachments

  • prop shaft bearing carrier.jpg
    prop shaft bearing carrier.jpg
    56.2 KB · Views: 81
Last edited:
Hi Rick, me again. Sorry for the delay; I had to winterize and store my boat for the season. I also realized that I had a lot more reading to do! I think I got a little intimidated when I couldn't follow your and Kim's discussion. LOL

First, I want to make sure I'm clear with your instructions.

1) carrier = bearing housing?
2) "two carrier fastener bosses" = the edges of the bearing housing that broke off with the screws, right?
3) anode = zinc ring?
4) "back-lash" = run off?
5) I may need more clarity about O rings and shaft seals and more instruction for checking the pinion gear damage and how to examine the die-cast slinger pump impeller and drive pins.
6) I think I'm clear on what some of the parts are but I'm not 100% sure what you're referring to as the "driven gear" and "main angular contact thrust bearing" I've attached a diagram that maybe you could fill in the blanks? (it's not the 290 but a simple diagram for easy reference)
diagram.jpg

Notes:
1) I don't have a way to secure the bearing housing and shaft into the gear housing in order to measure run off.
2) I don't have a stand or any way to secure the lower gear so I will have to work with the unit mostly in-tact and held up by the hydraulics.
3) I don't have anyone with any AQ experience (or any VP experience, for that matter) helping me. I'm working with the workshop manual. So I'm on my own here; capable but definitely a novice. (example: The closest boat repair shop quoted me $3000 to fix my reverse kick back issue. After some research and reading I fixed it myself by tightening the shift cable to engage the locking bar.) I do have a brother-in-law who is an auto mechanic and helpful with most of the complex mechanical concepts.
4) I'm working on a finite budget. This is a 1986 24' cabin cruiser I bought for $750, definitely recreational. (call it my starter boat) I'm not interested in dropping $1000 to keep it running; I'd rather save up and trade it in on an upgrade or sell it for parts.

That all being said, I'd love to get back on the water before the summer's over, if possible. :)

So far, I'm looking at buying a clamping dial indicator from harbour freight for about $30. I found a new bearing housing unit for about $140. I could also get a new zinc ring (mine looks all bumpy and corroded) $44 at walmart! LOL

https://www.harborfreight.com/clamping-dial-indicator-93051.html
https://www.bonanza.com/listings/Ne...JfU52L1TmRwkoobvkwBGMpsbg7MhHFTRKshoCUcrw_wcB
https://www.walmart.com/ip/B-S-Anodes-377-BSMV875821-Collar-zinc-volvo-290b/877259394

However, I need your expertise to help understand the directions and maybe approve the above items. :)

I can take pics/videos of any work I do if you'd be willing to oversee my project?

Again, thank you so much for all your help!!

Tricia
 
Hi Rick, me again. Sorry for the delay; I had to winterize and store my boat for the season. I also realized that I had a lot more reading to do! I think I got a little intimidated when I couldn't follow your and Kim's discussion. LOL :confused:

First, I want to make sure I'm clear with your instructions.

1) carrier = bearing housing?
2) "two carrier fastener bosses" = the edges of the bearing housing that broke off with the screws, right?
3) anode = zinc ring?
4) "back-lash" = run off?
5) I may need more clarity about O rings and shaft seals and more instruction for checking the pinion gear damage and how to examine the die-cast slinger pump impeller and drive pins.
6) I think I'm clear on what some of the parts are but I'm not 100% sure what you're referring to as the "driven gear" and "main angular contact thrust bearing" I've attached a diagram that maybe you could fill in the blanks?
diagram.jpg


Notes:
1) I don't have a way to secure the bearing housing and shaft into the gear housing in order to measure run off.
2) I don't have a stand or any way to secure the lower gear so I will have to work with the unit mostly in-tact and held up by the hydraulics.
3) I don't have anyone with any AQ experience (or any VP experience, for that matter) helping me. I'm working with the workshop manual. So I'm on my own here; capable but definitely a novice. (example: The closest boat repair shop quoted me $3000 to fix my reverse kick back issue. After some research and reading I fixed it myself by tightening the shift cable to engage the locking bar.) I do have a brother-in-law who is an auto mechanic and helpful with most of the complex mechanical concepts.
4) I'm working on a finite budget. This is a 1986 24' cabin cruiser I bought for $750, definitely recreational. (call it my starter boat) I'm not interested in dropping $1000 to keep it running; I'd rather save up and trade it in on an upgrade or sell it for parts.

That all being said, I'd love to get back on the water before the summer's over, if possible. :cool:

So far, I'm looking at buying a clamping dial indicator from harbour freight for about $30. I found a new bearing housing unit for about $140. I could also get a new zinc ring (mine looks all bumpy and corroded) $44 at walmart! ;)

https://www.harborfreight.com/clamping-dial-indicator-93051.html

https://www.bonanza.com/listings/Ne...JfU52L1TmRwkoobvkwBGMpsbg7MhHFTRKshoCUcrw_wcB

https://www.walmart.com/ip/B-S-Anodes-377-BSMV875821-Collar-zinc-volvo-290b/877259394

However, I need your expertise to help understand the directions and maybe approve the above items. :)

I can take pics/videos of any work I do if you'd be willing to oversee my project?

Again, thank you so much for all your help!!

Tricia
 
...................................
Hi Rick, me again. Sorry for the delay; I had to winterize and store my boat for the season. I also realized that I had a lot more reading to do! I think I got a little intimidated when I couldn't follow your and Kim's discussion. LOL :confused:
Yes.... without being there with you and with hands-on, it can be tough to follow.


First, I want to make sure I'm clear with your instructions.

1) carrier = bearing housing?
Yes.... we refer to it as a "prop shaft bearing carrier"!

2) "two carrier fastener bosses" = the edges of the bearing housing that broke off with the screws, right?
Yes!

3) anode = zinc ring?
Yes, commonly referred to as a Sacrificial Anode. Depending on the water, they will be either Zinc, Aluminum or Magnesium.

4) "back-lash" = run off?
No.... back-lash is a dimension to be achieved between gear teeth. Most often this is shim controlled.

5) I may need more clarity about O rings and shaft seals
You will be replacing ALL O-rings and shaft seals. Do not try to re-use any.

and more instruction for checking the pinion gear damage and how to examine the die-cast slinger pump impeller and drive pins.
Once you get this all apart, post pictures of the components.
I will label them and will re-post them for you.


6) I think I'm clear on what some of the parts are but I'm not 100% sure what you're referring to as the "driven gear"
In this lower unit scenario, there is NO pinion gear nor a ring gear. These are Auto and Industrial differential unit gear terms.
What you have is one "drive" gear (what some call a pinion gear) and one "driven" gear (that is nothing at all like a ring gear).


and "main angular contact thrust bearing"
This is a specially designed "double row" ball bearing that is capable of handling the tremendous thrust load.

I've attached a diagram that maybe you could fill in the blanks?
Not sure who's schematic that is. Volvo Penta typically uses a 2 digit SEQ # system.
Anyway....... in your schematic, SEQ # 175 is the die-cast slinger pump impeller.

View attachment 15928


Notes:
1) I don't have a way to secure the bearing housing and shaft into the gear housing in order to measure run off.
2) I don't have a stand or any way to secure the lower gear so I will have to work with the unit mostly in-tact and held up by the hydraulics.
3) I don't have anyone with any AQ experience (or any VP experience, for that matter) helping me. I'm working with the workshop manual.
Use the OEM workshop manual only. NO Seloc..... and no Clymers!

So I'm on my own here; capable but definitely a novice. (example: The closest boat repair shop quoted me $3000 to fix my reverse kick back issue. After some research and reading I fixed it myself by tightening the shift cable to engage the locking bar.) I do have a brother-in-law who is an auto mechanic and helpful with most of the complex mechanical concepts.
The AQ series is an exceptionally well designed and simply designed stern drive, and are among the easiest to work on.

4) I'm working on a finite budget. This is a 1986 24' cabin cruiser I bought for $750, definitely recreational. (call it my starter boat) I'm not interested in dropping $1000 to keep it running; I'd rather save up and trade it in on an upgrade or sell it for parts.
Don't cheap out..... it will bite you in the A$$ later on!

That all being said, I'd love to get back on the water before the summer's over, if possible. :cool:

So far, I'm looking at buying a clamping dial indicator from harbour freight for about $30. I found a new bearing housing unit for about $140.
$140 is far too expensive. You can do better.

I could also get a new zinc ring (mine looks all bumpy and corroded) $44 at walmart! ;)
Yes.... if the surface looks bad, it has been doing it's job! Be sure to replace it, and make dang sure that the fasteners are tight.

https://www.harborfreight.com/clamping-dial-indicator-93051.html

https://www.bonanza.com/listings/Ne...JfU52L1TmRwkoobvkwBGMpsbg7MhHFTRKshoCUcrw_wcB

https://www.walmart.com/ip/B-S-Anodes-377-BSMV875821-Collar-zinc-volvo-290b/877259394

However, I need your expertise to help understand the directions and maybe approve the above items. :)

I can take pics/videos of any work I do if you'd be willing to oversee my project?

Again, thank you so much for all your help!!

Tricia


.
 
Last edited:
Hi Rick,

I'm having trouble getting the bolts off. They are too tight and all my efforts are just stripping them. Any suggestions?

Thanks,
tricia
 
Hi Rick,

Well, you were right but I only stripped one of them. The space is so narrow that if I could have gotten in there with a box-end torque wrench, I wouldn't have a problem. But I bought a narrow chisel to notch the final bolt to get a grip to loosen it. :) So I think I got everything apart that I need. Here are some pics:
IMG_00501.jpgIMG_0066.jpgIMG_0063.jpg


I started to fight with the seal ring but I think it's glued in there or something b/c it started breaking off into pieces:
IMG_0057.JPGIMG_0053.jpgIMG_0058.JPG

Then I figured I may not have to remove that because I won't be replacing the seal rings in this bearing carrier b/c it's broken! LOL

Here is a video with some comments.
https://youtu.be/2QPUekeyCcY

I'm still having trouble finding the right bearing carrier part. I have it narrowed down to several part numbers: 3857097 (replaces 852456) OR 854044 (replaces 839389). Is there a way I can tell for sure?

Thanks!
Tricia
 
......................
Hi Rick,
I'm having trouble getting the bolts off. They are too tight and all my efforts are just stripping them. Any suggestions?

I had responded in post #22 thinking that you were attempting to remove the 4 clamping collar cap screws (aka bolts) at the transmission.
I just looked at your video and see now that you were talking about the 6 nuts (not bolts) that secure the thrust plate to the prop shaft bearing carrier.

I apologize for causing any confusion.
:eek:


OK..... the prop shaft bearing carrier that you need must be for a 280 or 290.
The 275 carrier will NOT work.
Use caution if looking on e-Bay..... because very often these sellers do not know what they have, nor do they list them correctly.
Example..... 270 vs 280 lower unit parts do not interchange, yet these guys will list them as though they will!


I may have a carrier that will work. I'll tie a string on my finger and will take a quick look today.
;)


BTW.....
at :33 into the video, you talk about the seals. While you do not need to concern yourself with the seals in the broken prop shaft bearing carrier, you will want to replace the two (2) seals in the new prop shaft bearing carrier.
These are steel bodied rubber lipped seals that install back-to-back.


at 2:55 into your video, the part that you say "fell right out" is a control shim.
That shim value may change with the new prop shaft bearing carrier.
I can later show you how to check the difference between the two carriers and how to make the shim value adjustment.


.
 
Last edited:
......................
I may have a carrier that will work. I'll tie a string on my finger and will take a quick look today.
;)
that would be fantastic! :) Thanks! If not, can you tell me which part number I should be looking for?

......................
BTW.....
at :33 into the video, you talk about the seals. While you do not need to concern yourself with the seals in the broken prop shaft bearing carrier, you will want to replace the two (2) seals in the new prop shaft bearing carrier.
These are steel bodied rubber lipped seals that install back-to-back.

Yeah I picked that up from the diagram in my workshop manual and a video I watched. Seems like its maybe 2 rings that are shaped like suction cups that go back to back to form an hourglass-like shape. right?

......................
at 2:55 into your video, the part that you say "fell right out" is a control shim.
That shim value may change with the new prop shaft bearing carrier.
I can later show you how to check the difference between the two carriers and how to make the shim value adjustment.
I also purchased a clamping indicator dial so when I get it all put back together in the outdrive, I can test to make sure the propshaft is true. :)


Thank you so much, again, for all your help! I really appreciate it!
Tricia
 
..........................
that would be fantastic! :) Thanks! If not, can you tell me which part number I should be looking for?
I will be able to take a look first part of next week.


[/COLOR]Yeah I picked that up from the diagram in my workshop manual and a video I watched. Seems like its maybe 2 rings that are shaped like suction cups that go back to back to form an hourglass-like shape. right?
Well, sort of.
These are seals (aka sealing rings).
One faces inward (this one seals against the gear oil) and one faces outward (this one seals against the seawater).


I also purchased a clamping indicator dial so when I get it all put back together in the outdrive, I can test to make sure the propshaft is true. :)
Checking for prop shaft "run-out" is one thing....... but since the prop shaft bearing carrier is being replaced, you'll also want to check the gear set "back-lash".
If the back-lash is excessive, the shim value will be increased.... and visa-versa.


Thank you so much, again, for all your help! I really appreciate it!
You are welcome.

Tricia
 
Back
Top