Logo

Gear lock nut wrench

Deanmck

Regular Contributor
Hi all.
after a couple if days fishing with many miles between fishing spots I have noticed milky oil seeping from my gear case seals. I have the service manual for my BF50a but they name a lock nut wrench to remove the locking nut in front of the seals. This wrench is beyond my budget. Is there anyone out there who has preformed this seal change without the lock nut wrench? How is this done? I was thinking of a brass punch but would like to hear from others before I start the job. While I'm here I take it the spares I need are only the two seals and a new o-ring is that correct.
Thanks in advance.
 
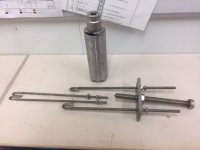
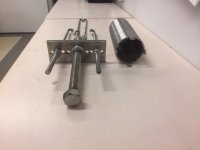
I have dropped the punch idea after Googleing and seeing a few horror stories of cracked housings. I am now thinking of manufacturing my own tool. Either out of piping that is a close fit cutting in the tabs needed or two flat bars bolted together to create a y with correctly spaced bolts ground down to flat edges.
How dificult is it to pull the seal housing out once the retainer nut is removed?
 
Hi Dean, first have a close inspection of the gearcase to see if it is cracked or not. They usually eventually crack on the outside of the casing in line with where the Gear Case End Nut #7 is located. A pressure test would show where the water is entering.
http://www.boats.net/parts/search/Honda/Outboard Engine/2002/BF50A2 LRA/PROPELLER/parts.html
This is due to galvanic corrosion between the Gear Case End Nut and casing being different metals combined with salt water.
The corrosion between the two expands the casing until it cracks(bad design).
Hopefully this is not your source of water intrusion, but if it is, you will need to get it welded or look for another gearcase assembly.

Another option to remove the Gear Case End Nut without the service tool is to carefully drill a hole through the nut allowing it to collapse enough to take the tension off it. Then undo it using a punch and hammer. Obviously you will have to renew the nut, but it is only US$10
You can fit the new nut using a punch and hammer.

The propshaft holder #30 will also be tightish due to corrosion and you will most likely have to heat the gearcase(to expand it slightly) to remove it without damaging it.

Since you have had water intrusion into the gearcase for however long? you will need to check all of the bearings and renew as required.
It would be foolish not to renew all of the oil seals and o-rings incl shift shaft & vertical shaft seals and o-rings.

Bob
 
Making your own tool makes sense. If you have a way to do it, try to make it so that you can put a torque wrench on the end of it.

I was wondering if a pvc pipe to fit the diameter would be strong enough to work. That way you could put a cap on it, with square hole for a torque wrench. On the other hand, the pvc might just strip out.

If you have a friend who works at a mechine shop, he could probably make it out of some hard metal and weld an end piece for the wrench. We have done that on a couple of occasions, when we got a Mercury in with a similar but different wrench requirement for the prop shaft holder.

That "nut" needs to be torqued to 68 ft lb.

Mike
 
Thanks Mike & Bob.
I have removed the prop and thrust washer to have a look at the damage. I could easily see that the prop shaft holder has failed as in there is two cracks on the housing right over the seals, the gear case on the other hand is still in good shape. I have no way of knowing if this is a old or new problem but its reassuring to know exactly where my problem stems from. I also really don't want to have to heat my gear case if I can avoid it I don't have a gas torch at home but could call in a favour at the local ship yard if it all turns to custard, it's just that I have recently touched up my paint work it would be a bit heart breaking to have to start again, but we will see when the time comes. I am guessing that it is new as I change out my gear oil mid season as its not expensive and more or less just for piece of mind that it is clean and full, this was done only a month ago, How these cracks appeared is anybody's guess it's not something I have heard of before & I am careful to the extent of paranoia in shallow water therefor am sure my prop has not been knocked. How about you guys any ideas?. I am pretty sure PVC will not be strong enough as it is in pretty tight. I am off to work Monday so I will take all the measurements and fashion a tool out of stainless piping and weld a socket onto the end as well as the shaft extraction tool although I would prefer to leave the shaft in place it worries me to use bearing pullers on the prop shaft holder putting pressure onto the shaft as in I don't want to push it out the back of the gear housing. I have no idea how tight these things are. I have ordered a new prop shaft holder, seals, o-ring and bearings from Boats.net (lucky they are not expensive items as I will also have to pay import duty) so they should be here in Denmark when I am back from the Rig in 14 days.
I will soak the end case nut in plenty of wd40 before I go & wrap it all up in a bin bag.
I will update (hopefully with pictures) once I am home again & have received my parts.
Thanks for the help & taking the time to answer my questions.
 
Hope the pictures work. I have made a lock nut wrench as well as a shaft holder puller. do I need to make a Prop shaft remover. I am hoping to leave the shaft in place and replace only the holder with new bearings and seals. Is this possible or does the shaft need to come out?
 

Attachments

  • IMG_5798.JPG
    IMG_5798.JPG
    76 KB · Views: 32
  • IMG_5799.JPG
    IMG_5799.JPG
    68 KB · Views: 37
Nice tool fabrication! I pulled mine out a couple years back and made my own tools for my bf200. To answer your question if my memory serves me right, the prop shaft holder will come out without pulling the shaft itself.
 
Thanks Scooter.
Do you remember if it was difficult to get out, could you do it without heating the casing? Does the reverse gear bevel need to be pressed out or is it easy to pull out, punch out. Sorry for all the questions but I want to be as prepared as I can before starting.
Thanks for the help.
Dean.
 
No heat needed, just a nice even pull will do the job. If you are going to remove prop shaft then the gearshift shaft needs to be removed before shaft comes out.
 
Thanks guys.
Making tools is easier with a good stainless workshop lots of raw materials and time.
Scooter sorry for asking but I can't see why the gearshift shaft needs to be removed if I understand correctly you mean the vertical shift rod. I.e. The fwd, neutral, reverse shaft placed just fwd of the vertical drive shaft. If this is what you mean I just don't see why as when I look at the drawings I understand them as only half of the shaft will come out as in up to and including the dog clutch and the shift slider rod. Am I missing something here?
I have decided to make a shaft remover tool while I'm at it 'just in case'.
Again guys thanks for the continued help.
Dean.
 
Joy Joy Joy.
After three days of heating, pulling, drilling and bashing I have finally this afternoon successfully removed the gear case bevel. I had too drill and collapse the lock nut as Bobmech suggested once I had that out I could see that it would never have moved the amount of salt and alloy corrosion was a lot. then came the gear case bevel jesus that was not moving for love or money i oiled it heated it cooled it heated again many times. I had so much tension on it the stainless 8mm pullers I made were straightening out. It got to the point that I was looking at new motors online. The gear case and i got to the point of all or nothing I bashed in the outer ring get that out of the way oiled it once more & heated again. wadda ya know out she popped. My gears and dog clutch have only the slightest sign of contact/ wear there is no rust or water sign in the gearcase everything is that grey brown colour of new parts. Bearings were as good as new but I have new so will use them. I have to do the paint work again but honestly thats nothing compared to having to scrap my motor because of a couple of dodgy seals.
I'll tell ya what guys and girls
There is nothing to put you in a good mood than sweet success.
Dean
 
Yeah, nice work so far. I hope she goes back together easy for ya.

Good luck with the rest of it.

I'll be lurking and watching waiting for success.
 
Back together with new bearings first coat of primer is drying in the sun. I sadly have to wait a few days for a new lock nut to arrive from stateside but that gives me time to paint.
time for that well deserved beer.
cheers lads.
 
Back
Top