Logo

Split powerhead or not?

FstaRockr Burns

Regular Contributor
I have my powerhead off now cos im replacing the lower seals. The bearing was a little bit loud yet has no play, shd i replace it or just grease it? What at minimum do I need to remove to replace the lower bearing (i dont want a handful of parts falling out)? at the moment its recessed quite deep so not sure how to pull it off?

Also, a friend whose been doing this for yrs said i shd not take the exhaust cover off, but in the manual it says its a very good idea in case theres water in there? what shd i do?

water.jpg

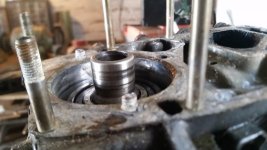
Heres a pic of the bearing - the teflon/plastic side cover partially shows the balls (which mens i can just get some grease in there) - surely this shd be a closed type of bearing? ie does it mean this one is shot or did they come with partially sealed sides? :confused:
20160726_150030.jpg

Was quoted $100 for the mariner part, lo and behold inside is a FAG 6207 C3 bearing.. bit cheaper here: why do marine shops rip u off so bad?!!

http://www.wychbearings.co.uk/6207-2rs-c3_fag.html
 
Last edited:
If the bearing is noisy/rough it needs to be replaced. If you can build a special puller, you may be able to extract the bearing in place, but that's quite difficult. Probably will have to split the crankcase to get better access. You don't necessarily have to pull the pistons all the way out so that the piston rings pop out, if you pull them out just a bit you can block up the crank and you'll have enough room to work on it with a puller. The last one I did, I used a bearing "splitter" to get the bearing pried away from the crank, far enough to get the jaws of the puller around the back of the bearing.

https://www.amazon.com/OTC-1123-Bea...d=1469571829&sr=8-1&keywords=bearing+splitter

Note that these bearings are not sealed, and are lubricated by the fuel/oil mix. So greasing it won't help or do anything but shorten the bearing's demise.

The "6207" bearing you linked-to will fit the application, but you'll need to pry out the grease shields on both sides and clean out the grease. Lube the bearing with some engine oil or pre-mix after installation.

Now, about that installation, the best way is to heat the bearing and then, with leather or heavy gloves, pick up the bearing and slide it really fast onto the shaft. It'll slide right up and seat itself against the crankshaft machined surface.

Here's some very good instructions about heating bearings, from SKF:

http://www.lubsys.com/knowledge/knw_heatmnt.htm

I have an old toaster oven I use in the shop for this purpose, it's a lot quicker and safer then running from the kitchen with a hot bearing!

I used to work in a Naval Shipyard and as an apprentice worked up in the electric motor section where we did this all the time, with noise-critical bearings. Except we had a special rig that heated the bearing with magnetism. But the "oven-trick" works well for these and I've done more than I can count, with never a failure.

Far as replacing the exhaust manifold cover gaskets, if you didn't have any leaks, I wouldn't mess with them. Especially if the bolts are stuck from rust or salt water use. Then you're into heating bolts and possibly breaking. If you do have a problem and are getting water on the spark plugs, that's another story, and it must be fixed.

Anyway, I've rarely used Merc factory ball bearings on these, as long as you get a good-quality ball bearing from a major mfr such as FAG, SKF, Fafnir, NTN, BCA, etc, you shouldn't have any issues. Note, NEVER use bearings made in China, they are cheap for a reason! And probably made of old Yamahahahas or Suzukis!! Harr!

BTW, if you split the cases, re-seal with Loctite Master Gasket Kit or #518, which is the same stuff as what's in the kit, but no cleaner/activator spray. Clean/degrease the crankcase halves with Acetone and lay an extremely thin coating of the sealer on one surface only. If you wear a rubber/latex/vinyl glove, you can easily spread the sealer around with a gloved finger.

If you can't get that, Yamabond or Kawasakibond would do in a pinch. Or even Permatex #3. But the anaerobic sealer (518) is the best.
 
ed once again fantastic info! i think its possible the blown crank seals probably lew out any lube the bearing would have from the crank pressure.. once i put in a little drop or two of motor oil it was fine.. didnt realise these were lubes like that - and why they are open, i thought the side had shrunk but obviously its an open design.

I think ill skip splitting the case for now.. at least all the bolts and possible breaks have been dealt with so if i have to pull it again wouldnt be too much of a mission -

but still deciding, might change mind and swap it anyhow..

that metal cap on the crank that actually seats on the seal (metal jacket)- can this be replaced? are there specs for it? and can i just heat it up with a heat gun and drop it on?

saving this write up for future use :) helps so much hearing from u seasoned guys! appreciate it for sure -
 
that metal cap on the crank that actually seats on the seal (metal jacket)- can this be replaced? are there specs for it? and can i just heat it up with a heat gun and drop it on?

Older motors didn't have a sleeve, and Mercury came up with a Speedi-Sleeve that fit over the crankshaft to fix worn/pitted seal surface. Your motor probably has a thicker stainless sleeve that is pressed onto the end of the crank, which was machined to a slightly smaller diameter to accept the sleeve and retain the same O.D. all the way up the crankshaft. This is so the bearing can easily come on and off.

For older motors where you pressed the repair sleeve on, it would interfere with removing the bearing and you'd have to remove the repair sleeve which would destroy it.

You'd have to post a good pic of the sleeve from the side so we could see if there are any problems with it. Unless it's pitted, a slight grooving from the seals won't hurt. But there are no replacements for that thicker sleeve, if that's what you have. So you'd have to have a machine shop make a new one, and likely you'd have to take the crankshaft out and strip it.

You can polish up the sleeve with sandpaper, going from coarse/medium and finishing with crocus cloth. Just be sure to use a solvent to clean any grit left, and stuff a rag or paper towel up against the bearing as FME (Foreign Material Exclusion).

Note that if it is the old-style repair sleeve, that part is NLA so you wouldn't want to destroy it, either without finding a dlr that had an old part in stock.

Anyway, post a pic and we'll see what your sleeve is all about! Cheers.........ed
 
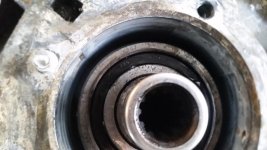
hi ed - thanks - heres the best pic i could find..

20160726_150018.jpg

i think its easy to remove,, but was taking a close look today - very vey light groove, hardly noticeable - and very smooth. i think the bearing ran dry cos it was sucking fuel thru it.. the bearing has no play at all sideways - so i think its fine.. since u said it lubes from the mixture shd be ok -

at least if i have to remove this lot again itll be alot easier with s/s nuts etc :)
 
That doesn't look bad at all, and it does appear to be the thicker sleeve. I'd polish it with crocus cloth but otherwise leave it be.

Remember that the 2 seals go "lips down" so that you see the hard metal part when you're pressing them into the cap. Be sure to press them into the same position in the bearing cap as the old ones occupied.
 
thanks for clearing up the seal direction - i thought surely one should face toward crank to seal with the crank case pressure and the other toward prop? anyway - i found seals with double lips.. so will have 4 - wd it be bad to install one towards crank? just being theoretical and curious here - :)
 
thanks for clearing up the seal direction - i thought surely one should face toward crank to seal with the crank case pressure and the other toward prop? anyway - i found seals with double lips.. so will have 4 - wd it be bad to install one towards crank? just being theoretical and curious here - :)

Yes, it would be bad!

I could just leave it at that, but not a good idea to go against the engineer's design.

It's more critical to keep water out, hence 2 seals pointing down. Especially when there's vaccum in the crankcase on the induction stroke, you can see how, if the seals were pointed upwards, it would suck water thru them like a Mad Dog.

With the seals down, crankcase vaccum only makes the sealing tighter.

Before you assemble the cap, spread a thin coating of Lubriplate or equivalent grease on the seals' lips, helps to lube them for assembly and 1st lite-off.
 
ok very interesting thanks! i thought the blown seals were allowing exhaust to go into leg housing - not the other way round, cos my drive shaft was basically covered in soot - which i assumed was coming out the top crank seals.. oh well - ill install em as is. the wear sleeve is still very smooth, dont think ill touch it - basically like a mirror really -

thanks again! hope to have her up and running soon!
 
Exhaust flows over the driveshaft and is a more likely source of your carbon deposits. Maybe they'll turn into a diamond someday!!!
 
bahahaha yeah maybe, until i scraped alot away! sooo - if my driveshaft is sooty, r u saying crank seals might not have been bad? deary dear i hope thats not the case? my lower plug was always wet, middle one a bit more, and top one 100%.. alot of blow by coming out of leg unit, and oily residue getting splattered everywhere - is this not symptoms of crank seals going bad?

im mixing 50:1 now, is black exhaust soot not perhaps the unburnt / over fueling from the crank seals leaking? or could it be gasket related? just when i thought i had it sorted!
 
50:1 is fine, you may have other underlying issues (carburetion, ignition, ?) for your plugs looking the way they did. Exhaust is always dumping down the center of the mid-section, that's why you need that rubber seal around the motor mount, it keeps exhaust & water from blowing out of there.

Typical symptoms of bad lower crank seals are water getting sucked into the cylinder, where you'll find water droplets on the #3 spark plug. and #3 cylinder dropping out at idle.

Anyway, it sounds like your seals were marginal and needed replacement anyway. But I don't think that'll be a cure for soot, a lot of that also depends on what type of oil you're using. A mfr's oil, rated TCW3, should burn cleanly. If you can get any of the Mercury synthetic or hi-performance 2-stroke oil over there, it should do well.

Gumout Regane is a good carbon-cleaning additive, as is Seafoam and Chevron Techron. Yamaha makes stuff called Ring-Free. Johnson/Evinurde have Carbon Guard. Any of those will keep your engine's innards clean and I'd encourage you to run at least one tank with additive.

Don't know how your fuel is over there, but a poor-quality fuel or ethanol doesn't help, either. If you can get straight gas (no alcohol), more's the better. Your 60hp would be happy with mid-grade or even premium, but will run OK on 87 octane if you have that.
 
guess ill have to double check that then once its all together! seriously thought i had a blown crank seal - but didnt realize is sucks, when i saw the soot i thought it was toast.. no water tho.. first motor and the more i touch the more im doing the wrong thing, those seals looked great - anyway, what can i do..

so if its ignition whats more likely to less likely?

coil
trigger
switch box?

ill/ see if i can make a diy spark gap tester - i have 2 bag full of spare coils, a trigger, 2 switch boxes and stators.. man if i pulled this apart for nuthin im gonna be real peeved!!

what a setback - again!
 
Time to not get carried away!

Get 'er back together, run it, see what (if any) symptoms you then have, and attack them systematically.
 
Back
Top