Logo

Honda 9.9 water check hole does not discharge water

capefear01

New member
My 9.9 has been in storage for about a year and now the water check hole port does not discharge water when intake is submerged, any suggestions?
 
Hello - I thought I'd post up to this thread, rather than post another with essentially the same title.

I hope that perhaps the experts here can shed some light on my situation.

I have a 2002 Honda 9.9. It's a BF9.9D.BFP9.9D which I understand means that it is a remote control unit, with a "power thrust" or high-thrust prop. We have it installed on an articulating bracket on the transom of a 25' sailboat. It is the XL shaft version (for the sailboat). I always run the fuel out (disconnect the fuel line and let it idle until the fuel runs out of the lines) and use the freshwater flush attachment to flush with a hose after each use.

Honestly the engine has been great except for the following issue: recently, I tilt the motor down to back out of the slip, motor for about 45 minutes to open water to go sailing. I shut down the motor, raise it up, and tilt it out of the water, and go sailing for several hours. The past two trips, when I was coming back in, when I put the motor back down it did not spit water from the check hole. I ended up drifting slowly, under sail, tilting the motor up, back down, start it again for a few moments to see if the water begins to flow, shut it down when it does not, to prevent overheating or impeller damage. Repeat. After maybe ten times repeating this, it will suddenly begin spitting water, and functions with no issues the rest of the time. Weird, right? I also tried applying some throttle in neutral, to see if I could "break" any air pockets that way, and also by running it in gear for maybe three seconds, before shutting down. Didn't work either.

I personally serviced the motor (oil change; lower unit gear oil change; water pump impeller and gasket). I know the key is on the shaft correctly because it does spit when it is first started, after having been stored titled out of the water for days/weeks.

I'm kind of at a loss as what to do here. Is this possibly related to the thermostat? I see that the two bolts holding the thermo cover are badly rusted and in need of replacement; I worry that the thermostat itself is in bad shape.

This last weekend I started using this "Salt Away" stuff, which uses an adapter with a little chamber for the fluid that goes in-line between the hose and the flush adapter, to see if that would clean out any deposits.

All responses are welcome - thanks in advance.

-Mark
 
Marke14
first off if you started your own post I'm sure you would have had more help by now, but your new. So welcome to the Honda forum. To me it sounds like a simple blockage. Honda are well known for this. Try blowing compressed air backwards thru the pee hole to dislodge any crap. If there is no luck there check the impeller again.
 
Hi Dean - thanks for the reply. Should I start a new thread? I am desperate to avoid dropping serious coin on a new outboard, but I also can't be dead in the water when I need my engine most. So I am struggling with that decision - to pay more money to an outboard mechanic, who may well declare that no problem can be found, when I could instead drop that money toward a new - or used but newer - motor.

The problem with my situation is that it seems to only happen when I am out on the water, not near any air compressor or really any means to access/work on the back of the motor. I did try sticking a tiny screwdriver into the hole, while leaning way over the transom, in case that was indeed the issue - no dice. The only thing that seems to work is to tilt the thing up and down a bunch of times, starting it each time to see if the water flows this time.
 
Many here have had the pee hole problem. The main bit of rescue kit is a piece of plastic from a weed wacker.
 
These issues are hardly ever fatal to the engine. Typically a small piece of debris gets into the nipple where the water indicator attaches. Try running a piece of monofiliment all the way back up the hole until it won't go any further and work it back and forth a bunch of times, as Dean suggested.

If the thermostat has not been changed recently, then it's time to do so, regardless. They don't last forever, especially if operating in salt water. After you have removed the old t-stat, inspect and clean all around the opening. Then seal the end of a garden hose into the opening and force fresh water back through that opening for 10 minutes or so to try to flush any debris out. When installing a new T-stat, be sure to used a new seal.

Just because no water is coming out of the indicator does not necessarily mean that the engine is not cooling properly. If you have access to an infrared heat gun, take that out with you and run the engine when the water indicator stops flowing, and check to see if you are really overheating. If no infrared heat gun, put your hand briefly on the head. If cooling normally, it will be hot but won't burn you - you will be able to hold your hand on the head for two or three seconds before it feels too hot.
 
Thanks for the replies - I appreciate these suggestions. Looks like I need to order a new thermostat and gasket. Honestly I also need two new bolts, if I remember the are 6 x 32 (from the shop manual). While I have the ear of the experts here, may I please ask for your wisdom in confirming the year based on my serial #? The Honda website doesn't go back far enough to allow me to simply type it in.

Our model # on the stamp is: BF9.9D.BFP9.9D and the serial is BABJ-1001555

Thanks again for the help.
 
Thanks, Alumarine, for the reply. I always have a hell of a time with the model number because it seems to me to have TWO model numbers in one! BF9.9D.BFP9.9D

Most places - incuding Honda's own website!!! - refer to "either" BF or BFP. And yet mine has both - go figure.

I hope the parts I've listed above are compatible with my engine. I will keep the page open on my browser for a while in case anyone answers on this thread today. I will order the thermo parts later today. Time to bite that bullet, I guess!
 
The 'P' In the serial number refers to 'power thrust'. The thermostats and associated gasket will be the same for 'P' and non 'P' units.
 
If/when this happens to me the next time, I will do two things straight away. First, I will remove the top cowling so I can attempt to run the motor even if the telltale hole is not spitting water; I can then place my hand directly on the powerhead and monitor for excessive heat buildup, so I can cut the motor if it gets too hot. We also have an overheat alarm built into the remote unit, and it works (I used to have the idle set too low and it would overheat sometimes when idling). I have also ordered an infrared thermo gun, for this purpose.

The second thing I will do, is try the "computer canned air" - you know, the stuff you use to clean the dust out of your computer and keyboard. That has a "straw" adapter that would probably fit perfectly into the telltale hole, and would be small enough that I could do it while on the water.

I'll order the parts for the thermostat now as well. Have you guys ever seen those bolts get rusty? I'm referring to the two that hold the thermostat cover on ... mine are super-rusty, I hope I can get them out OK.
 
Spray bolts with PBblaster first tap with hammer,repeat ,repeat,work bolts back&forth several times,apply heat to area where threads are.those old bolts snap easily..
 
Spray bolts with PBblaster first tap with hammer,repeat ,repeat,work bolts back&forth several times,apply heat to area where threads are.those old bolts snap easily..

Thank you very much for the PB Blaster and hammer tapping tips. I spoke with my brother who is a more experienced mariner - and mechanic! - than I am, and he recommended the same. I will definitely post back here once this is complete. Will likely be a week or two before the parts arrive and I have time to complete the job.

I also procured some of the "canned air" for the pee hole trick, should that happen again.
 
P.S. - Johnny, you mention applying heat to the area where the threads are. That would be the powerhead / engine case. I know some would try to do that with a heat gun but there is a lot of wiring and so forth around that area. What do you think about running the engine a little bit, specifically for that purpose?
 
I would first try without heat, I think the torque for 6mm bolts is about 5 foot pounds so I myself would soak them with loads of wd40 or pb blaster over a few days reapplying every now & again as well as giving them a wee tap to loosen the rust as Johnny described. Once your new parts arrive try to remove with maybe 6 foot pounds of torque. If that does not work you may well have to revert to heat. I would just leave it as a last option once you have tried everything else. When the new bolts go in clean out the threads with a 6mm tap. remember to use a good quality lube on the threads like molycote or something similar. You may be lucky that it's just the bolt heads that are rusted and the the threads are in good shape. Best of luck.
 
Thanks guys - I finally received my thermostat parts in the mail today. I may give it a try on Sunday, but it may wait until the following weekend. Will upate here once I've completed the repair (or attempted it and became stuck or had more questions!).
 
Your plan to feel for heat on the power head or use an infrared thermometer might do more harm than good IF your issue turns out to be a lack of water flow from the pump. If the pump isn't pushing water through the block it will heat VERY rapidly. So rapidly that running the engine for more than a few seconds could be damaging. Also, your remote console warning won't work correctly either. The sender for the console MUST be immersed in flowing coolant to correctly report temperature. It doesn’t sample air very well. Not even superheated air.
So, don't run your outboard any more than necessary if you're not sure if it's a pee bypass restriction or impeller not priming.

I agree with others that it's likely a bypass clog. If it is, it is OFTEN neccesary to take the pee hose and the fitting it connects to off of the engine and then run the engine at high rpm to BLASTthe debris out of the blocK with water pump volume. If you take the fitting out of the block and then start and rev the engine and water doesn't SHOOT all over the place then y need to go back and make sure all is right with the pump.

QUESTION: Did you replace JUST the impeller or did you install the complete pump kit?
 
Hello everyone - I finally have an update.

First, to jgmo's question - I replaced the impeller and the gasket. I did not replace the liner. I have a spare key now because I thought I would drop it in the water, but I didn't.

Ok. So I've had the boat out a few times since my last post. Once I had the same issue where it worked fine as I left the slip, went sailing, and then had issues coming in. After several tries the water began flowing through the indicator. Once, it worked with no issues period. Then last weekend, I had issues coming back in once again. That time I noticed that no water was coming out (I was running under load for maybe 20 seconds) and I had to shut down as I simultaneously noticed a lack of water flow and the console overheat alarm sounded. I had to sail to a nearby dock (that was interesting), and figure it out. I tried the canned air up the pisser trick and the water flowed right away after that. I made it back into my slip.

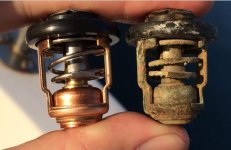
Today, finally, I was able to go down and swap out the thermostat. I will add a couple of pictures I took. Surprisingly, the bolts were not corroded as I feared they were (though I was armed with PB Blaster just in case). I had to put vice grips to the lower bolt as the head was far too corroded to get a socket or spanner on it.

Anyway after the swap, I fired up the engine and let it idle. It flowed water immediately, but overheated (as per the console overheat alarm) after about 2.5 minutes. I immediately shut it down, let it cool down a bit, and restarted it but this time, held the fast idle up a little bit to increase the RPMs. You could see an increase in the amount of water flowing from the pisser. I got bored after about four minutes of this (no more overheating) and disconnected and ran the gas out of the lines. Total run time the second try, almost 9 minutes without overheating (touched places on the head with my fingers as well - intake side was warm but not hot, the exhaust side was certainly hot but not fry-my-skin hot).

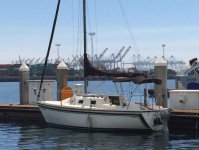
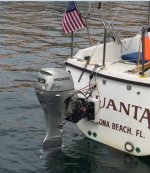
Overall the articulating outboard bracket is, IMO, mounted a bit too high as I have trouble keeping the propeller submerged in any kind of semi-significant seaway/wave action. That said, the shop manual says that the XL shaft can take a 27" transom mount; I measured with the mount in the down position and I am only 22" from the water to the top off the mount.

I wonder if these things are conspiring to cause my overheating, and possibly circulation problems:

1) The motor is mounted too high, thus the impeller is not in dense enough water to create enough pressure to break/overcome some bubble in the water jacket;

2) The idle speed is set too low (I don't know of a way to measure it BTW)

3) There is some partial blockage in the water jacket.

I can easily increase the idle speed but I'm worried that I will end up cranking it too high, and will cause damage to the pinion gears when shifting from neutral into gear. I can (and actually, probably will) re-mount the articulating bracket, so that I can get the motor down farther into the water. I suppose I can try that and see if it will make a difference (I suspect that it will). Finally, I can pay some so-called outboard expert several hundred dollars to try to "fix" it, though I am unsure how one would do it accurately without some surgical borescope or a CAT scan of the head and water jacket pathways. :)

EDIT: I always do a freshwater flush using the adapter that screws into the head near the thermostat housing. Lately I've been flushing with Salt Away using the in-line chamber for the Salt Away.

Anyway, thanks to this community for the ideas and suggestions. Hopefully I can attach these pictures.

Thermo - old and new:
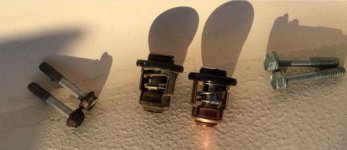
thermo 1.jpgthermo 2.jpg


Motor mounting height above water:

motor 1.jpgmotor 2.jpg
 
Last edited:
Motor needs to be lowered !

What racerone says!

You say "I have trouble keeping the propeller submerged in any kind of semi-significant seaway/wave action"
That's no good. You need to be a good 8" lower I think. The water needs to be at or above impeller level.
The impeller pushes water much better than it pulls.
 
To be clear, the intake screens are well below the surface in flat conditions. Thanks for the affirmation though, I will be remounting that bracket.
 
After looking at your pictures, I wholeheartedly agree with lowering the mount bracket. Not because of the depth of the water intake with the boat in the slip but for, as you already stated, the "lift" you are likely getting at the stern in any increasing swell or wave action. I can almost hear it now as the hull "bobs"...."brrrrrrr" then "BRRRRR" then "brrrrr" again as the exhaust nears the surface then submerges again. Am I right?
 
Yeah - after my very first outing I learned to keep a hand on the remote throttle and I bring it way down, nearly to neutral, when the bow begins to pitch downwards. It sucks because especially when motoring into the wind, you lose drive and momentum by backing the power down to almost nothing, generally right when you need it most to punch through oncoming waves.

To a certain extent, you can only mitigate this problem so much on a sailboat. If the motor is mounted too low, you run a very real risk of submersion/swamping (pitching fore-aft, as well as following seas). Also in off-center mountings such as mine (I have a semi balanced rudder that protrudes a few inches beyond the transom), when motor-sailing on a port tack - the boat heeled or tipped over to starboard - the motor rotates along the longitudinal axis with the boat, and that can cause it to pop out easier. I don't want to center it mainly due to the extreme forces imparted to the rudder when reversing, were it remounted to be centered.

So it's a balance between submersing the lower unit enough to keep the prop and water intake beneath the surface, and keeping the powerhead dry. Whichever previous owner installed the mount in the first place, didn't do a great job in terms of the mounting height (among other illogical things I've discovered).
 
You can mitigate the outboard "swing" by tightening up your friction adjustment on the pivot tube. All the Hondas have this and it's easy to adjust. There is a lever (or there should be) that you simply should be able to move to the left or right to stiffen or loosen the friction for resisting the motor turning. It's a handy tool.

But I wanted to talk a bit more about the cooling issue.

The link below is for an inexpensive, non contact tachometer for checking RPM. I'm not recommending this one but it might work for you. I use a much higher quality tach but you really only need it to work once. Before buying anything though, I would check with a Pep Boys or an AutoZone to see if they will "loan" you one. The point is, if you find that the idle is at 900-990, I would not increase it.

Your old stat shows signs of a pretty "good" coating of "stuff. If there is any way you can get the outboard ashore and do a good cooling system flush in a trash can then I would do that. Although, I know what a complete PAIN that is likely to be.

If your idle is correct the pump should be able to provide MORE than adequate flow to keep the engine cool. The reason I first asked about how you had serviced the pump, is that I have found that replacing the impeller only is typically not a good practice. The impeller housing, which comes with the complete kit Honda offers, has MUCH to do with pump "efficiency" at any given rpm. If the housing is scored at all, and most are after years of service, the pump will not move water as it should. I have found that buying the complete kit and installing it is actually a bargain.

Just my experience and I wish you good luck.

https://www.amazon.com/Signstek-Pro..._5?s=automotive&ie=UTF8&qid=1472663520&sr=1-5
 
Last edited:
Thanks jgmo! I take it that the tachometer would require that the recoil starer be removed in order to be able to place the reflective sticker on the flywheel atop the engine? That is a clever invention, not totally unlike an old school timing light in that it physically measures the revolution of some rotating component.

Yeah regarding the suggestion to remove the motor, it weighs about 120 pounds and it's a bitch to remove and transport it. Inside the thermostat housing, the interior walls had a similar coating of "stuff".

I will look into purchasing a full-on water pump kit for the next time. I had a really hard time sourcing the proper impeller; it turns out the XL shaft "high thrust" models have a different diameter impeller shaft so although the outside size/shape of the impellers are identical, the inside diameter is larger for my motor. I wonder if I would have similar difficulties with the water pump kit (though one would reason that if the OD is the same, then the kit/housing would be the same, but probably not due to that larger shaft).

Sounds like I am narrowing down the problem; certainly there is some amount of buildup inside the water jacket (working with Salt Away and will try to remove the "pisser hose" to try to blast it out that way), but I need to check the idle RPMs and get the motor mounted lower.
 
Back
Top