Logo

82' 75hp Evinrude 3cyl not reaching full RPM when WOT

Lazeronu

Contributing Member
First time poster here. I apologize for anything I can't explain properly.

I have an 82 Evinrude 75hp 3cyl on a 2002 bass tracker 17footer.

Took out last 3 times and a would top out at 5200rpm. Fish for a bit and it would usually fire back up quickly. I did get stuck 1 time and waited it out and tried again. I thought it was mostly the new throttle cable that I replaced and needed tinkered with to find the magic spot for it. Messed with it and got it to a level where it would start no problem after stopping. It would idle at 1400rpm.

Today on the water started just fine. Ran about 30mins. Fished for 45. Moved to next spot as I was WOT, I saw my RPM drop to 420rpm and speed dump from 34mph to 22mph. We pulled over and I thought it was the throttle cable. Messed with that awhile but did not fix the problem. I also noticed when going from forward to neutral, the rpm would rev to 300rpm and stay. I would have to open the motor and manually push the throttle bar ??? Back to idle.

i went the rest of the day like this and it became pretty difficult to start if the motor rested for a period of time.

I looked around and came up with the following to trouble shoot with. Any direction is greatly appreciated!

1- check spark on plugs
2- squeeze fuel ball when WOT to see if rpm boost
3-check carbs possible sticking or need rebuild
4- check coils (CDI ???)
5- any other suggestions are appreciated
 
(First)
All spark plugs must be removed when testing for spark. A tester of some kind must be used whereas a gap of 7/16" can be set for the spark to jump.... the spark should be a strong blue lightning like flame, a real SNAP! Is it?

You can use a medium size philips screwdriver (#2 I believe) inserted into the spark plug boot spring connector, then hold the screwdriver shank approximately 7/16" away from the block to check the spark or build the following:

A spark tester can be made with a piece of 1x4 or 1x6, drive a few finishing nails through it, then bend the pointed ends at a right angle. You can then adjust the gap by simply twisting the nail(s). Solder a spark plug wire to one which you can connect to the spark plug boots, and a ground wire of some kind to the other to connect to the powerhead somewhere. Use small alligator clips on the other end of the wires to connect to ground and to the spark plug connector that exists inside of the rubber plug boot.

Using the above, one could easily build a spark tester whereas they could connect 2, 4, 6, or 8 cylinders all at one time. The ground nail being straight up, the others being bent, aimed at the ground nail. A typical 4 cylinder tester follows:

..........X1..........X2

.................X..(grd)

..........X3..........X4

Thousands of parts in my remaining stock. Not able to list them all. Let me know what you need and I'll look it up for you. Visit my eBay auction at:

http://shop.ebay.com/Joe_OMC32/m.html?_dmd=1&_ipg=50&_sop=12&_rdc=1
********************
(Second)
With all of the spark plugs still removed, take a compression test of all cylinders. What were the psi readings?
 
Joe. Psi readings for all 3 cylinders came in at 92-94psi.

spark on all three had an orangish color with a couple blue sparks here and there. Was a decent snap sound.

Where red do I go from here?
 
(First)
All spark plugs must be removed when testing for spark. A tester of some kind must be used whereas a gap of 7/16" can be set for the spark to jump.... the spark should be a strong blue lightning like flame, a real SNAP! Is it?

You can use a medium size philips screwdriver (#2 I believe) inserted into the spark plug boot spring connector, then hold the screwdriver shank approximately 7/16" away from the block to check the spark or build the following:

A spark tester can be made with a piece of 1x4 or 1x6, drive a few finishing nails through it, then bend the pointed ends at a right angle. You can then adjust the gap by simply twisting the nail(s). Solder a spark plug wire to one which you can connect to the spark plug boots, and a ground wire of some kind to the other to connect to the powerhead somewhere. Use small alligator clips on the other end of the wires to connect to ground and to the spark plug connector that exists inside of the rubber plug boot.

Using the above, one could easily build a spark tester whereas they could connect 2, 4, 6, or 8 cylinders all at one time. The ground nail being straight up, the others being bent, aimed at the ground nail. A typical 4 cylinder tester follows:

..........X1..........X2

.................X..(grd)

..........X3..........X4

Thousands of parts in my remaining stock. Not able to list them all. Let me know what you need and I'll look it up for you. Visit my eBay auction at:

http://shop.ebay.com/Joe_OMC32/m.html?_dmd=1&_ipg=50&_sop=12&_rdc=1
********************
(Second)
With all of the spark plugs still removed, take a compression test of all cylinders. What were the psi readings?

Joe. Psi readings for all 3 cylinders came in at 92-94psi.

spark on all three had an orangish color with a couple blue sparks here and there. Was a decent snap sound.

Where red do I go from here?
 
Get a different compression tester as your compression is low. Also how far did the spark jump should be blue all the time not orange.
 
That compression reading of 92 to 94 psi is extremely low. That engine should read well over 100 psi on all cylinders.

Hopefully your gauge is faulty or for some reason you have a slow cranking engine. All speak plugs should be out when testing the spark or compression.

If the engine is cranking over normally (very fast) and the compression still reads low, remove the cylinder head to check the sealing surfaces of the head and block, the condition of the head gasket, pistons, cylinder walls, etc.
 
Compression gauge was bad. Tried a friends. 135-140psi for all 3 cylinders. Also retested the spark. A blue spark at 3/8" inch. Very strong snap.
 
I took the boat out today. Motor held rpm at 4200rpm constant 98% of the day. I poured some sea foam in the gas. It hit 4800 and 5000 twice. While WOT it hit those rpm. I was move the throttle cables and had pumped ball. don't know whether it was coincidence or what. I could not get it to touch the rpm again while trying to replicate what I was doing.

While under WOT I pumped the primer ball. That did not help increase rpm. It would not stay rock hard (not sure if that normal).

I did notice while WOT at 4200rpm it felt as if there was a slight slip every once and while. It felt like the prop maybe slipping. This happened about half the time I was WOT. sometimes I would feel it. It fell like I was full bore then a slight microsecond of a drop. The motor did not sound to be loosing any power. It stay at a constant hmmmmm throughout the slipping feel.

Anything else I should try? Maybe prop related?
 
Good that your friend had a compression gauge that you could use to double check... saves a lot of work. The compression reading of 135-140 psi is normal... and I'll assume that the 3/8 spark you speak of holds true for a 7/16" gap.

So you have great compression and normal ignition/spark. That leaves a fuel problem or a bad propeller to boat combination. If you don't know what diameter and pitch that propeller is, remove the propeller nut and spacer to observe that information... on the prop in back of the spacer. What is it?

With the nut and spacer removed, mark the bronze hub and the propeller with a magic marker... have that mark in alignment. Now run the engine to engage that slipping action. After encountering that slipping action, observe that magic marker line you drew. If the prop/hub slipped the lines will no longer be aligned. Did it slip or was the mark still in a straight line?

The top rpm (WOT) of that 1982 75hp model is 5200-5800 rpm. A reading of 4800 rpm usually indicates that the engine is dropping one cylinder.

Things to check with the engine in gear BUT NOT RUNNING!

Double check the horizontal high speed jets located in the bottom center portion of the float chambers. I carefully use a piece of single strand steel wire to clean them as solvent just doesn't do that job properly. Also make sure that "all" butterflies are wide open (horizontal) at full throttle. Some models have butterflies that can go beyond wide open and start to close again... make sure that isn't happening.

Make sure that at full throttle, the timer base is up against the rubber stop of the full advance stop screw and that the timer base moves smoothly through it's complete range.

NOTE: In going back to your initial post, you state "Took out last 3 times and a would top out at 5200rpm." (Very Good!) That statement indicates that the propeller diameter and pitch are okay (if it doesn't slip) and that the problem is either fuel related or there's a intermittent ignition breakup that isn't showing up on the spark test. Ignition would have a sharp instantaneous change in performance whereas fuel would be a gradual change.

Spark plugs should be Champion QL77JC4 plugs, gaped at either .040 (original recommended gap) or .030 (revised gap made in the 1990's)..... The .040 is a stronger spark... the .030 provides longer plug life (your choice).
 
Last edited:
I marked the prop. When I take out again I will post results. The prop is 12.5x 19 4 blade.

i did notice the 4 small holes on each side on the lower gear case which suck in water had a screen on them. 5 of the 8 holes screens where broken and little bits where surrounding it. Not sure if this was like this before or if the little piece of plastic screen could harm and be sucked in.

The high speed jets were clear of debris.

all the butterflies were horizontal. I could adjust throttle cable to get them to open past horizontal. I adjusted to keep them horizontal.

Timer base moves smoothly with increase in throttle. It stops at rubber screw.

Spark plugs are champion ql77jc4 as u suggested. .040 gap.

I also want to note that I did not see a thrust washer after removing the prop. Is that normal? I don't know why that would affect it as I have taken the boat to full rpm multiple times before.
 
It must have a thrust washer.-------Perhaps it is stuck on or built into the prop.--------------Try these " no money " steps.-----------Look into each carburetor bore at full throttle.----------Out on the lake and use a strong flashlight.----Compare amount of fuel coming up the main nozzle.------Run with a timing light to see if you can find an ignition miss.-------A 19' pitch may be too much on a 17' boat.
 
As "Racerone" suggests, the prop thrust washer is no doubt stuck in the propeller... a common happening. Without a thrust washer, the propeller would dig into the gearcase and really tear it up!
 
I took the body out today.

Prop is is not slipping. Marks still matched.


while idling I took off all 3 spark plug wires. Cylinder 2 did not have an effect on the rpms at all. 1 and 3 did. I idled and no change. I revved to 5k and no change.

What at would be next to try?? Also is it safe to drive the boat under these conditions?

Thanks!
 
Say, the # 2 carburetor has an issue.------That could mean a lack of fuel.-------------Also a lack of oil.--------That could spell disaster if you keep running it like that.-------------------So take the # 2 carburetor apart and inspect reed valves when carburetor is off.
 
Ok I took it out really quick and ran for it for an hour.

I guess since it was idling it didn't not effect the 2nd cylinder. I ran it WOT and pulled all spark plugs 1 at a time. All cylinders would show a drop in rpm. I then ran the motor and pumped it with sea foam. It revved much higher but I still could not get the motor to go past 4200 rpm on the water WOT.
 
Ok so took out the spark plugs. Sparks 1 and 3 had some carbon buildup. Not much. The inside also had carbon build up as I looked in.

Spark 2 had water drops on it and was very clean. The inside was also very clean with what look like water drops as well.

I'm going to rebuild carb #2 next week.

Many concern is cylinder #2. Where do I go from here. Could the carb rebuild and reed inspection be enough to solve the problem?

thanks for all the help and suggestion!
 
Ok I pulled the head and to replace the gasket. Quite a bit of rust surrounded the outer part of the manifold. I would take this is bad news. It's mostly on the middle cylinder.

Can I remove this Rust and still get performance out of the motor?
what would be the best way to remove rust from inside the cylinder? Best way to remove outside the cylinder?
What is the best way to remove rust?

thanks for all the help!
 
I would carefully try mineral spirits and 400 or 600 wet/dry sandpaper on the cylinder walls. Plug the intake ports with rags to keep that solution out of the crankcase.

Outside the cylinder?.... I don't really understand that question, but am suggesting a flexible carbon scraper, sharp edge putty knife, etc.

I've never run into that scenario and hope that other members have a better understanding of where that rust is along with a better solution and join in here.
 
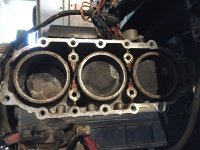
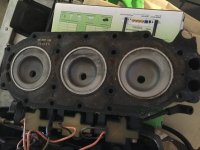
1464916520738.jpg1464916739664.jpg

Here are the 2 pictures. I hope they are in better detail as I did this on my phone. I was going to use a 1500 emery cloth with a touch of oil. And then a razor blade to scrap the edges of the bolts.

Thanks again for all the help!
 
I apologize, I posted with gasket on and did not take an after pic. Essentially where the rust is on the gasket is where the rust was on the head I pulled
 
Okay..... in cleaning the sealing surface of the block and cylinder head, I carefully use a very sharp edge scraper that resembles a putty knife... very carefully so as not to dig into the aluminum. I also go over those surfaces lightly with a wood block that is tightly wound with 220 sandpaper, then 400 sandpaper in a figure 8 pattern.

When installing the head bolts, torque them 18 to 20 foot pounds in the following sequence.... each number indicates a bolt. Tighten gradually, NOT all at once!

21...........22
17...........18
13...........14
7..8.....9..10
1..............2
6..5.......4..3
12...........11
16...........15
20...........19
 
Thanks again. I will take the boat out Saturday and update the thread.

Do I need to retorque after the boat has heated up and cooled?
 
Ok so on the water. Rpm have dropped to 3k and will not go higher after the gasket change. I pulled the 2nd spark plug and again water drops.

I have not rebuilt carb #2 yet.

i can definitely feel a skip or misfire now when WOT.

Is there anything else I can try on the water before taking it to a shop.
 
Ok so on the water. Rpm have dropped to 3k and will not go higher after the gasket change. I pulled the 2nd spark plug and again water drops. I have not rebuilt carb #2 yet. i can definitely feel a skip or misfire now when WOT. Is there anything else I can try on the water before taking it to a shop.

I couldn't see the sealing surfaces of the block or head in the pictures close enough to tell if there were any corroded trails between the water passages and the cylinders. That would have needed to be determined by you. If those surfaces turned out that there was just one slight "dig" trail between the water passage and the cylinder, the head gasket would be unable to prevent water from flowing through it.

If on the other hand, those sealing surfaces were perfect, and you torqued the head bolts properly, the water would be entering the cylinder via another route.... normally via the gaskets in the exhaust baffle plate on the port side of the engine and/or a warped exhaust baffle plate. If you decide to go into that (usually necessitates powerhead removal), replace the inner baffle plate #324555 with a new one as it is a troublesome thickness and prone to warping.... avoid double/repeat work!

Joe,

I really do appreciate the help! I have taken better pictures. To me, I do not see any dinks. Check out the images below, you can see clear "milky" water as well as some "grey goo" on the side pocket outside of cylinder 3.

http://postimg.org/gallery/c54wckzw/


To be clear. My next steps are:
exhaust gasket #317228
inner baffle plate #324555 ( i am looking to purchase right now)
gasket plate to crankshaft #317227

number 28,29,30 in diagram below.


upload images
 
I cannot seem to find the part 324555 anywhere.

Is this a tough part to find? Do i need to replace this? I know it is suggested and would like to, but i cannot find it for sale.
 
Back
Top