Always replace the condensers when replacing the points!
(Point Setting Of Magneto Models)
(J. Reeves)
Set the points as follows. Have the flywheel key aligned with the fiber rubbing portion of the ignition points. Adjust the gap so that a .020 gauge will pass thru but a .022 will not. Should there be any question of the points being dirty (touching the contact with your finger would cause them to be dirty), clean them with a small brush and acetone or lacquer thinner.
NOTE 1: Should the operating cam have a small portion on it with the word "SET" imprinted, align this portion with the fiber rubbing portion instead of the flywheel key.
NOTE 2: Should the cam have the word TOP embossed on the top of it, that is a cam that could be installed upside down and this is simply telling you which side is up. It is not a position where one would set the points.
Thousands of parts in my remaining stock. Not able to list them all. Let me know what you need and I'll look it up for you. Visit my eBay auction at:
http://shop.ebay.com/Joe_OMC32/m.html?_dmd=1&_ipg=50&_sop=12&_rdc=1
DO NOT attempt to check the spark by using the spark plugs... a waste of time! On that engine (magneto ignition), you must use some kind of spark tester whereas you can set a 1/4" gap for the spark to jump which must be a strong blue lightning like flame... a real SNAP! Adjustable spark gap testers can usually be found at any auto parts store... or you can build one such as the following.
(Spark Tester - Home Made)
(J. Reeves)
You can use a medium size philips screwdriver (#2 I believe) inserted into the spark plug boot spring connector, then hold the screwdriver shank approximately 7/16" away from the block to check the spark or build the following:
A spark tester can be made with a piece of 1x4 or 1x6, drive a few finishing nails through it, then bend the pointed ends at a right angle. You can then adjust the gap by simply twisting the nail(s). Solder a spark plug wire to one which you can connect to the spark plug boots, and a ground wire of some kind to the other to connect to the powerhead somewhere. Use small alligator clips on the other end of the wires to connect to ground and to the spark plug connector that exists inside of the rubber plug boot.
Using the above, one could easily build a spark tester whereas they could connect 2, 4, 6, or 8 cylinders all at one time. The ground nail being straight up, the others being bent, aimed at the ground nail. A typical 4 cylinder tester follows:
..........X1..........X2
.................X..(grd)
..........X3..........X4
Thousands of parts in my remaining stock. Not able to list them all. Let me know what you need and I'll look it up for you. Visit my eBay auction at:
http://shop.ebay.com/Joe_OMC32/m.html?_dmd=1&_ipg=50&_sop=12&_rdc=1
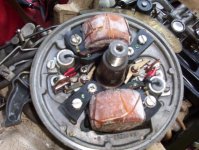
Now, where the metal portion of the coils sit upon the aluminum surface of the armature plate.
(Magneto & Driver Coil Alignment)
(J. Reeves)
To align the coils properly, have the metal vertical portion of the coil yokes aligned with the inside edge of the bevel that exists on the top portion of the aluminum seat upon which the coils sit. This creates the proper distance between the coils and the flywheel magnets. Faulty alignment creates friction and the yokes of the coils heat up, turn blue and expand.
Thousands of parts in my remaining stock. Not able to list them all. Let me know what you need and I'll look it up for you. Visit my eBay auction at:
http://shop.ebay.com/Joe_OMC32/m.html?_dmd=1&_ipg=50&_sop=12&_rdc=1
The recommended and alternative spark plugs for that engine are: Champion J4C or J6C plugs gaped at .030. Use no others! The J6C would be the better choice due to the age of the engine.