Logo

BF20D charging system control switching

olliric

New member
Hello,
I have just bought a 400 Ah LiFePo4 battery for my performance sailing catamaran. I will have multiple charging sources most of which programmable. The exceptions are the 2 Hondas BF20D which when the battery is charged can put out up to 14.9 volts with a 12 A max charge. The battery max charge voltage is 14 V so if the battery is charged and the engines need to be run there is a risk of overcharging and setting off the Battery Management System safety relay that will cut off the charging bus bar and possibly fry the alternators.
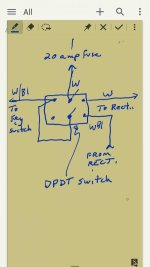
The idea is to have a relay controlled by the battery monitor that will interrupt the exciter coil or a wire in the regulator/rectifier when the state of charge is 100%. By Looking at the enclosed diagram from the service manual I guess the Y/Bl yellow black wire that goes from the regulator to the CDI unit seems a good candidate. The exciter coil is directly connected to the CDI so there are no direct connection between the regulator and the exciter coil. The other wires on the regulator have other functions. W (White) regulated dc to the battery, the 2 greys are unregulated ac into the rectifier bridge, White black is positive in from the ignition switch. The strange thing is that the the CDI unit is powering the exciter. I suspect that the Y/Bl is sensing the voltage generated by the charging coil. If that is the case then if I open the circuit it may actually crank up the exciter current. So maybe cutting the exciter coil circuit may be a better option.
I hope some one here is familiar with this engine charging system.
CheersView attachment Charging system.pdf
 
Cut the exciter coil wire and the engine will stop.

You might look at one or both of the grey leads from the charge coil. Opening that circuit will cut off the ac input to the rectifier.

I am not sure what that will do to the reg/rect.

If you have both motors connected to the one battery, then when the motors are running and charging, the two regulators are looking at the battery and the other regulator. I question whether either motor really will be putting out a full charge. One will see the other 14 + volts on the battery and possibly not charge. The other one may be doing the same thing and cause some sort of see saw condition.

Each motor is supposed to have its own battery, then everything is clean. Since this is probably not the case in your situation, cutting the output from the charge coils might be the best option. You will just have to make some current readings to see what the engine charging systems are really doing, when both are connected to one battery versus just one at a time.

I am sure that you want to charge the battery as quickly as you can and run the motors as little as possible while sailing, so some testing will be in order.

Those batteries looks like a super battery. Just checked out some testing done on them on YouTube.

Keep us posted on your findings and how you eventually connect everything up.

Mike
 
Thanks for your input Mike.
Can you pls articulate why the engine would die if I open the exciter circuit?
I suspect that the engine could run off the battery voltage even when nothing is generated, you should not be loosing the engine if the alternator packs in. The Rectifier/regulator is always connected to the positive of the battery and the W/Bl wire exit the regulator and feeds the ignition key which when turned energizes the Bl/Y (load, see bottom of diagram for ignition key wiring) which powers up the CDI via the buzzer Y/G. When the engine shuts down on oil LP or water HT the CDI switches Y/G to ground and the buzzer sounds. I enclose the continuity checks on the remote control box.
The regulators are set to put out 14.9 V. I have a solar array so the battery is always fully charged when the boat is not in use. If I start one engine and rev up I get the 14.9. Definitely dangerous for my fancy battery. Also when I motor in calm waters I always use only one engine. So I need to find a way to stop the charging in a way that will not damage the alternator.
The AC output from the alternator may not be easy to switch with a small relay. There is also the potential issue that when the battery state of charge drops, the relay will close while the engine is under load. The voltage regulator may not like it :(
Although by testing I should probably figure it out there is the risk of frying something in the process. Do you know any body fluent with this system?
Cheers


View attachment Control box electrical 244.pdf

Cut the exciter coil wire and the engine will stop.

You might look at one or both of the grey leads from the charge coil. Opening that circuit will cut off the ac input to the rectifier.

I am not sure what that will do to the reg/rect.

If you have both motors connected to the one battery, then when the motors are running and charging, the two regulators are looking at the battery and the other regulator. I question whether either motor really will be putting out a full charge. One will see the other 14 + volts on the battery and possibly not charge. The other one may be doing the same thing and cause some sort of see saw condition.

Each motor is supposed to have its own battery, then everything is clean. Since this is probably not the case in your situation, cutting the output from the charge coils might be the best option. You will just have to make some current readings to see what the engine charging systems are really doing, when both are connected to one battery versus just one at a time.

I am sure that you want to charge the battery as quickly as you can and run the motors as little as possible while sailing, so some testing will be in order.

Those batteries looks like a super battery. Just checked out some testing done on them on YouTube.

Keep us posted on your findings and how you eventually connect everything up.

Mike
 
To explain what I mean about the exciter coil.....

The exciter coil supplies a constant high voltage (over 100v) to the CDI unit. The Pulse generator supplies timed low voltage pulses to the CDI unit (Bu and Bl leads) and tells it when to pass that high voltage (momentarily) to the spark coil...producing the spark. Thus....no output from exciter....engine does not run. The engine does not need the battery to run. It only uses the battery to crank the starter to start the engine.

I do not know of anyone, other any JGMO, who may know about the rectifier. There is nothing written, that I know of describing its operation. However, I will give you my best interpretation, looking at the circuit diagram. It has been a long time since I did any circuit design, but I think I can make sense out of most of its operation. It would be easier, if I could see the actual circuit inside, but here goes.

I will go over my interpretation of each of the leads going/coming into/out of rectifier. I will refer to it as rectifier, so I do not have to type regulator/rectifier each time.

Simple one first....Bl is the ground

The W lead seems to be both the sensing lead (to see if the battery is charged) and the charging lead. It also receives 12v input to the rectifier which then goes out the WBl lead, which provides 12v power to the key switch.

The two Gr leads comes from the Charge Coil, which supplies the low voltage AC (my guess around 20 - 25vac ) which the rectifier changes to DC to charge the battery through the W lead.

This is the part that is a subject to interpretation....so if anyone else wants to jump in (Jimmy), please do so....

The Y/Bl takes the output from the Br lead from the SE Thermal Valve coil (under the flywheel) and does a couple of things along the way. It provides a connection to the CDI, to provide, what I think is the signal so the CDI knows when the engine overrevs. The lead then continues to provide and output for a tachometer changing to a Gr lead.

Lastly, the Br/W lead provides a half rectified voltage to power the SE valve (which is a starter enrichener). This valve is the white round object on top of your carburetor. It is a valve that is open when the engine is cold and allows a richer mixture of fuel and air for starting. You will notice the idle somewhat high at start up. As the valve heats up (due to the power from the Br/W lead), the valve slowly closes, thus cutting off the extra fuel/air mixture and slowing the motor to standard idle.

So, there is a lot going on with this simple little box.

One concern I would have with cutting the output from the charge coil on and off when the engine is running at full speed is the transient voltages (voltage spikes) that could occur the rectifier. Those spikes could ultimately cook your rectifier.

So at this point, I have no completely safe solution to your situation.

As I typed that, I do have one thought. What if you cut the charging of the motors off completely....all the time until you manually turn it back on. It appears that this could be done with a double pole double throw switch. You would tap in where the W leads come together and the W/Bl leads come together at the connecting block. You would insert the switch so that when it is thrown one way, the charging system works as it should. Throw the switch the other way and the W/Bl lead and the W lead are opened and the 20 amp fused voltage does not go to the rectifier but is routed around it to the W/Bl lead to the keyswitch. Everything else should work as normal on the engine (assuming the SE valve voltage is a separate circuit inside the rectifier). That would have to be tested. So there is no voltage to the rectifier but the keyswitch can start the motor.

The switch should only be operated when the motor is not running...thus avoiding any spikes. You should know from your charge gauge on your battery whether you need the extra charging of the motors or not.

Here is a crude circuit, that I drew on my phone. Your motors may have a grommet plugging a hole in the front of the engine (normally used for the oil pressure light -- which is not there if you have remote controlled engines) You could install a toggle switch there...or even extend it to a control panel, if you wanted to get really fancy. Of course, you would need one for each engine.

So....I am not offended if anyone wants to jump in and say it will not work or has a better solution. That is what this is all about.

Mike
 

Attachments

  • circuitforchargecutoff.jpg
    circuitforchargecutoff.jpg
    29.1 KB · Views: 55
Mike, thanks for your valuable input. Hopefully a bit by bit the mystery will be solved.
Alternator:
I am more familiar with alternators in the MW class but some of the principles should apply to this one. The word exciter in elect. machine refers to the field which is the magnetic field to be applied to the machine to produce AC. It is a DC voltage usually applied to the rotor. Voltage regulation of the alternator usually is done by varying the DC supplied to the exciter coil.
So unless the engine has a permanent magnet to generate the field the exciter coil has to be fed rather than producing voltage. If the exciter coil produces voltage how does the voltage regulation happen?
As for the regulator wiring I think you are right but you forgot the W/Bl. What is your take on that? The key to the question is how the alternator output is regulated.
The manual switching is not very practical and is subject to the the risk of automatic switching. Sometime i will forget the sequence you mentioned.
Provided that is safe to just open the output (W wire) that it can be easily done by the battery monitor and a relay as I originally explained. The issue is if the system can tolerate the infinite resistance of the open circuit. The battery does have some resistance. The other issue is the transient current upon switching.
Another way would be to switch on an external resistance on the output to simulate the battery resistance.
Cheers


To explain what I mean about the exciter coil.....

The exciter coil supplies a constant high voltage (over 100v) to the CDI unit. The Pulse generator supplies timed low voltage pulses to the CDI unit (Bu and Bl leads) and tells it when to pass that high voltage (momentarily) to the spark coil...producing the spark. Thus....no output from exciter....engine does not run. The engine does not need the battery to run. It only uses the battery to crank the starter to start the engine.

I do not know of anyone, other any JGMO, who may know about the rectifier. There is nothing written, that I know of describing its operation. However, I will give you my best interpretation, looking at the circuit diagram. It has been a long time since I did any circuit design, but I think I can make sense out of most of its operation. It would be easier, if I could see the actual circuit inside, but here goes.

I will go over my interpretation of each of the leads going/coming into/out of rectifier. I will refer to it as rectifier, so I do not have to type regulator/rectifier each time.

Simple one first....Bl is the ground

The W lead seems to be both the sensing lead (to see if the battery is charged) and the charging lead. It also receives 12v input to the rectifier which then goes out the WBl lead, which provides 12v power to the key switch.

The two Gr leads comes from the Charge Coil, which supplies the low voltage AC (my guess around 20 - 25vac ) which the rectifier changes to DC to charge the battery through the W lead.

This is the part that is a subject to interpretation....so if anyone else wants to jump in (Jimmy), please do so....

The Y/Bl takes the output from the Br lead from the SE Thermal Valve coil (under the flywheel) and does a couple of things along the way. It provides a connection to the CDI, to provide, what I think is the signal so the CDI knows when the engine overrevs. The lead then continues to provide and output for a tachometer changing to a Gr lead.

Lastly, the Br/W lead provides a half rectified voltage to power the SE valve (which is a starter enrichener). This valve is the white round object on top of your carburetor. It is a valve that is open when the engine is cold and allows a richer mixture of fuel and air for starting. You will notice the idle somewhat high at start up. As the valve heats up (due to the power from the Br/W lead), the valve slowly closes, thus cutting off the extra fuel/air mixture and slowing the motor to standard idle.

So, there is a lot going on with this simple little box.

One concern I would have with cutting the output from the charge coil on and off when the engine is running at full speed is the transient voltages (voltage spikes) that could occur the rectifier. Those spikes could ultimately cook your rectifier.

So at this point, I have no completely safe solution to your situation.

As I typed that, I do have one thought. What if you cut the charging of the motors off completely....all the time until you manually turn it back on. It appears that this could be done with a double pole double throw switch. You would tap in where the W leads come together and the W/Bl leads come together at the connecting block. You would insert the switch so that when it is thrown one way, the charging system works as it should. Throw the switch the other way and the W/Bl lead and the W lead are opened and the 20 amp fused voltage does not go to the rectifier but is routed around it to the W/Bl lead to the keyswitch. Everything else should work as normal on the engine (assuming the SE valve voltage is a separate circuit inside the rectifier). That would have to be tested. So there is no voltage to the rectifier but the keyswitch can start the motor.

The switch should only be operated when the motor is not running...thus avoiding any spikes. You should know from your charge gauge on your battery whether you need the extra charging of the motors or not.

Here is a crude circuit, that I drew on my phone. Your motors may have a grommet plugging a hole in the front of the engine (normally used for the oil pressure light -- which is not there if you have remote controlled engines) You could install a toggle switch there...or even extend it to a control panel, if you wanted to get really fancy. Of course, you would need one for each engine.

So....I am not offended if anyone wants to jump in and say it will not work or has a better solution. That is what this is all about.

Mike
 
Sorry. The W/Bl lead provides 12v to the key switch to start the engine and to provide power to the gauges.

There are permanent magnets in the flywheel that pass by all of the coils that we have been discussing. To prove it, you can disconnect the battery from the engine and pull start the engine. You just have to remember to turn the keyswitch to on. When the keyswitch is turned off, it acts like pulling the safety landyard and kills the spark.


If you disconnect the W lead, you will not be able to start the engine by the keyswitch. However, you could open the connection in the W/Bl lead and supply a fused 12v to the W/Bl lead at the key switch. Then you could open and close the W lead with your relay. Then we are back to our transient problem of switching while the motor is running. That may be where you could use some sort of resistor in series with the W lead and the relay would bypass the resistor or allow the resistor in the circuit. So, the engine may still be putting a charge out to the battery (although it should be minimal) and the relay could short across it for full charging. It would be nice is the resistance could vary as the change is made to essentially ease into the circuit.

Alternately, you could leave the W/Bl lead connected as normal and put the resistor in one of the charge coil leads, and switch it in and out of the circuit with the relay. As above, if there was a way for the resistance to varying for easing in and out and minimizing any spikes. Just can not think of what that is at this time...or even if it exists.

There is probably a way to automate it all with a "if this then that" circuit....considering engine running, engine not running, battery fully charged, battery needing charge, etc.

I know you are looking for the KISS (keep it simple stupid) solution. There may be one, but there are too many unknowns regarding switching while running.

This is an interesting mental exercise for my feeble brain. Maybe, if I let my subconscious mind work on it while I sleep or do other things...something simple may come to mind.

Mike
 
Yes, because of the permanent magnet this alternator is different form the automotive type. Because of that maybe switching on and off the charging output (W wire) may not be such a problem. I would need a direct feed to the key switch as you mentioned.
The battery voltage would be at around full charge when switching occurs so the current will be limited by the regulator.
A simpler and safer way would be to leave the Hondas alone and switch on and off with the output of the battery monitor a load (a rheostat) on the system to create a voltage drop in the Honda alternator output down to the safe 14 V from 14.9 V. With a rheostat the correct load could be fine tuned.
How many watts load would I need to drop 0.9 V??


Sorry. The W/Bl lead provides 12v to the key switch to start the engine and to provide power to the gauges.

There are permanent magnets in the flywheel that pass by all of the coils that we have been discussing. To prove it, you can disconnect the battery from the engine and pull start the engine. You just have to remember to turn the keyswitch to on. When the keyswitch is turned off, it acts like pulling the safety landyard and kills the spark.


If you disconnect the W lead, you will not be able to start the engine by the keyswitch. However, you could open the connection in the W/Bl lead and supply a fused 12v to the W/Bl lead at the key switch. Then you could open and close the W lead with your relay. Then we are back to our transient problem of switching while the motor is running. That may be where you could use some sort of resistor in series with the W lead and the relay would bypass the resistor or allow the resistor in the circuit. So, the engine may still be putting a charge out to the battery (although it should be minimal) and the relay could short across it for full charging. It would be nice is the resistance could vary as the change is made to essentially ease into the circuit.

Alternately, you could leave the W/Bl lead connected as normal and put the resistor in one of the charge coil leads, and switch it in and out of the circuit with the relay. As above, if there was a way for the resistance to varying for easing in and out and minimizing any spikes. Just can not think of what that is at this time...or even if it exists.

There is probably a way to automate it all with a "if this then that" circuit....considering engine running, engine not running, battery fully charged, battery needing charge, etc.

I know you are looking for the KISS (keep it simple stupid) solution. There may be one, but there are too many unknowns regarding switching while running.

This is an interesting mental exercise for my feeble brain. Maybe, if I let my subconscious mind work on it while I sleep or do other things...something simple may come to mind.

Mike
 
(a rheostat)
Seems like the damage proof answer.

I connected my New battery charger today to my old 'deep-cycle' (Costco's smallest) and it showed voltage expanding from 13.4 to 15.3 (within twenty minutes or so) and then it cut off showing 100% charged.

Great to see the battery technology expanding as you have posted.
Art
 
Would you be putting the load in series (in the W lead) or across the output (which would be across the positive and negative of the battery)?

If it is across the output, the load would probably cause the regulator to put out more current, due to the demand. So, it might work counter to what you are trying to do.

If it is in series, then the resistance needed for a 0.6v drop will depend on the current output at any particular time. It could vary from zero to 12 or so amps.

If there is 1 amp output then using ohm's law E=IR R= 0.6v/1amp = .6 ohms The wattage would be EI = .0.6v x 1amp = .6 watts As a rule you should double the wattage to 1.2 watts for best power dissipation. So a minimum of 1.2 watt rheostat set at .6 ohms.

If there is 12 amp output, then using ohm's law E=IR again R = 0.6v/12 amp = 0.05 ohms (pretty small) The wattage would be EI = 0.6v x 12 amps = 7.2 watts. Doubled would be a minimum of 14.4 watt rheostat set at 0.05 ohms. So.....what is the real setting for the rheostat? I am not sure.


All that being said, I have never measured the charging output of these motors over time until the battery is fully charged. Once it is fully charged, the output may be so minimal (if the regulator works well) that maybe all of this modification may not even be necessary. It might be worth checking that out. Or maybe you have.....

Mike
 
Long ago, we were preparing for a voyage across the State (Florida) and at 'dark-thirty" I discovered search light had turned on when hatch was closed and not only melted cover, but killed the battery.

Pull-Start Honda 'kicker' saved the day as the ten minutes it took for it to get us out to the ICW, it had charged battery (@ 5 Amps) enough to start main (Yamaha) engine and voyage proceeded without any further problems.
Art
 
The rheostat would not be on the engine wire. It would be connected via the distribution system. Just like any other load. Today I did a bit of testing. I would run up the engine then switch on the 6A fridge to see the voltage drop. Unfortunately in the middle of the testing one of the engine would no longer start so I ended up trouble shooting the engine instead. The 6A load would cause a .3V drop. So I think I would need to put a load similar to the engines output (12Ax2). So a rheostat that could be adjusted up to about 250/300 watts.
Hopefully I'll do some more testing tomorrow and post the results.
Another issue that may affect the voltage is the battery resistance which I suspect is different between batteries types.


Would you be putting the load in series (in the W lead) or across the output (which would be across the positive and negative of the battery)?

If it is across the output, the load would probably cause the regulator to put out more current, due to the demand. So, it might work counter to what you are trying to do.

If it is in series, then the resistance needed for a 0.6v drop will depend on the current output at any particular time. It could vary from zero to 12 or so amps.

If there is 1 amp output then using ohm's law E=IR R= 0.6v/1amp = .6 ohms The wattage would be EI = .0.6v x 1amp = .6 watts As a rule you should double the wattage to 1.2 watts for best power dissipation. So a minimum of 1.2 watt rheostat set at .6 ohms.

If there is 12 amp output, then using ohm's law E=IR again R = 0.6v/12 amp = 0.05 ohms (pretty small) The wattage would be EI = 0.6v x 12 amps = 7.2 watts. Doubled would be a minimum of 14.4 watt rheostat set at 0.05 ohms. So.....what is the real setting for the rheostat? I am not sure.


All that being said, I have never measured the charging output of these motors over time until the battery is fully charged. Once it is fully charged, the output may be so minimal (if the regulator works well) that maybe all of this modification may not even be necessary. It might be worth checking that out. Or maybe you have.....

Mike
 
Thanks for the suggestion, I look in this kind of switchgear before. For various reasons I don't want additional starting batteries. Even if I was to have them I would still have the problem of damaging the LiFePo4 battery. With the product you suggested they would be paralleled while charging. If I were to keep them separate I would loose the handy engine charging.

http://www.ebay.com/itm/Blue-Sea-Sy...ash=item19f3fad325:g:sO0AAOSwfcVUHAMO&vxp=mtr
IDK maybe something like this I would want the house on a separate circuit from the motors. The motors should have their own batteries in my opinion.
 
Again, I am not sure adding a load will help, but it is an interesting approach.

The 6A load that you added is an inductive load (compressor) but if you ignore that, I think the internal battery resistance can be calculated (approximately).

If we consider everything pure resistive load and the refrigerator is drawing 6a. If there were no loads on the battery before you started, there was negligible current flow from the battery when first measured. If the voltage dropped by .3v when there was a 6 a load, then the internal resistance is .3v/6a = .05 ohm.

Maybe that will help in any calculation that you will do.

Mike
 
I've been lurking on this one and while I think this particular problem may be a bit above my pay grade....I believe the simple solution is to just stop charging...per your original idea of using the battery monitor system to to operate a relay to cut power from the CHARGE COIL. Not the exciter coil.

This approach will CERTAINLY pose no threat to the coil so the only consideration would be any "line voltage spike" that may occur when the relay points open affecting the voltage regulator. I think that is easily addressed by using a spike suppressor relay. The relays used in automotive systems to protect the ECM from spikes are capable of dissipating 5,000+ volts and would probably work in this case to protect the voltage regulator.

HOWEVER...I wouldn't take MY word for it.

I mean ME....

...I.....MYSELF....

......wouldn't take MY word for it.

I'd ask an electrical engineer....or....I would just spend the $60.38 and have a brand spankin' new rectifier/relay assembly handy in case I was DEAD WRONG.

But HEY....isn't that what SCIENCE is all about?? EXPERIMENTATION? And...if you can EXPERIMENT with someone else's money.....

SCIENCE can be REALLY FUN!

Good luck figgerin' it all out.
 
Just for chuckles....I get on the ol' web and start looking up LiFePo4 (Lithium Iron Phosphate) batterias....and WHOA MOLLY!...

...HOW MUCH did you pay for that thing anyway??!!

I was looking at a 12v. 50ah for the tidy sum of $469.99! What does a 12v. 400ah copy of one of these set a fella back for?
WHEW!
 
I paid 1600 USD exworks China.

Just for chuckles....I get on the ol' web and start looking up LiFePo4 (Lithium Iron Phosphate) batterias....and WHOA MOLLY!...

...HOW MUCH did you pay for that thing anyway??!!

I was looking at a 12v. 50ah for the tidy sum of $469.99! What does a 12v. 400ah copy of one of these set a fella back for?
WHEW!
 
I have two solar chargers and an inverter charger.

Both 20s have their own charging system correct? You do not want to run both motors together on the same battery period. What all othere charging systems are you referring to? Having a emergency backup is allways a good upgrade just keep one engine on its own battery and you can use the other motor to charge the house battery.
 
Do you have any details of these spike suppressors?

I've been lurking on this one and while I think this particular problem may be a bit above my pay grade....I believe the simple solution is to just stop charging...per your original idea of using the battery monitor system to to operate a relay to cut power from the CHARGE COIL. Not the exciter coil.

This approach will CERTAINLY pose no threat to the coil so the only consideration would be any "line voltage spike" that may occur when the relay points open affecting the voltage regulator. I think that is easily addressed by using a spike suppressor relay. The relays used in automotive systems to protect the ECM from spikes are capable of dissipating 5,000+ volts and would probably work in this case to protect the voltage regulator.

HOWEVER...I wouldn't take MY word for it.

I mean ME....

...I.....MYSELF....

......wouldn't take MY word for it.

I'd ask an electrical engineer....or....I would just spend the $60.38 and have a brand spankin' new rectifier/relay assembly handy in case I was DEAD WRONG.

But HEY....isn't that what SCIENCE is all about?? EXPERIMENTATION? And...if you can EXPERIMENT with someone else's money.....

SCIENCE can be REALLY FUN!

Good luck figgerin' it all out.
 
Mike, here are the results of the testing.
Battery voltage: 13.67
Voltage with port engine on: 14.8
Fridge on: 14
Battery: 13.2
Voltage with stbd engine: 15.32
Fridge on: 14
Both engines running: 14.96
Fridge on: 14.68

So if had another 12 A load I would keep the system voltage at around 14V. So basically put a load on that is similar to the engines alternator output.
This is with the AGM battery. The LiFePo4 battery has an impedance of less or equal to 0.5 mOhm. I wonder would would be the difference?

Again, I am not sure adding a load will help, but it is an interesting approach.

The 6A load that you added is an inductive load (compressor) but if you ignore that, I think the internal battery resistance can be calculated (approximately).

If we consider everything pure resistive load and the refrigerator is drawing 6a. If there were no loads on the battery before you started, there was negligible current flow from the battery when first measured. If the voltage dropped by .3v when there was a 6 a load, then the internal resistance is .3v/6a = .05 ohm.

Maybe that will help in any calculation that you will do.

Mike
 
Well, allow myself to correct......myself.

If you were to "break the line" of the charge coil with a relay....you would not ONLY need that relay to have a suppression diode but you would ALSO want a TVSS (transient voltage surge suppressor) diode installed in a "bi-polar" manner BETWEEN the two leads to the coil. It all looks simple enough to do and these folks may be able to lend you a hand:

http://www.littelfuse.com/products/tvs-diodes.aspx

Here is a good example of a dual zenor "avalanche" suppression diode...and these guys are giving away FREE samples!

The best AC line spike suppressive illustration I could find is here:

https://www.google.com/search?q=tra...ZYriBWXfM:&usg=__7pPr-cn6RwVTjfd8RZgaJxalfYE=

As far as the relay is concerned....it would look something like this:
http://www.partdeal.com/cole-hersee...map=77173865&gclid=CKP89MDt4cgCFYeCfgod86wNTA

And here are a couple of YouTube videos I thought you might find entertaining:

https://www.youtube.com/watch?v=LXGtE3X2k7Y

And:

https://www.youtube.com/watch?v=WaIT-koyo1w

And while it's obvious that BOTH of these guys are WAY smarter than me....they each made "errors" while filming their videos. Did you catch them?
 
Last edited:
Very interesting material you came up with! Thank you.
However, from the video is seems that the suppression diodes eliminate the spiking on only the coil circuit of the relay. Not the motor charge coil. So the issue of possible damage to the voltage regulator remains. To complicate the matter is that the charge coils put out AC of so far unknown voltage.

Well, allow myself to correct......myself.

If you were to "break the line" of the charge coil with a relay....you would not ONLY need that relay to have a suppression diode but you would ALSO want a TVSS (transient voltage surge suppressor) diode installed in a "bi-polar" manner BETWEEN the two leads to the coil. It all looks simple enough to do and these folks may be able to lend you a hand:

http://www.littelfuse.com/products/tvs-diodes.aspx

Here is a good example of a dual zenor "avalanche" suppression diode...and these guys are giving away FREE samples!

The best AC line spike suppressive illustration I could find is here:

https://www.google.com/search?q=tra...ZYriBWXfM:&usg=__7pPr-cn6RwVTjfd8RZgaJxalfYE=

As far as the relay is concerned....it would look something like this:
http://www.partdeal.com/cole-hersee...map=77173865&gclid=CKP89MDt4cgCFYeCfgod86wNTA

And here are a couple of YouTube videos I thought you might find entertaining:

https://www.youtube.com/watch?v=LXGtE3X2k7Y

And:

https://www.youtube.com/watch?v=WaIT-koyo1w

And while it's obvious that BOTH of these guys are WAY smarter than me....they each made "errors" while filming their videos. Did you catch them?
 
"the suppression diodes eliminate the spiking on only the coil circuit of the relay. Not the motor charge coil. So the issue of possible damage to the voltage regulator remains."

CORRECT! However, that is WHY I offered the DUAL ZENER "AVALANCHE" DIODE solution! It is what is used in in low to medium voltage AC electrical circuits to suppress spikes. Up to about 600vac!

I don't know for certain what the charge coil output voltage is but it will PROBABLY top out at somewhere near 120vac at full engine rpm. THAT is EASILY measured if it is a concern to you and WELL within the capability of the dual zener diode suppressor.

So....Wire in the zener on the AC coil lines from the charge coil to the voltage regulator being careful to select the two GRAY connectors to gain access to the charge coil wires (green insulation in the schematic you provided). And use a suppressor equipped relay to protect the switching circuit of your battery monitor. Set the monitor to switch at 14v. DONE.

The BIGGEST problem I can see with this is that the battery monitor will need to have some "hysteresis" built in...say .5vdc... to keep from "chattering" the relay as the voltage rises above and falls below 14 volts. Hopefully yours is already equipped with this feature or it provides for you to adjust "cut in/cut out" voltages.

Whatever you decide to do....I wish you good luck.
 
If you are continuing down the avenue of applying a load on to the battery equivelant to the output of the motors, you are negating any output from the motors...thus getting no charge. The added challenge is that the motors output will vary by speed of the motors.

If I am assuming correctly that during racing, you would want all to be automatic....you would not be running the engines at that time....and a little manual intervention might be ok.

Maybe you can simplify this whole thing. I know I am repeating myself from so previous post...and you prefer to make things automated...but.....

Put a switch on the motor that opens the output of the charge coil and keep it turned off all the time (a variation of kimcrwbr1's suggestion) If at any time you need that extra charging from the motors, simply operate the switch/switches before you start the motor/motors. Then you do not have to be concerned with any spiking. Have your automated system provide an audible tone when the battery is fully charged and when either motor is running. Then, as long as it is safe, momentarily turn off the motors....flip the switch and restart the motors.

You could active the tone by using 12v output from the motors keyswitch through your sensing circuit relay. If the motor is on and the sensing relay is on then you get a tone. When the motor is off and the sensing relay is on, you get no tone..

If the motors are easy to get to, the switch can be installed in one of the grommeted holes on the front of the engines. Or.....you could remote it (with the switch on your control panel) using a small relay on the motor. Use the break contacts of the relay, so that if something fails, the motors will always put out a charge.

All I can say is, you are getting a lot of ideas. I hope you can find something that will finally work the way you want.

Mike
 
So a simple bi-directional diode accross contact 30 and 87 (see relay from West marine-Hella enclosed) will solve all the issue of possibly frying the charge system? It sounds like it is almost too nice to be true :p. But it does make sense and is a good idea, thanks. I guess I could give it a try, one engine at the time.....
As for the relay control there are no issues. Instead of having the relay controlled by the relay output of the battery monitor on state of charge I would wire it as high voltage control. See enclosed battery monitor manual extract. I would the have it to switch the charging back on and off between 14.3 and 14.1. There is also a time delay on switching to eliminate unwanted operation due to transient loads. Victron rocks!
As for measuring the charging coil output I am a bit afraid to test it. The simple way would be to open a grey wire connector and stick the multimeter to it. Which will is like cutting the wire and creating infinite resistance. The regulator may not like it.

View attachment hella relay 931680011 Data Sheet.pdf
View attachment Manual-BMV-700-700H-702-EN-NL-FR-DE-ES-SE-PT-IT 23.pdf

"the suppression diodes eliminate the spiking on only the coil circuit of the relay. Not the motor charge coil. So the issue of possible damage to the voltage regulator remains."

CORRECT! However, that is WHY I offered the DUAL ZENER "AVALANCHE" DIODE solution! It is what is used in in low to medium voltage AC electrical circuits to suppress spikes. Up to about 600vac!

I don't know for certain what the charge coil output voltage is but it will PROBABLY top out at somewhere near 120vac at full engine rpm. THAT is EASILY measured if it is a concern to you and WELL within the capability of the dual zener diode suppressor.

So....Wire in the zener on the AC coil lines from the charge coil to the voltage regulator being careful to select the two GRAY connectors to gain access to the charge coil wires (green insulation in the schematic you provided). And use a suppressor equipped relay to protect the switching circuit of your battery monitor. Set the monitor to switch at 14v. DONE.

The BIGGEST problem I can see with this is that the battery monitor will need to have some "hysteresis" built in...say .5vdc... to keep from "chattering" the relay as the voltage rises above and falls below 14 volts. Hopefully yours is already equipped with this feature or it provides for you to adjust "cut in/cut out" voltages.

Whatever you decide to do....I wish you good luck.
 
Mike thanks for your input. At this stage I think that jgmo's idea of a bi-directional diode across the charge coil relay connection seems the simplest and most accurate way to do it especially using the high voltage alarm switching option. Given that the risk is only probably worth some hassle and 63 USD of voltage regulator it may be worth a try. Be nice to have some second or third opinion though.
What do you think of it?


If you are continuing down the avenue of applying a load on to the battery equivelant to the output of the motors, you are negating any output from the motors...thus getting no charge. The added challenge is that the motors output will vary by speed of the motors.

If I am assuming correctly that during racing, you would want all to be automatic....you would not be running the engines at that time....and a little manual intervention might be ok.

Maybe you can simplify this whole thing. I know I am repeating myself from so previous post...and you prefer to make things automated...but.....

Put a switch on the motor that opens the output of the charge coil and keep it turned off all the time (a variation of kimcrwbr1's suggestion) If at any time you need that extra charging from the motors, simply operate the switch/switches before you start the motor/motors. Then you do not have to be concerned with any spiking. Have your automated system provide an audible tone when the battery is fully charged and when either motor is running. Then, as long as it is safe, momentarily turn off the motors....flip the switch and restart the motors.

You could active the tone by using 12v output from the motors keyswitch through your sensing circuit relay. If the motor is on and the sensing relay is on then you get a tone. When the motor is off and the sensing relay is on, you get no tone..

If the motors are easy to get to, the switch can be installed in one of the grommeted holes on the front of the engines. Or.....you could remote it (with the switch on your control panel) using a small relay on the motor. Use the break contacts of the relay, so that if something fails, the motors will always put out a charge.

All I can say is, you are getting a lot of ideas. I hope you can find something that will finally work the way you want.

Mike
 
There are no conflicts. Multiple charging of the same battery is very common on a boat. I'll have 5 charging sources. It is only about the individual charging source ability to not exceed the proper charging voltage for the battery (14.4V in case of LiFePo4). The 3 Victron charging sources (2 solar and 1 inverter charger) are "smart" and completely programmable. The Hondas with their 15V top voltage are dumb chargers that will shorten the life of any type of battery.
That is one of the reason I don't want extra batteries.


The way I see it running both engines on the same battery will allways be in conflict no matter what you do. You can tell what charging system you have by the number of wires to the rectifier/regulator 4 for the 6amp and 7 for the 12amp. It sounds like one engine will keep up with the demand just fine for the house circuits. Why depend on one battery when you have the capability of a good emergency backup system. Then you can just switch the house circuit between batteries with a simple relay.
 
The cutoff voltage for the lifepo4 is 14.6 volts according to the specs..i fail to see the problem as being as big as stated..i will not get into the design of a circuit as i think the exposure to develop a problem far exceeds the need...i agree with kincrwbr1 on not running both engines on the same battery..doing so may work until some failure occurs and then the exposure to either get stranded with both engines not starting or worse yet damaging charging systems on both engines...

i disagree with the charging systems in the engines being battery killers...good batteries will last their life span on these systems..

http://www.pdbattery.com/contact-us

this is support contact info...
 
they have a solar panel designed for your battery...i would also ask them about switch wiring ....but i would also keep it simple..i notice only a 2 year warranty on that expensive battery...
 
My battery full charge voltage is 3.55V per element. So 14.4V is the safe max you can give them, many people that install this kind of systems usually program the charging sources max voltage to 0.2 v below (14.2) or even 14. Anything higher that 14.4 will for sure cause a BMS triggered shut down eventually (the engines may be run for days on end), by opening the charging bus relay. The sudden opening of the motor charging system is likely to damage the voltage regulator (for sure in conventional automotive type, not sure on this permanent magnet type). The other issue is the reduced life cycle of the battery. This batteries don't like to be constantly charged, the float function of the charging sources will be disabled. In fact the best storage mode of this batteries at 50% charge.
This 400 Ah bank is a power house in practice equivalent to 900 Ah AGM battery. I want to get the rated life cycle (2000 cycles) or possibly more given that I will likely not cycle it at 80% DOD.


The cutoff voltage for the lifepo4 is 14.6 volts according to the specs..i fail to see the problem as being as big as stated..i will not get into the design of a circuit as i think the exposure to develop a problem far exceeds the need...i agree with kincrwbr1 on not running both engines on the same battery..doing so may work until some failure occurs and then the exposure to either get stranded with both engines not starting or worse yet damaging charging systems on both engines...

i disagree with the charging systems in the engines being battery killers...good batteries will last their life span on these systems..

http://www.pdbattery.com/contact-us

this is support contact info...
 
Back
Top