Logo

Method to replace steering arm? (DIY BF130)

yamaham

Contributing Member
I picked up a boat with the dreaded heavily corroded steering arm. If I'm looking at the diagrams right, I would want to remove the two lower bolts that go into the rubber mounts, pull the lower mount block off the steering rod spline, then lift the whole engine up to clear the steering tube. Then I can get at the two upper bolts and replace the steering arm (#5 here http://bit.ly/1Oh44Up) being sure to replace seals and critical hardware.

Any input from people who have tried it?
 
I hope it will allow me to attach these images
 

Attachments

  • Steering1 (Small).jpg
    Steering1 (Small).jpg
    41.1 KB · Views: 1,947
  • Steering2 (Small).jpg
    Steering2 (Small).jpg
    51.5 KB · Views: 4,380
The 2 upper nuts are readily accessible with a ring spanner if you turn the motor to port and starboard.
But however you choose to do it, factor in that it is very likely the centre mounting # 12 http://www.boats.net/parts/search/Honda/Outboard Engine/2002/BF130A2 XA/EXTENSION CASE/parts.html
will be seized onto the mounting frame(steering tube) spline and will need to be destroyed to remove it e.g. cut it and spread it to remove.
You will then have to renew the centre mounting $100.
If you don't damage the mounting frame(steering tube) in the process you maybe able to clean it up and reuse it, worth $240

Bob
 
Last edited:
Bob, thanks for the further detail! I can accept the risk on the $100 part doing it myself as the yard wants $800 in just labor. I'll share with you just how roached this integrated arm is, and unfortunately I'll have to scrap the whole mounting frame (aka steering tube) for another one in good shape. The two upper nuts are coated in that same gray paint, I'm guessing it was a late attempt to stop the corrosion. I hope it will let go if I ask nicely, otherwise I'll have to get creative with cutting tools. I'm scouring the internet for a good used part. It is a real shame the previous owner put his family at risk with such an important link. Really appreciate your input.
 

Attachments

  • Photo-Jul-15,-7-40-44-PM.jpg
    Photo-Jul-15,-7-40-44-PM.jpg
    55.8 KB · Views: 1,673
Well I'll be. The top two nuts came loose almost TOO easily using that method. Now the bottom two 19mm are awfully tight and my air gun is broken. I'll work on those next. Thanks so much Bob!
 
It's not that uncommon down here (south Florida) when you combine a year-round saltwater boating season with uneducated boat owners who don't understand why routine maintenance is a safety issue. Even on trailers, many people live close enough to the water to be in a corrosive environment 24/7.
 
I can't get the lower bolts to budge. Hit them with impact on 90psi and not a creak. Wish the nuts were more exposed so I could heat them up. Any tips? Been soaking them in pbblaster since yesterday and will try again today.
 
Got it! Had to buy a 17mm wrench for the lower nut and one side took some elbow grease but it gave. I had to stand on the wrench on the other side which creaked but finally gave too. Looking at the lower mount from the bottom, I'm going to assume it is seized and since the steering arm is too damaged to keep I will just cut it off like Bob mentioned. Picked up an engine hoist for when the time comes to set her free. Will update as I make progress.

This is is a really easy job with just 4 bolts. The general consensus online is that this job requires disassembling the entire motor to get the steering tube out, and maybe that's true for some makes/models, the Honda BF75-130 seem to come apart the same way - very serviceable.
 
Good info. As mentioned on another post, I have noticed some corrosion on my steering components but have yet to do a good inspection. I will be doing that during my next visit.

Thank you for clarifying that the Steering Arm is the same part that is called the Mounting Frame in the parts pictures.
 
I'm looking into replacing my hydraulic steering cylinder only and it turns out the manufacturers (so far Teleflex [incl. BayStar & SeaStar lines] and Ultraflex) have different part numbers to address the specific BF115/130 set-back design (the arm is designed much shorter than other makes/models). Of course that makes it less common and harder to find used/cheap - it's not the 'usual' part number.

Here's an example of two identical parts, one for nearly all outboards with standard-length steering arms and the other just for Honda BF115/130.

'Normal'
http://uflexusa.ultraflexgroup.com/easyUp/image/uc94_disegno_1_011(1).jpg

'Honda'
http://uflexusa.ultraflexgroup.com/easyUp/image/uc94_disegno_2_011(1).jpg

(taken from this page http://uflexusa.ultraflexgroup.com/easystore/schedevedi.asp?schedaid=817)

The difference appears to only be in the arm tying the outboard steering arm to the cylinder - one is straight and the 'Honda' application is a 90 degree with a step. Looking at the parts diagram for my motor, there's a part# 53234-ZW5-010 (seen here #20 http://www.boats.net/parts/search/H...130AX LA/STERN BRACKET SWIVEL CASE/parts.html) that would appear to extend the outboard steering arm for what I assume is multi-motor tie bar installations. It's designed to mount upside-down which may bring it level with the former image above - or close enough that I could use a short plastic spacer to make up the difference.

What are the chances this $20 part will open up my options on hydraulic steering cylinders?
 
Chances look pretty good in my opinion, but that is only based on viewing the pictures, not a real life scenario. Even if this specifically does not work, something similar probably could be made to do the job.

Wow, Honda really botched the design on the steering arm in every way. It seems, given the safety concern, that there would be a recall on this part. Has anyone heard if there was one?
 
Spoke with Uflex and they were awesome. Got a new cylinder that's compatible with my existing helm and hoses the very next day. Waiting on some back ordered OEM parts to replace worn items. Bought and assembled an engine hoist in prep for removing all the mount bolts. Just about ready to knock this out.
 
I inspected my steering arm this weekend. While it has some rust, it does not appear to be much more than surface in nature.

For the sake of clarity, where did your steering arm break? Was it at a point near where the steering rod/cable attaches (most forward point) or was it closer to the pivot point?

Also any info on your hoist would be interesting - price and store.
 
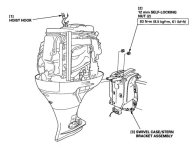
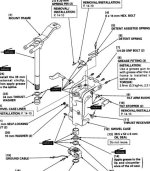
Alright, so I backed the rear quarter of the boat into the garage and got started before lunch today. I decided to remove the motor from the transom entirely to perform other maint in the comfort of the AC, which means I can work day or night - you don't work outdoors after 6pm here, the mosquitoes will carry you away. First order of business was disconnecting the control cables, main harness and battery cables. That was not much fun, but it's not too different from working on a modern car and I got through it. Next I still followed the manual's method of attaching the hoist to the lifting ring, removing the top two nuts, then removing the bottom two nuts. Pulling back on the wheeled engine hoist, all I could get was about 1/4" gap on the bottom bolts and maybe it wiggled 1/8" on the top studs. There's what appears to be a stainless shaft running right through the center of the mount frame (steering arm shaft) and into the lower unit. I don't see how it's possible to separate the motor from the mount frame with this in place, and it can't come out the top or bottom - unless I'm supposed to drop the lower unit too? Manual doesn't say!

So I broke down and removed the entire bracket from the transom and left it on the hoist in the garage. In retrospect that's much easier and will allow me to reseal the bolts because I didn't notice any silicone remnants and that's not a good thing. Additionally, removing the old steering bracket wouldn't have been possible with the bracket still on the transom, so it was going to happen anyway and I just didn't realize it.

Now it's in the garage but I've had a full day and will leave it to think about how to attack it next time. How the heck do I get that shaft out of the center of the mount frame? I was under the impression the mount frame was solid, not hollow.
 
That shaft is the shift shaft & you first have to remove the lower unit. Then grip the bottom of the shaft with a pair of pliers or similar & tap it downward, & it will drop out. When reinstalling be aware to align the splines have a flat which must face forward when in neutral.

Bob
 
Alright Bob thanks again for your expertise. Been a long time since I removed a lower, do I need to drain the gear oil first?
 
This is an awesome thread with lots of good detail. Given its usefulness to Honda owners (self included :)) moving forward, is there any chance you could post some pictures as you go through the process?
 
Alrighty then!

Boat backed up to the garage with the hoist connected, about to start removing the top and bottom bolts. This was before I realized the shift shaft runs through the mount frame and the lower unit will need to be removed
https://www.dropbox.com/s/2kynmci2uvyu11i/Photo Jul 28, 1 23 41 PM.jpg?dl=0

Remote controls and harness removed
https://www.dropbox.com/s/o13f6pkm26a9yx2/Photo Jul 28, 1 23 52 PM.jpg?dl=0

Some things disconnected and labeled. Not really necessary since it turns out there aren't two similar connectors to get confused. Re-routing the stuff won't be a lot of fun, though. All the work is done on the port side of the motor near the ECU. Don't think I even had to glance at the intake side.
https://www.dropbox.com/s/7c9zt45vgmg24nu/Photo Jul 28, 1 23 57 PM.jpg?dl=0

Today I may get the lower unit off and the transom bracket removed. Of course now that the transom is exposed I see some things I would like to look closer at. I hate investigating and exposing new things to fix. Sigh.
 
Much appreciated, particularly when you start removing the old steering arm.

It does get frustrating, but given your approach it is clearly an investment in the future.
 
With a combination of info and pics from Clymers, Honda and Bob I was successful in removing the bracket and mount frame from the motor! I really thought this would be a one day job. The labor quotes sounded high and while I can get this done myself for far less, if you value your time then it's a job for the yard. Me, I had a week vacation to burn before it evaporated so this fits my schedule. Guess now that it's portable (if you call 50lbs of metal portable) I will take it to a shop and have the old parts pressed out and new parts pressed in.

Offender
https://www.dropbox.com/s/cetygulx6qvvmjj/Photo Jul 29, 1 27 19 PM.jpg?dl=0
https://www.dropbox.com/s/nwf6kg2byrz706e/Photo Jul 29, 1 27 28 PM.jpg?dl=0

Electronic documentation
https://www.dropbox.com/s/tr94ukidtrwbci4/Photo Jul 29, 11 40 06 AM.jpg?dl=0

Pieces everywhere
https://www.dropbox.com/s/h1wbu6w9g9ecanj/Photo Jul 29, 1 38 04 PM.jpg?dl=0


Also a great place for this quote: Cheap boats are expensive!
 
Last edited:
Wow, the pics support your comments.

Mental note - If my steering arm gets as bad as that, then replace with new motor.

What needs to be pressed?

New motor is almost $10k and I'll have this licked under $500 if you don't include tool costs. Add $200 or so to have a Honda marine shop do the press work to set the seals and liners. Then it's just a matter of reassembly. Time, tools and physical exertion are things I can supply so it isn't too bad. Also have a new Uflex UC94 cylinder and bulkhead hoses to install. Should clean up the splash well real nice. Since the motor is off I'm going to check the condition of the transom and make some cosmetic repairs to it if it's solid. Well, whenever it stops raining.
 
Yep, since you were already into it before realizing the magnitude of the job and you had Vac to burn, it made sense for you. But as you noted, this job is probably not for those that value their time. If I figure it would cost $700+ in labor and $300 more for parts, I'm not sure its worth it at all. Time will tell when I have to cross that bridge. By then I will know if my motor has been reliable (other than this issue), which will help in the "fix it myself vs have it fixed vs replace it" decision. Hopefully it will have proven to be a good motor other than this.

Thanks again for taking the time to document what you are doing. Very useful.
 
I bought a new tilt tube since the last 1/8" threads on mine had corroded off. Any tips on getting the old one out? I got the 32mm nut off OK. I don't have the right size tool for the larger one. I tried hitting it but it doesn't budge. Would a shop press be able to push it straight out?
 
I got both the tilt tube nuts off now, but the tube still won't slide after pounding it with a hammer (left a nut threaded on and hit it, have replacements). Shop press or is this going to require a flame?

I cut the lower mount frame in half then pried it off the splines like a clamshell. Then I cut all but about 1/8" off the rotten splines back to good metal so I would have something to beat on. No movement. I have to hit the steering arm with a hammer to get it to swivel. No wonder the old hydraulic steering was leaking, it had to put up with a lot of friction. Now I recall having to bear hug the motor and swing it with all my weight to get it to swivel enough to get at the upper mount bolts.

This is a long fight but I'm not throwing in the towel just yet. Spent too much money on parts and tools to turn back now.
 
Not that I have any experience with this specific part, but for me PB Blaster and heat are usually the solutions for things that will not come apart.
 
Back
Top