Logo

2006 Honda 9.9 4-stroke (BF9.9D) Impeller

I have a 9.9 HP, 2006 Honda with apparently about 5 to 10 hours on it, per the original owner. It looks absolutely brand new outside and under the cowl. It seems the engine was used a handful of times and then stored-- never serviced in any way, I was told. I'm not at all comfortable with a 10-year-old impeller, no matter how few hours are on it, and when it was briefly test cranked, I was not impressed with the water stream. It could be we never revved it enough to pump well, but I didn't want to chance it.

Here's my question-- the Honda shop manual says to pull the prop off as well as to remove the prop shaft and I'm, wondering why? You have to disconnect the shift linkage above the gear case assembly. Instructions I see on youtube videos etc., show that removal of the prop shaft isn't needed on similar motors, including some Honda motors.

I'm willing to do what is needed but would rather avoid disassembling anything unnecessarily.
 
That section of the manual goes into how to disassemble the complete lower unit.

You have to read past some of that. Here is a customer handout for how to change the waterpump with pictures.


View attachment 10898

Yes, the section is for water pump disassembly-- section 4-11 in Honda's manual, but even for that, it seems odd to suggest removing the prop and prop shaft, and it directs you to separate sections for these as the initial instruction for the water pump (sections 4-2 and 4-3) before you go to section 4-9 to disassemble the gear case.

My worry was that something could shift if I didn't remove the prop shaft and make reassembly a problem.

I will use the instructions you provided. I'm waiting on the kit I ordered to show up with the impeller & gasket so I can get this solved...

Thanks very much!
 
It has to do with the technical writers just trying to cover everything at once. So...of course...they raise more questions than they answer at times. Your new pump kit...installed WITHOUT any transmission disassembly...will get you back up and out on the water.
Although, it is ALWAYS a good idea to remove the prop and inspect/replace the thrust washer as well as remove any debris...typically fishing line...from the shaft. Fishing line wrapped on the shaft behind the prop is the #1 reason that prop shaft seals fail. And when those fail....you have to disassemble the transmission!
 
Thanks. I'll check for any stray line in there... I had been reading all the steps and seeing an apparent need to press out various 4mm & 2mm pins and all sorts of tedious stuff, with lots of small parts, and quite honestly, starting to think I had just bought the 9.9hp outboard with the most complicated impeller to replace EVER! LOL...

I have another question-- I ordered a Honda fuel line for a new, (but non-Honda) gas tank. The line didn't cost much more than a generic primer bulb, plus the needed outboard fitting, and some quality fuel line, so it made sense to buy...

I didn't realize the fuel line had a quick disconnect on the tank end. I could clearly switch that for a barbed-fitting-based connection, but I like the quick connect feature...

Here's my question: are those quick disconnect fittings standard items I can grab at most any marina, or Honda-specific items? There aren't many Honda dealers too close around here, in fact I'm a good drive from any marina at all, and I don't know what I'm asking for apart from a Honda fitting.

Suggestions? Is there a generic name for that sort of fitting, which will find one for me, or do I need to order the from a Honda dealer? I really wanted to have one in hand to get this working this weekend. I should have the impeller tomorrow.
 
One thing to keep in mind about quick disconnects...at the tank AND on the outboard. They are MECHANICAL in nature and will EVENTUALLY fail. They have a spring...some little balls and, when the male portion inserts into the female portion there is an "interface" that will wear down over time and start restricting the flow of fuel. YES! They are convenient but just keep in mind that they can also cause you problems.

Having said that, as far as I know (hondadude ALWAYS knows better) Honda is always pretty much Honda specific. So, if you have a "generic" hose coupler, you would need to mate it with the other half "generic" hose coupler and they can be very "brand specific". I would NOT try to source a match for what you have on the generic hose at a Honda shop. West Marine is the first place I would look because you can shop their inventory online. I don't know for sure but there are likely many variations of those quick disconnects just as there are in the compressed air fitting world.

And, don't try and substitute anything OTHER than fuel line approved connectors....like the compressed air ones....because they will leak.
 
All quick disconnects are not the same....size.....etc.

The Honda number is 17977-ZV5-A00. You probably could go aftermarket with minimal problems if you needed to Sierra 18-80400. The Honda one is one a few dollars more. Google either one and I am sure you will find plenty over the internet.

As for this impeller being the most complex to change.......quite the contrary!

There are no pins that you need to punch out like the small Tohatsu or Mercury Engines.

The most critical part is putting the shift linkage back together when you are finished. Easy to do, but easy to mess up the shifting, if you do not follow the directions (spacing the small nut from the end of the shaft).

This is probably the easiest impeller of any motor to change.

Mike
 
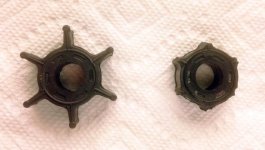
I finally got the new impeller. The old one did look a little worn, LOL. (See pic.) I hope I found all the old pieces left behind I see about 4 veins. Hard to tell if the rest got pulverized or are still hiding somewhere... (lots of crushed bits of rubber) Must have happened when cranked the last time-- previous owner advised it had been sitting for several years as he cranked it, but it just idled for a moment while in water so I don't think we have a problem.

One other question-- the gasket underneath the steel place (below the impeller)-- do I need to coat that with anything when I replace it? Gasket Sealant? Grease? Or just leave it dry?

Thanks!

honda.jpg
 
Ha HA! The thing on the right is NOT an impeller......it's an ORING! HA HA!

Yes, HOPEFULLY you found all the pieces or got them out at any rate.

The gasket goes on dry but make sure the mating surface is clean and all OLD gasket has been removed.

Also, make sure you use MARINE GREASE on the tips of the impeller vanes and on all the metal parts (plate and housing) that the impeller "rubs" against. Smear some on the metal and smear some on the rubber wherever they will contact each other when the pump is spinning. You don't need to "GOB" it on...just a thin film on each part to prevent dry start and excess friction. But, you don't need to be super neat with it either...a little excess in the housing is ok.

"70% of all catastrophic engine failures begin in the cooling system."

Just a little quote I like to repeat....over and over and over and over.

GOODONYA fer gettin' 'er DUN!
 
Thanks. Hey, here's another quick question-- I was wanting to be as certain possible that any debris is out of the water line that goes up to the engine. I'm not certain what the proper name is for it is, but the opening where what many call the "pee stream" comes out to confirm water pressure-- I blew a little air up the water line and could feel air come out, but I glanced at the opening and noticed two very similar openings where that opening is, side-by-side-- what is the second small opening there?

Air was only coming out the one opening-- I assume this is normal? I puffed a little air into that hole (from the top) in case bits of rubber were up in there-- all that came out the bottom was a few grains of sand. Either that part of the line is clear or if partially blocked, the debris is stuck hard, and I don't want to put too much pressure in there.

So, again, what is the second opening for, and also is there anything else I should do to hunt for missing veins that might have pumped up that tube?
 
The only way I know of to make sure the water passages are clear back down to the pump is to remove the thermostat and housing and put pressure into the water passages in a reverse flush manner. You can use water from a hose or compressed air or...my personal favorite....both to "blow out" the lines.

This is most effective if done while the gear case and pump are removed of course.

As far as the opening next the other opening....you lost me. I re-read it three times and I'm not gettin' it.

Without a photo I'm just not sure I can grasp what you are seeing.
 
Jimmy,

I think he is talking about the carburetor drain.

There should be a clear tube on the otherside of that opening....if so, it goes to the carburetor bowl drain.

Do not blow it with compressed air...you will pop it off of the carburetor.

It is good to pull it from the carburetor when you do an oil change and blow out the tube. Little critters like to make nests in the tube and it will prevent you from draining the carburetor.

Mike
 
Thanks Mike! Yes, that MUST be it! My mind was trying to visualize an additional hole next to the tell tale hole in the block and I was just going into scrambled brain mode.

So, ABG, if you are talking about the nozzle in the side cover next to the pee hole then YES, as Mike points out, it is the carb bowl drain hole. It is an IMPORTANT tool you can use to keep your carb clean inside and prevent starting and running problems. There is a clear tube that goes to that and you must NOT put pressure in there. But, use it REGULARLY to drain the float chamber on your carb anytime you are going to lay up the boat or outboard for any time longer than a week. There is a slotted screw in the bottom of the carb that allows you to do this. Take advantage of it and you will have way less carb issues than the next guy.
 
Back
Top