Logo

1982 Honda BF75L water pump seal/bearing question.

Flyinbrian87

New member
Hello! First post here and was wondering if you guys could help.

I have a 1982 Honda bf75L engine that will not pump water. I've replaced the pump once only to ruin it again. I believe this is due to the crumby corroded "seal" it was rotating over. Id like to remove the seal and the bearing underneath it and replace with the new parts so that my pump has something clean to sit on. Is it even possible to pull the bearing in this case without taking the prop off? Or should I just pry the seal, relube the bearing (hoping it's not damaged too bad), then lay a new seal over it?


This is is the only problem I see the motor having as it does run nicely. I unclogged every single hole, hose, port, pee hole I could find. I am in the process of replacing the thermostat, and was thinking of replacing that seal (rather than just clean it as the rubber is shot around the drive shaft). I'll attach a pic of the drive.

Any other ideas as to why my impellers are being bent up?
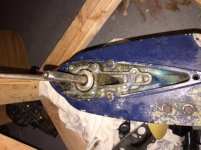
image1.jpg
ALSO, I'll upload the schematic of the parts. Any idea which way is the correct positioning? Honda clymer manual says bearing on top. And the schematic from boats.net shows bearing on bottom. I'm leaning towards seal on top, bearing underneath.
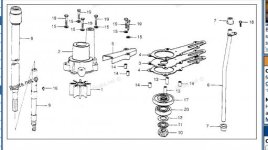
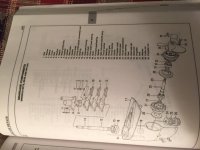
image2.jpgimage3.JPG


Thanks so much.
 
The seal can be removed and replaced without removing the shaft if you are careful. You can use a small drill to put a hole in the seal and then insert a pointy tipped screw carefully just enough to get a purchase on it so you can use a slide hammer bearing puller or possibly pliers with a bit of leverage over a block of wood. Be very careful not to damage the housing or you won't get a proper seal again. Installation of the new seal will require a hollow tube of similar diameter to the seal and with a hollow large enough to fit around the drive shaft. Lube it up with a bit of grease first.

The seal goes on top and keeps the water out and the gear oil in. The bearing is in the gear oil, not the water. If you are not getting water in your gear oil then you likely don't need to replace it.

you should have a paper gasket on top of the housing next, then a stainless wear plate then another gasket, the impeller and then the impeller housing. The impeller should only be in contact with the wear plate and the housing, not the seal itself.

If the housing or the wear plate are scored then you should replace the whole lot. Both gaskets, wear plate, impeller and housing.
 
I'm NOT arguing with what skronkman told you, just the opposite. He lists a viable way to remove and replace the seal....although I will add that you can use a piece of appropriately sized PVC pipe (hollow tube) as a driver to install the new seal.

BUT, if your gear case isn't having water intrusion issues, I'm not sure I would advise disturbing that seal. IF IT AIN'T BROKE, DON'T FIX IT sort of advise.

Is water getting in the gear housing? If so, then yes, it may be time but be advised that there are other places to check as well...the SHIFT SHAFT seal and.... the #1 cause for water intrusion....the prop shaft seal. In addition to those, add the two plugs...fill and drain...in the case. Those can leak if left loose or the little seal or gasket gets damaged.

Another question I have is are you replacing ALL the parts of the water pump or JUST the impeller? If not, then that may be your problem. If the impeller is getting "chewed up" then it is likely because it is not running against smooth surfaces. Again, as skronkman said, gasket-wear plate-gasket AND housing play an important role in how long the rubber tips of the impeller will last.

Sadly, boats.net is correct and Clymer is wrong. As usual. I always advise anyone doing their own work on a Honda to get the official HONDA shop manual due to so MANY errors in the Clymer, Seloc and Haynes offerings. In your particular case, this is NOT a hugely expensive manual and can usually be found on Ebay for less than $40.

Other ideas about what could be happening are:

Is the flat spot that drives the impeller on the main shaft in good shape? Over the years an impeller can "catch" and slip on the shaft...causing wear to take place ON THE SHAFT. It's incredible but the RUBBER impeller will wear down the STEEL in short order if something like that is happening. A poorly "seated" impeller can run "cocked" and wear out prematurely as well as slip and cause damage to the main shaft.

Are you POSITIVE that you have the impeller turning the RIGHT way? The book says "install the housing while rotating the shaft clockwise"....are you doing that? If done correctly, the vanes will all be bent over to the left if looked down on from the top of the outboard. You don't have to pull the housing to ACTUALLY look at them but just get a picture in your "mind's eye" of what is happening in there as you place the cover over the impeller.

Are you installing the "distance collars" for the impeller housing and cover in the correct locations? There are two that are longer than the other 4. If installed out of place, this could cause the housing to be cocked to one side or be loose.

Look UP into the oil case where the water tube inserts into the case. Look to make sure there is nothing in that hole that might block the flow of water. Also, make sure the hole has not corroded and deformed so that a new water tube seal will fit properly and not leak. A leak there could cause you big time problems.

Also, get a piece of wire and GENTLY probe up in there to see if you can detect any blockage. I caution to do this GENTLY so that IF anything is up in there, you don't push it deeper and make the problem more difficult to solve.
Sometimes small pieces of impeller vane break off and will travel up there and get lodged in the passage. OR they can travel through and get into the thermostat housing or in the cylinder head water jacket.

The wire probe trick will only be useful for a couple of inches. So, if the wire encounters a bend you can't see, don't automatically assume that anything is wrong. You have to use your judgement here.

If you haven't pulled the thermostat housing yet...you may be in for a shock. If you are operating in salt water and the outboard isn't regularly flushed, there is going to be quite a bit of corrosion and mineral deposits in there. You need to be careful cleaning that out as the minerals actually become part of the base metal of the engine and you can accidentally remove engine metal that you don't want to if you scrape too aggressively. Even engines operated IN fresh water and "salties" that get properly flushed can show some evidence of this type of corrosion.

That's about all I got...hope some of it helps.....please get back to us with any more questions OR, even better....your SOLUTION to the problem!

Good luck!
 
Last edited:
Thanks so much for the lengthy replies. I'm going to get a better look at the engine when I'm home from this trip im working. In the mean time, I guess I just really need to clean the wear plate (assuming no water in my gear oil). The impeller is being BENT not shredded. It's like it comes out warped. Not ripped or broken. I am looking forward to getting a peak at the gear oil this week. Every single hole, tube, and piece of plumbing seems fine with shop air. No blockages. When I get home I'll keep you all updated.
Thanks
 
I'm not sure how "bent" you mean, perhaps a photo will help. The impeller is meant to be somewhat bent/twisted into the housing. The vanes are perpendicular to the shaft in straight lines when you purchase it and put it on the shaft before the housing is installed (like bike wheel spokes). When you twist on the the housing it bends over all the vanes and makes a tight fit to the walls of the housing and would appear more like looking at jet turbine end on. As per jgmo, it is very important that you only turn the drive shaft in its direction of rotation as you install it so that the vanes are bent in the correct direction. Also, just to be sure, you do have the impeller key or pin to hold the impeller on the shaft installed right? Otherwise the shaft will spin freely inside the impeller and not rotate it.
 
I'm not sure how "bent" you mean, perhaps a photo will help. The impeller is meant to be somewhat bent/twisted into the housing. The vanes are perpendicular to the shaft in straight lines when you purchase it and put it on the shaft before the housing is installed (like bike wheel spokes). When you twist on the the housing it bends over all the vanes and makes a tight fit to the walls of the housing and would appear more like looking at jet turbine end on. As per jgmo, it is very important that you only turn the drive shaft in its direction of rotation as you install it so that the vanes are bent in the correct direction. Also, just to be sure, you do have the impeller key or pin to hold the impeller on the shaft installed right? Otherwise the shaft will spin freely inside the impeller and not rotate it.


By bent I mean some vanes are twisted and some are going forward of rotation and some dragging aft. I'll have a picture when I get home from my trip. Other than the warps, it's not chewed up/chaffed/torn or ripped.
 
Also quick question about that picture I posted, anyone know if that black rubber on the shaft and around the edges is old gasket? I don't see a part number for it if there is one. When I wipped some of the crud off the wear plate the rubber flaked right off.
 
All the vanes should be bending back behind the direction of rotation. Are you sure you installed it by twisting the shaft only in the direction of engine rotation? I can't make out the black stuff you mention. There should be no rubber on the shaft (other than where the seal meets it) and also none on the wear plate. The gasket is a type of gasket paper. Perhaps a previous owner used some kind of liquid gasket?
 
All the vanes should be bending back behind the direction of rotation. Are you sure you installed it by twisting the shaft only in the direction of engine rotation? I can't make out the black stuff you mention. There should be no rubber on the shaft (other than where the seal meets it) and also none on the wear plate. The gasket is a type of gasket paper. Perhaps a previous owner used some kind of liquid gasket?

The rubber stuff is around the base of the drive shaft and the wear plate. As well as around the outside of the wear plate and the metal water pump housing in the picture. What I'm asking is, does the impeller sit on top of the wear plate? Or does a gasket go between the impeller and wear plate. I'm asking because rubber came off as a ring around the drive shaft. Crumbled with a squirt of shop air. Hope that makes sense.
 
The rubber stuff is around the base of the drive shaft and the wear plate. As well as around the outside of the wear plate and the metal water pump housing in the picture. What I'm asking is, does the impeller sit on top of the wear plate? Or does a gasket go between the impeller and wear plate. I'm asking because rubber came off as a ring around the drive shaft. Crumbled with a squirt of shop air. Hope that makes sense.


Heres a link to MAYBE what needs to wrap around the drive shaft that goes under the wear plate?

http://www.iboats.com/mall/partfind...&gd_poid=109617&gd_row=1&session_id=712140855
 
The gaskets are paper, they only seal around the outside perimeter of the impeller housing (top and bottom). The impeller sits directly on Top of the wear plate. The only rubber thing that wraps around the shaft is The water seal under the wear plate (and the impeller of course). The water seal in your photo seems to be displaying more stainless steel and less rubber than I would expect. It may not be OEM and it may still be doing its job, not sure. It's possible that some lubrication product was used when parts were installed that ate away the rubber? I would think it should look more like this "http://next-vl.ru/published/publicdata/A24312/attachments/SC/products_pictures/DSC0254258_enl.JPG". Perhaps the black stuff you found was old rubber from the top of the seal. Have you ever run the engine without the leg in the water (or on the hose)? This will totally destroy your impeller in about 10 seconds and if left to go longer will continue to create heat from the friction and could have melted the seal rubber too.

Gaskets have a large hole in them that only seals around the perimeter of the impeller housing. See here "http://www.partspak.com/ProductCart/pc/catalog/products34/images/hon-19232-881-306.jpg"

Wear plate has a smaller hole for the drive shaft so the impeller does not contact the gasket or the water seal. See here "http://ecx.images-amazon.com/images/I/71tGygmgN6L._SX425_.jpg"

i never ran it dry, but can't say what the previous owner did. I'm hoping that seal is good, I'll check the gear oil under it for contamination this weekend. Hopefully my parts arrived and I can button her up and get it started. I'll keep you all updated on the progress!
 
I agree with skronkman...it's old rubber from....SOMETHING.
Don't neglect to use a generous amount of marine grease on all the impeller contact points. IE: impeller to wear plate and vane tips to housing. Smear some on the inner housing surface as well as the tips of the vanes themselves.

Good luck.
 
Well after a few hours of poking wire through all the hoses and channels in the motor...I HAVE A PEE STREAM! ITS A GREAT SOLID STREAM! Water pump is working great

BUT I've hit another wall. Thermostat opened and now my oil started dropping out of the filler neck plastic casing. The oil is milky (melted coffee ice cream look). What happened? Gasket bad on the oil filler neck? I understand the water tubing goes to that block of plastic. Maybe the filler neck casing is warped? Hoping its nothing TOO serious. I've drained the oil so it doesn't do any damage as I wait.

Any ideas?

Thanks.
 
Yes, I do believe that water can get by the seal for the oil filler cover (item#14 in the first page link). And, I'm not sure that you can "sneak it out and back in" without removing the power head. Also, that cover DOES WARP and a new seal won't cure the problem if that has occurred.

http://www.boats.net/parts/search/H...75Z LA/OIL PUMP OIL FILTER MUFFLER/parts.html

But, it can also intrude from a small oring seal at the base of the block in the oil case. Item #31 in the page link below. That seal is actually "nestled" in a cutout of the cylinder block to oil case composite gasket. It DEFINITELY requires that the power head be removed to change it.

Another "usual suspect" would be the head gasket area.

But...the GOOD news is....the only thing that is TOO serious about maintaining these engines is the unavailability of SOME parts. Otherwise, taking the power head off is really not a big deal with these. That is.....as long as you make sure to remove the "HIDDEN" bolt. Many an oil case has been destroyed when people miss the hidden bolt and try to pry the case from the block...BAD JU-JU! With the proper count of bolts removed (8 of 'em) the case and block separate with a gentle "rap or two" from a soft faced hammer.

Another GOOD thing is that, if you do need to take out the power head, it affords you the OPPORTUNITY to roll in new engine bearings, check/replace the oil pump and, AT THE VERY LEAST, clean the oil filter screen and sump so that you KNOW all is squeaky clean inside.

All the parts for doing ANY of these tasks are still readily available so...DIG IN!

fantastic! Thanks! Looks like I have my work cut out for me. I don't see the second link though for item #31 that you are talking about.
 
A leakdown test may help you identify if it's a top or bottom problem and give you an idea of where to start looking. The milky coffee oil is a sign that water is mixing with your oil and being emulsified in the crankcase. Do you know how long it has been like this? If run like this for a long while it can wear out parts (or worse but your engine still runs so that's good), if left like this for awhile it can start rust internally. If you are going for a teadrown then best to at least put an eyeball to the components inside the crankcase and under the rocker cover. If it's a top end thing only then you may get away with repairing that and putting in new oil. Keep an eye on the color of the new oil and you might want to change it out again after a few hours of running just as a cleansing rinse.
 
Got her apart. Broke the oil tube trying to separate the filter from the tube. The plastic housing for the dipstick is definitely warped and i will be replacing it along with the seal. I can't seem to find the spot for the "o ring" around the drive shaft seal. But will look into it more tomorrow.


Anyone know where an entire oil filter assembly is available? I can't seem to find any other than a used on on eBay.
 
The oil pick up tube and filter are available at boats.net. See items #8 and 9 in the link below. The holder (item 10) I'm not sure about since it has no "retail" price listed. When both columns in the price list show a cost of $0.00 it usually means the part is no longer available. I don't know what $0.00 in one column and $8.33 in the other column represents. I don't think I've ever noticed that before. But, you can call them for verification

http://www.boats.net/parts/search/Honda/Outboard Engine/0/BF75F LA/OIL PUMP/parts.html

If you are referring to the oring that I talked about in post #15 above, it is NOT "around the drive shaft seal". It is an approximately 9mm X 2mm oring that seals the water passage in the oil case where it meets the water passage in the engine block. there is a small recess in the oil case to fit it in. Refer to item #31 in the link on post #17 from me in this thread. Oh shucks....here's the link again:

http://www.boats.net/parts/search/Honda/Outboard Engine/0/BF75Z LA/OIL CASE ENGINE COVER/parts.html


The precise dimensions given for the oring are 9.8mm X 1.9mm. It might be hard to find one of those at the hardware store so make sure you order one for reassembly when you order your block to case gasket.

If that is NOT the oring you were referring to, I would need some clarification of your question.

Good luck and happy wrenching!
 
Back
Top