Logo

Joe Reeves Re Jetting? 1979 Evinrude 140

smhamilt

Member
I have a persistent lean condition at idle and it wont stay running shifting from N to fwd or rev. I believe I have done everything (over and over) such as clean carbs check link/synch. Compression is goo etc.

I have seen Joe Reeves post about changing the jets. Can anyone advise? Do I go smaller or larger. I am finding conflicting info.

Also, I need a source and PN's for jets. Thanks
 
If you can find a good old BRP dealer he would have the info on jet sizes and part #'s . It depends on the year and the model if you go larger or smaller on the jets to make it run richer or leaner.
 
Last edited:
I have a persistent lean condition at idle and it wont stay running Do I go smaller or larger. I am finding conflicting info. Also, I need a source and PN's for jets. Thanks

I read your PM. I need to look into somehting before replying but the alarm is set at the time and I can't get at my books. I'll reply tomorrow. What is the model number of that engine?
 
Both the high and slow speed jet measures fuel... NOT air.

High Speed Jet is part number 322810 - Marked 65C - ID is .065

Slow Speed Jet is part number 317473 - Marked 30 - ID is .030

To richen the flow of fuel thru either jet, the ID would need to be larger. (From experience... do not exceed .031).

Before reworking any jet, make absolutely sure that the compression and spark are as they should be ie:

Compression should be 100+ and close to even on all cylinders.

With all spark plugs removed, the spark should jump a 7/16" gap with a strong blue lightning like flame... a real SNAP! NOTE that spark plugs should be Champion QL77JC4 plugs, gapped at eithe .040 (original recommended) or .030 (late 1990's revised recommended).

Parts no doubt available on this site and your local dealership. I may have whatever jets you need if it comes to that... if you can't obtain them here.
 
Last edited:
I was allways taught if jet was carb body mounted it was metering air and bowl it metered fuel and if the diagram is correct its a side mounted jet which should be air.
 
I was allways taught if jet was carb body mounted it was metering air and bowl it metered fuel and if the diagram is correct its a side mounted jet which should be air.

It depends on where the jet is siruated. On the 1979 140 model, the slow speed is inserted in the side of the carburetor's top body close to the mounting flange, then a sealing screw with a O Ring is screwed in on top of it. This seals it completely within the fuelway path.
 
Last edited:
From what I see it only has high and low fuel jets #30 for the slow jets and #65 for the high jets. Look at the numbers stamped on them which ones do you have? Fuel jets need to be larger to to richen the mix and air jets need to be smaller. Seaway marine in seattle has the best books for jonnyrudes but are only open weekdays with a big sign on the door gone fishing holidays and weekends. Rule of thumb you drop the jet size two for every 2500 ft elevation if you engine has smaller jets it may be jetted for higher altitudes? What color are your spark plugs? They should be a nice toasty brown on the insulators, White plugs means too lean and too dark is running rich.
http://www.seawaymarine.com/

Thanks. This motor has never shown brown plugs. Always black. Obviously indicate rich condition but maybe also ignition timing or spark quality. I pd a shop to chk timing link synch since I had not done that before. Well now I'm studied up on how to do it. Going to test both before trying to change jet size.
 
Both the high and slow speed jet measures fuel... NOT air.

High Speed Jet is part number 322810 - Marked 65C - ID is .065

Slow Speed Jet is part number 317473 - Marked 30 - ID is .030

To richen the flow of fuel thru either jet, the ID would need to be larger. (From experience... do not exceed .031).

Before reworking any jet, make absolutely sure that the compression and spark are as they should be ie:

Compression should be 100+ and close to even on all cylinders.

With all spark plugs removed, the spark should jump a 7/16" gap with a strong blue lightning like flame... a real SNAP! NOTE that spark plugs should be Champion QL77JC4 plugs, gapped at eithe .040 (original recommended) or .030 (late 1990's revised recommended).

Parts no doubt available on this site and your local dealership. I may have whatever jets you need if it comes to that... if you can't obtain them here.

Much, much appreciated. Going to lake to test timing and re check spark quality one more time before I try the 031 jet. I did pay a shop to chk timing since I had no experience in that. Studied up and going to learn how to do it now.

I will report back.
 
NEW TO LINK/SYNCH/TIMING SO COULD USE HELP. I took boat to launch and did the following:
1. started and warmed motor. Have to use start lever to keep it running even when warm. In order to keep motor running with start lever all the way down I have to restrict air to throat of carb by partially closing choke. When doing that the motor idles good but seems too low.
2. I measured idle timing to be 2 degrees with lever all the way down. So, I need to advance to 5 deg.
3. Removed throttle cable and tried to adjust throttle cam yolk to advance spark. I am not sure I did this properly as the roller did not line up with the scribe on the cam anymore.
4. I ended up just adjusting the throttle cable to increase rpm and this advanced the idle timing to 6 deg. But now the idle RPM sounds too high and shifting is not as smooth. Although motor will run at idle and will move to gear without dying. I do still hear a lean pop at idle in gear and can smooth that out by restricting the air flow as described above.

I think I have something wrong. I have read the instructions many times and OEM manual says to set scribe on cam to middle of the roller BEFORE adjusting idle timing. BUT as I adjust the throttle cam yolk to advance timing the position of the roller on the cam changes.

So, think I am getting close but need some help with some specifics of entire link/synch timing procedure.

Any help is appreciated.
 
Have you checked the compression and spark yet?

Smhamilt..... Synchronization via the "Kiss" (keeping it simple stupid) method:

1 - Back the throttle off so that the metal cam IS NOT touching the throttle roller.

2 - Make sure the butterfly throttle linkage between the two carburetors is adjusted properly so that the butterflies open and close at the same time. At idle, you do not want one butterfly completely closed and one ever so slightly open.

3 - Remove spark plugs... At cranking speed, set the "idle timing" to whatever it is supposed to be set at via your service manual and temporarily screw the mechanical idle stop screw in so that the setting (engine throttle linkages) is locked there.

4 - Adjust the throttle roller so that the scribe mark on the cam aligns with the center of the roller.

NOTE: Unless someone has tinkered with the adjustment of the threaded nylon yoke on the end of the threaded shaft that connects between the vertical throttle arm and the metal cam, aligning the roller with the cam scribe mark should present no probem..........

However, if that nylon yoke adjustment has been tinkered with then that will need adjusting also for the roller to align with the cam scribe mark... not a major problem. (The reasoning to have that mechanical idle stop screw temporaily set up).

Now, with the engine running, the idle rpm can be set properly, throttle cable trunion, idle stop set screw etc.

Let us know how this workd put for you.
 
Thanks. Understood. This is an ongoing saga. Notes say compression 2 wks ago is 110, 115, 105, 110. Compression and spark have always been good. I just don't have experience w link synch timing. Going to keep working at it until I get it right.
 
Have you checked the compression and spark yet?

Smhamilt..... Synchronization via the "Kiss" (keeping it simple stupid) method:

1 - Back the throttle off so that the metal cam IS NOT touching the throttle roller.

2 - Make sure the butterfly throttle linkage between the two carburetors is adjusted properly so that the butterflies open and close at the same time. At idle, you do not want one butterfly completely closed and one ever so slightly open.

3 - Remove spark plugs... At cranking speed, set the "idle timing" to whatever it is supposed to be set at via your service manual and temporarily screw the mechanical idle stop screw in so that the setting (engine throttle linkages) is locked there.

4 - Adjust the throttle roller so that the scribe mark on the cam aligns with the center of the roller.

NOTE: Unless someone has tinkered with the adjustment of the threaded nylon yoke on the end of the threaded shaft that connects between the vertical throttle arm and the metal cam, aligning the roller with the cam scribe mark should present no probem..........

However, if that nylon yoke adjustment has been tinkered with then that will need adjusting also for the roller to align with the cam scribe mark... not a major problem. (The reasoning to have that mechanical idle stop screw temporaily set up).

Now, with the engine running, the idle rpm can be set properly, throttle cable trunion, idle stop set screw etc.

Let us know how this workd put for you.

I will do those things and report back. Thanks
 
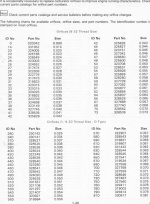
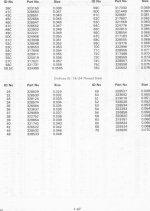
For your reference:

Don't mix "C's" with "D's" btw. Like cats & dogs ...
 

Attachments

  • jet1.jpg
    jet1.jpg
    77.2 KB · Views: 231
  • jet2.jpg
    jet2.jpg
    57.8 KB · Views: 139
Okay Joe. I have checked and reset throttle plates. also rechecked crisp snappy spark at 7/16.

I am trying to set idle timing at 5 deg. No plugs in at cranking speed. The idle set screw is screwed all the way in and I am only reading 4 degrees. (was at 2 degrees) Going to continue the process and go to lake with a helper to measure WOT timing.

Does my idle screw issue mean a timer base adjustment may be needed???
 
Started from the beginning with throttle plates/linkages. Adjusted idle timing from 2 deg to 5 degrees. Adjusted nylon yolk to line up mark on cam w roller. Took to lake and WOW. What diff 2 degrees is in idle timing. I have never heard this motor warm and idle so nice. Adjusted t cable and all is well. For 4 yrs I have had blk plugs and crappy idle and thought it was fuel. Checked plugs when I returned and they look great. Clean (didn't run motor too long). Now it all makes sense!

One question is in order to achieve 5 deg idle timing the idle set screw us all the way screwed in. And it doesn't always return to the stop as it should. Messed w throttle cable adjustment some and I think I improved it. Any tips?

Thanks to you all for your help. I feel like I have a new motor. And now I can do link synch timing.
 
Also tested WOT timing at cranking speed w no plugs in measured 24 deg. I have had a helper to test I the water yet. I suppose it should do that.
 
I am trying to set idle timing at 5 deg. No plugs in at cranking speed..... The idle set screw is screwed all the way in and I am only reading 4 degrees..... (was at 2 degrees) Going to continue the process and go to lake with a helper to measure WOT timing. Does my idle screw issue mean a timer base adjustment may be needed???/QUOTE]

No... I mentioned the idle stop screw simply to use as a lock to keep the linkage from moving. Back that screw out and later set the idle rpms to 1000 on a flushette, then set the idle screw so that the rpm will not drop under that 1000 rpm reading at idle/neutral.

You can set the idle timing simply by moving the throttle cable wherever it needs to be... a setting of anywhere between 4 to 6 degrees actually.... then after you have that setting, if the scribe mark on the cam is not aligned/touching with the center of the roller, adjust the nylon yoke so that it is.

You can adjust the full spark advance at cranking speed if you desire to as follows:

NOTE: If your engine has the "Fast Start" feature", you must disconnect/eliminate that feature in order to use the following method. The "Fast Start" automatically advances the spark electronically when the engine first starts, dropping it to normal when the engine reaches a certain temperature.

The full spark advance can be adjusted at cranking speed,"without" have the engine running as follows.


To set the timing on that engine, have the s/plugs out, and have the throttle at full, set that timer base under the flywheel tight against the rubber stop on the end of the full spark timer advance stop screw (wire it against that stop if necessary).


Rig up a spark tester on the #1 cylinder plug wire. Hook up the timing light to the #1 plug wire. Crank the engine over and set the spark advance to 4° less than what the engine calls for.


It's a good idea to ground the other plug wires to avoid sparks that could ignite fuel that may shoot out of the plug holes. I've personally never grounded them out and have never encountered a problem but it could happen.


I don't know the full spark advance setting your engine calls for, but to pick a figure, say your engine calls for 28°, set the timing at 24°. The reasoning for the 4° difference is that when the engine is actually running, due to the nature of the solid state ignition components, the engine gains the extra 4°.


If you set the engine to its true setting at cranking speed, when running it will advance beyond its limit by 4° which will set up pre-ignition causing guaranteed piston damage! You don't want that to take place.


No need to be concerned about the idle timing as that will take care of itself. The main concern is the full advance setting.

A fellow member from one of the various marine forums suggested having water supplied to the water pump (flushette or barrel) simply to provide lubrication to impeller. A worthwhile suggestion I thought, and entered here.


Be sure to use your own engines spark advance settings, not the one I picked out of the air here in my notes.

Thousands of parts in my remaining stock. Not able to list them all. Let me know what you need and I'll look it up for you. Visit my eBay auction at:

http://shop.ebay.com/Joe_OMC32/m.html?_dmd=1&_ipg=50&_sop=12&_rdc=1
********************
 
So basically throttle plates must be closed and roller centered on cam at 4-6 degrees. If that is the case then I have proper fuel/air mixture at that timing? From there the throttle cable and stop are used to set idle rpm. Got it right ?
 
You got it right!

Of course getting that idle timing set properly involves the adjustment of the threaded nylon yoke along with the screw adjustment of the roller, but I'm sure you figured that out... dosen't take rocket science mentality there.
 
Idle screw is still basically all the way screwed in to make about 1000rpm in N. Doesn't seem right. Seems like 1000 rpm should be near the middle of the idle adjustment screw. Maybe it is what it is. Any concerns with this?

Thanks again
 
Back
Top