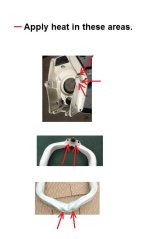
I am in the process of "trying" to remove the keeper bolts and hinge pins in my 1979 280 OD. I have gotten lucky so far and managed to get one side keeper bolt out by using some heat. No such luck on the port side. At this moment I have the upper and lower units removed so I am only dealing with the intermediate and swing arm. I even have the engine and flywheel cover removed.
At this moment I have several concerns about how much heat to use.
I have built a diverter dam system around the top of the OD where it bolts to the transom and ran a small trickle of water so it runs down to keep the boat gel coat and hull from getting hot.
My concern is how much heat can I apply without damaging the seal between the transom and OD plus damaging the plastic sleeves (bushings)that the swing arm rides on.
If I damage any of those and am not able to get the pins out I am up the creek without a paddle and would be in a worse condition than I am right now.
I have read as much as possible on this site in regards to this and realize that I do not want to break a bolt or I might as well "pack it in"
Of course the 4 bolts that hold the exhaust "Y" on are also "salt" frozen so there is another challenge if I wanted or needed to take the entire assembly off the boat.