Logo

AQ280 Prop rotation

PatinIdaho

Regular Contributor
Hi. New to Volvo Penta and this site but glad I found it ;)
So I want to make sure I understand his correct.
Right hand rotation is better then left hand rotation for the outdrive?

Currently my prop rotates LH. I need to buy a new prop. I can easily change the rotation to RH if it will help prolong the life of my old drive.
Thanks for the help!!!!!
 
No, left hand rotation is better. Really doesn't make a big diff on 4 Cyl engines but V8 should, IMO, be spun left. Spinning left forces all the drive inertia in forward gear DOWN thru the drive. Right hand spin, in forward, the top cap and it's 4 bolts are holding back all the inertia.
 
Hi. New to Volvo Penta and this site but glad I found it ;)
So I want to make sure I understand his correct.
Right hand rotation is better then left hand rotation for the outdrive?

Currently my prop rotates LH. I need to buy a new prop. I can easily change the rotation to RH if it will help prolong the life of my old drive.
Thanks for the help!!!!!

In addition to what Gary said, this can be a double edged sword, so to speak.
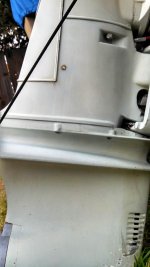
This is tuff to explain if you are not familiar with Volvo Penta's cone clutch transmission... so bear with me.

This is limited to the single prop drives:

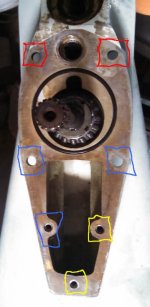
All three transmission gears spin constantly when the engine is running.
The vertical shaft remains static until a gear is selected.
Once a gear direction selection has been made, the vertical shaft spins in the direction of that gear selected for forward propulsion.

LH prop requires this shaft to spin CW when viewed from above.
RH prop requires this shaft to spin CCW when viewed from above.

When spinning a LH prop, the power is transmitted via the transmission's main drive gear and the lower driven gear.
As said, this turns the vertical shaft in a CW direction when viewed from above.


When spinning a RH prop, the power is transmitted via the transmission's main drive gear and the upper driven gear.
This turns the vertical shaft in a CCW direction when viewed from above.

As per design, the gears sets themselves don't care which hand prop you run.


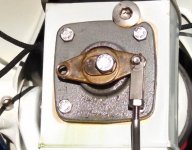
Here's the catch... actually several catches:

When we run a RH prop, the transmission's vertical shaft undergoes a downward force, which is countered by the special LH thread top nut.
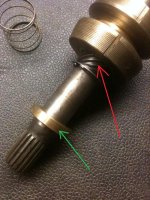
When we run a LH prop, the transmission's vertical shaft undergoes a upward force, which is countered by the brass split ring keeper.
These brass split ring keepers undergo stress that will eventually cause them to expand and fail over time.


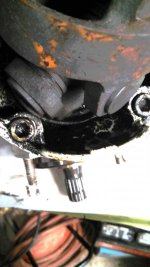
Gary is correct regarding the gear's bearing force.
The main drive gear and the selected driven gear want to oppose one another and cause a separation force.
When the upper driven is selected, the top cover controls the separation uplift force.
When the lower driven gear is selected, the Intermediate housing controls the separationg downward force.

In all my years witht the AQ series, I've never seen a top cover break due to this gear separation uplift force alone.
However, I have seen and repaired transmissions where the top cover has broken due to a split ring keeper failure that caused the vertical shaft to come up and through the top cover.

If your transmission has been turning a LH prop for years and years, you may want to look at this brass split ring keeper for signs of expansion.
If it is expanding, you had best replace it, especially with V-8 power!


The other catch:

A 280 drive trim fin/torque tab works well for either hand prop.
A 250, 270 or 275 trim fin/torque tab works best for a LH prop... and don't ask me why!


.
 
Here is a vertical shaft, sliding sleeve and brass split ring keeper (green arrow).

The OD sides of the brass splint ring keeper should be perfectly parallel to one another.
If not, it is expanding.
 

Attachments

  • Vertical shaft and split ring keeper 2 modified.jpg
    Vertical shaft and split ring keeper 2 modified.jpg
    86.7 KB · Views: 215
I fully understand what your saying Ricardo:cool:
Here is a little history on how i got this boat. Gonna be kinda long but what the heck!
I sold my computer to buy a 14f aluminum boat as i don't have the funds to just go buy one and i wanted to get out and go fishing and stop sitting at the computer feeling like i was wasting away.(52yo)
So got the boat and after a little swapping around and fixing up the wife and i took it out on the BIG lake 15 minutes from my house:)
I was fine with it but the wife soon discovered she did not like it at all being to small and uncomfortable so i decided to sell it abd see what i could find a little bigger. Sold it for $1400
Took a couple weeks and found a 1979 19F tri-hull that had been redone about 6 years ago and bought it for $1000.
We could not take it out on the lake as it was windy and the waves were about 4F high so we ran it on the muffs. Sounded good and shifted fine.
Hull is solid as well as the transom. Interior near perfect.
Sense then i have been to the lake twice with it.
Found carb needed rebuilt so got a kit and rebuilt it. Back to running as it should.
Changed out drive oil also. It was slightly milky but you could tell there was water in it. Checked bellows and no sign of water or oil in it(whew)
Second time at lake boat worked great!. Got back to dock and started loading boat but forgot to raise out-drive. As i was winching it onto the trailer i remembered it and raised it(drug it about 2 feet across concrete).
Once out of the water and looking things over i seen oil coming out of the side of the lower unit not much just a drip or two where it hooks to the mid section just above where that cap screw is on the side.
So now i have a dilemma.
I can put i new seal in it easy enough im sure And this weekend i plan on doing that and then do a P/V test.
So now i worried about it being so old that it needs gone through but around here that is EXPENSIVE! with out a doubt. I have a little money but not that much.
I am capable of doing the work my self as i have a friend with a pretty nice shop and i can barrow mic's from work but i have no special tools and no shims if needed. So i can't do it even if i was brave enough.
So now im trying to decide if i should change seal and hope for the best or just sell it and buy another computer and sit at home again:confused:
Here is pics of the one i sold and the one i bought
 

Attachments

  • 00101_8xGOnfU6Ejo_600x450.jpg
    00101_8xGOnfU6Ejo_600x450.jpg
    43.9 KB · Views: 104
  • IMG_20140625_192915_052.jpg
    IMG_20140625_192915_052.jpg
    85.4 KB · Views: 109
"Cap screw on the side". I'm trying to decipher this. If you mean between the lower unit and the intermediate, there are three O-rings there. One will not leak oil, it's for water. The other two could/will leak oil. One is way smaller than the other and seals around the oil transfer tube and the other seals around the driveshaft bearing area. All three are easy peezy to do. Hour at the most. Grab three quarts of motor oil and have at it.
 
Here is a vertical shaft, sliding sleeve and brass split ring keeper (green arrow).

The OD sides of the brass splint ring keeper should be perfectly parallel to one another.
If not, it is expanding.

I just put the brass keeper on a piece of glass, non-split ring side, and if it rocks, time for a new one. I have seen, in desperation, guy's put the brass collar in a press and push it back the other way. I've always got old parts and pieces laying around so I've have never tried this way, don't think I would.
 
I just put the brass keeper on a piece of glass, non-split ring side, and if it rocks, time for a new one. I have seen, in desperation, guy's put the brass collar in a press and push it back the other way. I've always got old parts and pieces laying around so I've have never tried this way, don't think I would.
As the keeper expands, the upper area protrudes some. That may be what you are seeing.

However, what's important are the sides, as they must be parallel to one another.
Easiest method for testing, is to place the OD of the keeper between the jaws of a dial indicator caliper.

If you see no daylight at any contact point, the keeper sides are parallel, and it should be OK.
If you can see daylinght at any contact point, the keeper is expanding from the force of the carbon steel split ring.

NOTE: I've had the ugly task of reparing several transmissions over the years due to damage caused by a split ring failure.... and it was not an inexpensive repair.

My suggestion to any of us who are running a LH prop or a Duo Prop drive, and with V-8 power, that we most definitely check the condition of this part.
OK.... enough said! :D


Changed out drive oil also. It was slightly milky but you could tell there was water in it.
FYI...... the single prop drives require 30W engine oil.... not gear oil.

The first ikely suspect for water intrusion would be the eccentric piston seal.


Checked bellows and no sign of water or oil in it(whew)
Did you replace the drive shaft bellows?


Second time at lake boat worked great!. Got back to dock and started loading boat but forgot to raise out-drive. As i was winching it onto the trailer i remembered it and raised it(drug it about 2 feet across concrete).
Once out of the water and looking things over i seen oil coming out of the side of the lower unit not much just a drip or two where it hooks to the mid section just above where that cap screw is on the side.
Need more info! Pictures if possible.


So now i have a dilemma.
I can put i new seal in it easy enough im sure And this weekend i plan on doing that and then do a P/V test.
This will be a pressure/vacuum "leak down" test with a time duration.
Oil must be drained from drive at least while doing the Pressure Leak Down test!


So now i worried about it being so old that it needs gone through but around here that is EXPENSIVE! with out a doubt. I have a little money but not that much.
In a small boat like yours, the 280 (unless it's been water contaminated for years) will likely be OK.
These are known as "bullet proof" drives if the maintenance has been kept up properly.

I am capable of doing the work my self as i have a friend with a pretty nice shop and i can barrow mic's from work but i have no special tools and no shims if needed. So i can't do it even if i was brave enough.
No re-shimming is requred for a "re-seal" if all shims are accounted for and are placed back where they were.


So now im trying to decide if i should change seal and hope for the best
Again, can you be more clear as to what area you're talking about?
Are you talking about O-rings, or actual seals, or both/all?

The AQ series drive is a three piece drive.
Upper gear unit (transmission), Intermediate housing, and lower gear unit.
Between the transmission and Intermediate housing will be two O-rings.
Between the Intermediate housing and the lower unit, will be three O-rings. One for the lower pivot tube water seal, and two for the oil seal between the two cases.
I'd suggest that the pivot tube water seal O-ring be glued in place.
 

Attachments

  • Orings required for R and R.jpg
    Orings required for R and R.jpg
    46.1 KB · Views: 249
Last edited:
Hi. Guys. Thanks for all the help and info your offering:cool:
Here is a pic showing where the oil is leaking between the mid section and lower unit located between the 2 cap screws shown.

No i did not change the bellows. i unclamped it from the out-drive and looked in it. It is clean and dry.

Here is my plan for this fall/winter as i don't know any history of this boat.

I have removed the exhaust manifolds and risers. They look to be in fine shape and should go a few more years easy. Very little rust inside the water passages and the mating surfaces are clean with no rust or pits anyplace:)

I removed the thermostat housing and will replace the thermostat.

All hoses need changed. They are hard and some have cracks on the outer part as well as the two exhaust coupler hoses.

New raw water impeller. It is cracked, collapsed and missing a couple vanes.

Full tuneup including a Petronix conversion kit, wires, cap, rotor,plugs, coil, oil, filter.

New/rebuilt prop

Install new bellows, exhaust bellows, water line

So
Now i really feel like i need to get that brass split ring keeper checked out or replaced and also get the seals replaced on the transmission part. Is this something i can do myself sense ill be reusing all the original parts except the brass ring and seals?

Also to change the prop shaft seal is this also something i can do my self?
 

Attachments

  • IMG_20141024_154233_028.jpg
    IMG_20141024_154233_028.jpg
    36.1 KB · Views: 112
The 1979 AQ225D will not use risers/spacers. You will have only manifolds and elbows.
Good call regarding pulling them and inspecting them.
Make sure that the new transfer port gaskets are fully open!


The elbow to Y-pipe couplers are 95mm. The OEM replacements are always too short! Repeat… Always too short!
If you replace these… have a marine exhaust hose Company bring new 95mm soft wall exhaust hose in by the foot, and make sure that each one is at least 2 inches longer than the OEM.


When/if you change drive shaft bellows, remove the transmission only! Watch for the shims underneath...... don't loose any, they must go back in!
This will open up the area for easy access to the water neck fitting, S hose, shift cable clamp, etc....... and will allow you to see the brass split ring keeper! It's also much easier than trying to remove the entire drive.
This will cost you 4 new O-rings and one fill port gasket only.


As for the Pertronix kit… I would strongly suggest that you remove your ignition distributor and have it checked on a Sun, Allen or King machine, and if need be have the curve recalibrated to OEM specs.


The oil leaking at the shift mechanism cover is likely from the eccentric piston seal.
There is a trick to removing one style detent pin spring pin!
The "directional" seal itself is an easy change.

New prop shaft seals can be a user friendly installation. You may need to build a special prop shaft bearing carrier "puller tool". (more on that later)


You'll want to find and retrieve the missing seawater pump impeller blades.
If not retrieved, they can cause problems.

Post a photo of the seawater pump. If large volume, there are some inherent issues regarding the correct impeller.

.
 
Last edited:
Ok so got the Transmission off and the lower unit off and this is what i found.

YIKES!!!!!!!!!!!!!!!!!!!!!!!!!!!!!!!! #^$&*^#(@*!)*@#&)$*(@#

The lower unit could have been severely damaged or even lost in the lake!!
Check out the picture of it from the top.
RED indicates no bolts there at all!!
BLUE indicates lose bolts
Yellow indicates tight bolts.
I never even thought to check if they were there and tight after i bought it.
It is leaking from the shifter seal.
It is leaking from the input shaft seals.
There is very fine metal flakes in the oil that are hard to see unless you look very close. They are steel colored not bronze color.
1 u joint feels a little stiff so they both need replaced.
Can not tell about the PDS bearings but they are full of grease

The bearings in the transmission and lower unit all feel smooth when turned from what i can tell.
All bolts turned easy. Even the 2 tight ones!
The impeller if the big Jabsco one. I think its 1.990 but could be wrong

So now the question is can i replace the main input seals my self or should i find some one that can.
I can take it apart and reassemble it correctly keeping track of the shims naturally.
If it needs reset up ill need to find a shop that will do it.
Anyone have a idea what a fair price to have a shop do it?
 

Attachments

  • Lowerunit.jpg
    Lowerunit.jpg
    37.1 KB · Views: 136
  • Shift.jpg
    Shift.jpg
    66.3 KB · Views: 133
  • driveshaft.jpg
    driveshaft.jpg
    44.5 KB · Views: 109
  • impeller.jpg
    impeller.jpg
    39.1 KB · Views: 174
Pat, Nothing but normal everyday Volvo things going on in your drive and I say that in a good way as Rick and I see them everyday. The upside down, as I call them, bolts falling out is nothing new. The shift shaft seal leaking is an everyday occurance when they get old. The two o-rings between the inter and lower never leak unless the bolts become loose and fall out. Impeller is a typical too old to be in use impeller. Bearing crosses should be checked yearly and if one is tight, they've not been checked. Grab your good manual and you shouldn't have a problem doing what needs to be done, we're here for you.
If you have doubts about your ability on your drive, Rick or I can do it for you for reasonable. Rick did mention he might be giving up working on them though. We're both the next state over so a shipping time frame wouldn't be bad.
What did the oil screen have in it when you separated the lower from inter. It's in the small, roughly 5/8 hole, oil return hole between the other two o-ring holes. Just stick your pinky down the hole and pull it out.
 
Hi Gary.
In the little screen there was nothing at all i could find after i removed it from the housing.
Its reassuring to know that everything i have described is normal stuff for a 280.
Now i suppose its a waiting game for me as i need to order parts but there is really not much more i can do for about the next 5 or 6 months
I'll keep up with any progress i can get done though during the winter.
Want to thank you and Ricardo for helping me out with this:cool:
Next year i just want to enjoy the boat and not worry every time im out with it!!!!
 
It is leaking from the shifter seal.
It is leaking from the input shaft seals.
There is very fine metal flakes in the oil that are hard to see unless you look very close. They are steel colored not bronze color.
1 u joint feels a little stiff so they both need replaced.
Can not tell about the PDS bearings but they are full of grease

The bearings in the transmission and lower unit all feel smooth when turned from what i can tell.
All bolts turned easy. Even the 2 tight ones!
The impeller if the big Jabsco one. I think its 1.990 but could be wrong

So now the question is can i replace the main input seals my self or should i find some one that can.
I can take it apart and reassemble it correctly keeping track of the shims naturally.
If it needs reset up ill need to find a shop that will do it.
Anyone have a idea what a fair price to have a shop do it?
i recently posted tips regarding the eccentric piston seal replacement. If you can't find find the thread by doing a search, I'll take a look.


Note regarding the main drive gear seal:
The four clamping collar cap screws need to be removed in order to
remove the bearing box for this seal replacement.
DO NOT attempt to remove these without first applying heat to the four corresponding thread inserts!
If the socket heads become rounded out, you'll be taking your transmission to a machine shop for some delicate milling machine work!


Your bearing crosses can be a Spicer 5-1306X. Same or better quality and at approx $14 each if you know how to buy them.

As for the PDS bearings, I know of no good proof method to confirm if good without removing the PDS. If you question the condition, replace them now!
A failure here will be more than expensive, and you'll be beating your head wishing that you would have done so!


If you have the large volume Jabsco seawater pump (6 cover screws), measure the pump body impeller cavity depth and confirm with the new impeller.
The .090" difference in depth between the Jabsco and Johnson impellers is critical.


.
 
Last edited:
I was timed out earlier.
Here's an image of an early AQ series transmission (pre-A drive) recieving milling machine work to remove the four rounded-out cap screw socket heads.
Each cap screw seats against a very delicate shoulder.
These shoulders are necessary to prevent water intrusion, and is why we can't simply drill these socket heads out without risk to these shoulders.

Heat is your initial Friend here....... and your ONLY intial Friend!
If you hurt this friend's feelings, your next friend will be the machinist! :eek:
 

Attachments

  • Milling machine 3.jpg
    Milling machine 3.jpg
    77.7 KB · Views: 130
Last edited:
I'll admit to being one of the people that made that mistake. After rounding out the cap screws, I took the gearbox to an automotive machine shop. They proceeded to drill out the bolts, and also removed the bolt shoulder seating surfaces. And, of course, the sealing ring was ruined. Bad part was, I wasn't really aware of what had happened, just had a feeling that it didn't look right.

Luckily, I was able to buy a freshly overhauled and sealed gearbox from Rick. Be aware that they're not cheap.
 
Well if everything goes to hell taking this apart my previously mentioned buddy just happens to have a bridgport milling machine sitting there:)
Im pretty sure this is the impeller i need. Jabsco 18777-0001-P It does have less fins? 10 instead of 12 but read something about it being the "new" style. I am unsure about it though. It seems to be a real pita finding what impeller i need for sure. The pump does have 6 screws holding the cover on.
As for the shifter seal i have looked at a few posts and parts diagrams. Should be easy enough to replace.
 
Also about the raw water pump. If i have any funds left after all the parts i need to buy as it stands now ill be getting a Johnson pump I think its F6B-9. Ill need to look to be sure though.

So anyway curiosity got the best of me and i went out to the garage to take the 4 bolts out. After the initial pop they all 4 came out with out a problem. No heat necessary:p

I do expect this drive to last a good long while. Im actually pretty easy on stuff. Ill never be pulling a skier. Maybe a inner tube(grand kids)every once in a while.
I generally ease the throttle forward run for about 15/20 minutes then fish with a trolling motor 3 or 4 times a week. Seems like light use to me?
I do regular maintenance probably more then necessary and not knowing the boats history led me to this point. I need to know its all as it should be!
Also the engine and out drive are very clean. I would bet the boat has never seen salt water as there is really no corrosion or rust at all and things just come apart to easy. Anyway rambling now so Have a good night/day everyone!!!!!
 
Last edited:
Im pretty sure this is the impeller i need. Jabsco 18777-0001-P It does have less fins? 10 instead of 12 but read something about it being the "new" style. I am unsure about it though. It seems to be a real pita finding what impeller i need for sure. The pump does have 6 screws holding the cover on.
As for the shifter seal i have looked at a few posts and parts diagrams. Should be easy enough to replace.

If six cover screws, it is indeed a Jabsco seawater pump.
If the impeller cavity measures 1.990" in depth, it will be the large volume pump.
The large volume Johnson pump impeller looks identical in diameter, blade count and spline configuration, but measures only 1.900" in depth.
If the Johnson 1.900" impeller is used in the Jabsco 1.990" pump body, it will be shy by .090", and it will breach suction.
Parts counter people get this wrong quite often... so be aware!


Also about the raw water pump. If i have any funds left after all the parts i need to buy as it stands now ill be getting a Johnson pump I think its F6B-9. Ill need to look to be sure though.
The SBC with either cooling system (closed cooling or open) requires the small volume seawater pump only.... I.E., the F5B-9.
These are occasionally on sale for around $150 complete with new impeller.
Mounting bolts are different!

So anyway curiosity got the best of me and i went out to the garage to take the 4 bolts out. After the initial pop they all 4 came out with out a problem. No heat necessary:p
You are either very fortunate and had lots of luck on your side.............., or this transmission has very little fresh water only use.
This day and age, I would not dare try to remove these cap screws without first applying heat to the thread insert areas.


I do expect this drive to last a good long while. Im actually pretty easy on stuff. Ill never be pulling a skier. Maybe a inner tube(grand kids)every once in a while.
I generally ease the throttle forward run for about 15/20 minutes then fish with a trolling motor 3 or 4 times a week. Seems like light use to me?
FYI: we basically have two efficient speeds....
1..... hull speed, and 2.... planing speed.
Anything in between is not fuel effecient and places a greater load on our engines and drives.


Also the engine and out drive are very clean.
Good sign!

I would bet the boat has never seen salt water as there is really no corrosion or rust at all and things just come apart to easy.
Had the drive seen salt water, I can just about guarantee you that those four cap screws would have given you trouble.


While you have the main drive gear bearing box removed, I'll suggest that you press the gear from the 30207 bearing.
With the gear pressed out, you will be able to see and examine the two races and two roller cages.
The 31307 race will give you a tell tale sign of the condition of the 31307 roller cage ..... of which is the critical bearing here.

NOTE: no change to the shim value will occur while removing the gear from the BB, nor will any changes be necessary.... unless the rolling torque value is low.
If low, you can remove approx .001" to .0015" of shim value only..... and then re-test for run-in bearing rolling torque value.

If you replace the bearings, you'll want to perform a new rolling torque value check.


.
 
Last edited:
Im going to be ordering a complete out drive seal kit thursday but i see there are 3 different makers with a large discrepancy in price.
Volvo Penta i cant seem to find
Sierra is $150ish depending on who has it
Mallory is $88
from the description they all contain the same parts. Any one know what the real difference is?
 
I've been using Sierra parts for over 30 years and have never had a problem with them. You will get more than needed in the seal kit but it will all be in the kit. Sorry I don't know what the diff is and on many occasions my supplier has shipped me Mallory instead of Sierra and they all worked also, BUT I have never used a Mallory seal kit.
 
I'm with Gary....., I too have used Sierra parts before and with no issues.
While Sierra, Mallory and Volvo Penta outsource these and package/label accordingly, I will typically use the OEM seals.
Sierra seals will be just fine.

To completely reseal your 280 drive:

transmission
1 main drive gear seal (single lip)
1 very small diameter O-ring within the seal surface wear washer (between this part and the male yoke flange)
the kit may include a new tension bolt..... not necessary IMO.
2 bearing box O-rings (1 each clamping collar and main case sides)
1 eccentric piston seal (directional)
1 eccentric piston housing O-ring
1 red phanolic fill plug gasket
1 top cover looped gasket
1 hollow bolt O-ring
1 bearing retainer O-ring
1 oil drain-back tube O-ring
1 dip stick O-ring

Intermediate housing to lower gear unit
1 vertical shaft lower-to-Intermediate housing O-ring
1 oil drain-back tube O-ring
1 water tube (aka pivot tube) O-ring


lower gear unit
2 propeller shaft seals (directional back to back installation)
2 prop shaft bearing carrier O-rings
1 drain plug O-ring

NOTE: while you have the prop shaft removed and disassembled for the new seals, look closely at the die cast aluminum slinger pump impeller.
This impeller is pinned to the "driven" gear. If this drive has ever seen heavy gear oil in the past, these drive pins may have been damaged.
If damaged or sheared off, the slinger pump no longer moves the cooler oil up to the transmission.


Bearing Crosses for early universal drive shaft
Spicer 5-1306X

PDS bearings/seals (red 1 pc V-8 flywheel cover)
1- 6206 .... 1- 6007.... 2- 35x62x7mm seals in either TCM or Timken, single lip


Tips: (no offense, as I don't know your skill level)


  • use a propane or mapp gas torch heat where needed.
  • watch carefully for all shims.... measure, label and lay aside.
  • if sealant is used at O-rings, note that the eccentric piston housing's O-ring grove can hydrolock if sealant is excessive.
  • look closely at the Bearing Box alignment pin. it must be in tact.
  • if the eccentric piston detent pin is secured via a parallel spring pin.... post back. if perpendicular to the piston, you're good to go.
  • use a primer and thread locker at the vertical shaft top LH nut and at the male yoke tension bolt
  • use hand held impact driver on drain plug.... two mild blows will do it.
  • no need to remove the entire drive.... unless suspension fork, reverse latch, pivot tube, etc work becomes necessary.
  • if the suspension fork hinge pins are to be removed... remember that Heat is your friend!
  • use nothing harder than an Italian bread stick on the hinge pins when driving them out (aluminum or brass ONLY).
  • if PDS bearings/seals are replaced, be sure to pre-fill the grease cavity prior to installing the seals.
  • the FWD 35x62x7mm seal should be glued or staked so that it will not dislodge in the future.
  • the AFT 35x62x7mm seal installs in the Non-Conventional direction.... (seal lip/tension spring facing AFT)


Good luck with the project! ;)


.
 
Last edited:
Hiya.

Tips: (no offense, as I don't know your skill level)

Oh i have the skill.
Started out greasing semis for my grandfather at 8yo cuz your free labor!. At 14yo i could rebuild 13speed Road Ranger transmissions by 17 i could rebuild 400 Cummings in my sleep. Grandfather owned a truck shop.
Never really messed with HyPoid gears much though although i did rebuild a 72 monte carlo rear end once and it worked for as long as my buddy had the car!
So im not at all afraid to tear into it.
Im just afraid there will be something wrong that will be very expensive to repair and as i don't have the tools to reset it up properly myself ill probably need some one with the tools to do it and that equals LOTS of money i don't have.
The transmission bearings all feel smooth when i turn the shafts on the bench. Im pretty confident there all good.
The lower unit however does feel a little rough when i turn it. I can't tell if its a bearing or the 2 gears meshing that im feeling.
My suspension is its a bearing starting to go out:(
I suppose if it is a bearing ill just have to take a few months to buy micrometers so i can replace it and set it up with proper shimming/preload.

Oh Also here is the manual im using. Hope its ok to post it. Maybe others can use it also.
http://www.mybayliner.co.uk/boatmad/280285290.pdf
 
Last edited:
.....................

Im just afraid there will be something wrong that will be very expensive to repair and as i don't have the tools to reset it up properly myself ill probably need some one with the tools to do it and that equals LOTS of money i don't have.
Get into it first. Good chance all will OK.
Do pay attention to the main drive gear bearings, and press the gear from the 30207 bearing.

The transmission bearings all feel smooth when i turn the shafts on the bench. Im pretty confident there all good.
Unfortunately, even mildly worn bearings can feel OK. But again, you'll likely be OK.

The lower unit however does feel a little rough when i turn it. I can't tell if its a bearing or the 2 gears meshing that im feeling.
My suspension is its a bearing starting to go out:(
I could place two 280 lower units side by side, and each will feel a bit different.
The gears will give you a tell tale sign.

I suppose if it is a bearing ill just have to take a few months to buy micrometers so i can replace it and set it up with proper shimming/preload.
If the large trust bearing needs to be replaced, these are so precisionally manufactured, that often the differences between old/new are in the .00010" to .00020" range.

Oh Also here is the manual im using. Hope its ok to post it. Maybe others can use it also.
http://www.mybayliner.co.uk/boatmad/280285290.pdf
That is an OEM PDF file copy..... and it should be good.
Steer clear of Seloc and Clymers.

When doing lower unit hypoid gear work and/or changing bearings, note that the drive gear to driven gear contact must be checked with a downward load force against the vertical shaft tapered roller bearing race.
 
THANKS SOOOOOOOOOOO MUCH Ricardo and Gary for all the help you have given so far. Im sure this is going to turn into a long thread by the time im done.
I can't add much else till next week when my seal kit arrives and i start the final tear down and reassembly.
So stay safe and stay tuned in till i post some more progress and pics and questions :D.
 
Back
Top