Logo

Parts Help

divegusto

New member
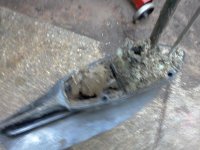
Just about finished cleaning up a 2008-2010 Tohatsu 20HP MFS short shaft manual tilt electric start that had been in fresh water river for over a year. Serial number tag gone which is why the year span. The transom stern brackets are broken so need to replace. I have the part numbers 3BJQ62112 & 113 so know the various years models that use the same brackets for Nissan/Tohatsu. Question is can Mercury parts be used as well (my belief ) and what are the numbers to reference, thanks. Doesn't have to be exactly the same just functional. I do have the swivel bracket bar/tube with nuts and the distance piece/rod.

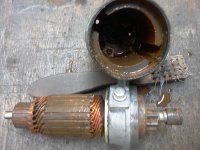
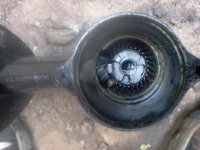
Pics from when I opened it up. After cleaning starter it worked & lower end turned no rust. Flushed the motor, everything turns and valves had no rust showing.
 

Attachments

  • 061114091745.jpg
    061114091745.jpg
    63.9 KB · Views: 33
  • 060714094303.jpg
    060714094303.jpg
    72.1 KB · Views: 30
OK, you have an MFS20CEP short. Year is irrelevant for servicing a Tohatsu outboard. The serial number is stamped into the soft plugs of the engine. Tohatsu America can furnish a replacement SN tag to your local dealer. Since you have a tube and probable drag link, your setup is likely a Remote (not tiller) as the tiller model uses a solid shaft for the tilt.

Yes, the complete Merc-branded bracket will fit, but you may need the Merc swivel assembly; can't confirm without seeing it side by side.

There is a distinct possibility that you have damaged electronics after so long under water. Likewise, you may end up replacing the carb. If you are interested in getting it running again, I would inspect and test everything to determine feasibility of repairs before bringing in parts. The Merc parts (new) will cost about double the Tohatsu parts, but if you have a donor motor, and plan to make one good motor out of two, you might be OK. Odds are that the cam and other critical items (such as the oil pump) may need to be replaced due to rusting. Rings and the cylinder bores are probably in poor shape. Re-facing the valves and valve seats will take time, but are straightforward operations. If it is indeed a Remote model, you will also need an RC box and cables. Since the transom clamps are broken, it is very possible that the motor broke free while running, and was submerged while running, so bent connecting rods are a real possibility as well.
 
Thanks Paul for the reply. I will look on the soft plugs for numbers.

The motor broke off during rescue boat (4 man inflatables) training ops. Tiller operation and hand pull starts. They hit a large clay mound coming down the rapids right at the end of the run. I was there and saw it, boat one direction, 2 personnel another, and motor a third direction. The motor was running while in the air but kill lanyard went with the operator so suspect it stopped before it hit the water, everything went quite high lol. I wish we had a gopro going.

I am in agreement not to spend money on a lot of parts until I get it to run. Right now I have many hours of my time in and minimal money. I have taken the unit apart except for the motor. Drained, flushed, & repainted. Paint had bubbled up all over the lower sections but not on the engine, cowling protected it from the river silt action. Engine was full both oil *water but no silt, drained filled and will re-drain . I continue to turn and shake the engine while working on it to get anything else to drop into the oil. Took out plugs and valve cover to clean and blow out anything that might be there, only found oil*water. Carb-unit taken off and torn down totally cleaned. While blowing out carb heard a ting, didn't know about the small brass tube under the o-ring seal but found it. No rust anywhere on the engine except for the stator and coil start spring, all now clean. Some of the non stainless steel bolt heads had a little rust. Every switch and all wire connectors were taken apart cleaned and tested.
I don't know about the rings and bore sleeves but expect that once it filled there was no water movement and no additional oxygen so that is the wild card. I will attempt to start it before I get the brackets but want to be ready (optimistic) when it runs. If I find a deal on stealbay or somewhere else I want to know what will-won't work.

Here is a pic of the fresh water mussel growing in the lower gear and the day it came out of the water.
 

Attachments

  • 061114092421.jpg
    061114092421.jpg
    55.7 KB · Views: 29
  • 060514204755.jpg
    060514204755.jpg
    75.6 KB · Views: 38
Worked on the motor and the stand I built to hold it....remember transom brackets are broken. Hand pulled and got the oil light on each pull. Oil light comes on whether start button is out or not......is that correct. No spark to the plugs. Started rechecking the wiring found the fuses slightly corroded - pulled and cleaned - still no spark. Anybody have a wiring diagram that shows what the output values.

My first rig to work on the motor and now the newer stand. A better view of stand in last pic.
061214100346.jpg102014140031.jpg102014135530.jpg
 
Last edited:
The info you need is in the Factory service manual, available from any dealer. Very good diagrams and complete troubleshooting steps.
The alternator output will cause the CD to produce a signal to the ignition coil, and then the coil will generate the spark.
There is only 1 fuse, and that is only for the start/charge circuit. The motor would run regardless.
The stop switch must be pulled out to allow signal from the CD to the coil. Power for the oil LED will be there regardless of whether the stop switch is activated.
You need a good analog DVA meter to get a reading from the CD top the coil to see where the lack of fire is occurring.
Likewise, a good analog ohm meter will tell you whether your components are OK.
 
Mine is fused both from the rectifier Red lead to left terminal of stater solenoid and starter switch lead. I don't have an analog meter but it does have a max hold function. Will all have to wait as there seems to be component failures based on ohm readings I took. The kill switch shimmed & works but just left it disconnected while cranking.
Pulser coil read 192 ohms and range is 148-222 so that's good
Ignition coil is open circuit on all readings, even spark caps when isolated
Alternator coil reads .7 which is high I believe .27-.41 is range but not a deal breaker since I had oil light, however
Exciter coil reads 15 ohms instead of 12.5k-18.8k so not sure why the resistance is not there or had not just gone to open or short circuit. Since alternator & exciter are one part sort of meaningless that alternator works
Rectifier is open on all lead checks so also bad
CD no way to check but expect it also got fried when it hit the water
Now with the cost of electrical components and questions whether the bearings, valves, etc. will be good might be better to part it out.
 
If the primary side of the ignition coil reads open, it's probably shot. It's normal to read almost open on the secondary side. The exciter may be OK. Next test would be to get a DVA reading of the output of the CD feeding the ignition coil.

But you must use an analog ohm meter to get enough drive to the circuit under test. Likewise, a peak-hold digital meter may not give you a decent DVA number.

The motor will run OK even if the rectifier is disconnected.

There is a distinct possibility that you are best off parting out the motor.
 
Paul why do you think the exciter could be okay? Is the range I quoted wrong, don't know if it is correct. I may remove the recoil flywheel again and re-clean in case some debris is still in there especially where the wires exit. If it is still good I may take a chance on the ignition coil $$ to see if it runs.

Can a bad CD ruin an ignition coil ? If I were to borrow to see what happens.
 
Last edited:
Forgot to list the SN from the soft plug 39806AX Do the numbers indicate made in March '98
Nope. The numbers are the actual serial order as manufactured. The last 2 letters are the date code. You can call Tohatsu America at 214 420 6440 to get the date of manufacture (hint: it is newer than 1998).
 
Paul why do you think the exciter could be okay? Is the range I quoted wrong, don't know if it is correct. I may remove the recoil flywheel again and re-clean in case some debris is still in there especially where the wires exit. If it is still good I may take a chance on the ignition coil $$ to see if it runs.

Can a bad CD ruin an ignition coil ? If I were to borrow to see what happens.

Coil tolerances vary a ton. Yes, you are way out of spec, but you must use an analog meter to be sure. Coils usually fail dead short or dead open, but I have seen a few that went off spec and then needed to be replaced. If you get a reading up in the K ohms, you may be OK.
I have never seen a bad CD wreck an ignition coil.
 
That's what I thought the coil should be all the way open or direct short so will clean it again and see what happens. Motor is 2011 confirmed by Tohatsu, sent request same time I posted here.
 
Good news, I took the flywheel off to clean the exciter alternator coil again. I had unknowingly dropped a bolt down in there and it was wedged against the wires. Surely would have cut the shellac and shorted it all out with enough pulls or worse if it had started. Bad news no change in ohms reading, not sure why the factory specs are that high anyway.
The cowling gasket had been attached many times and the glue has never held. Cowling was held on by duct tape and latch was missing as well. I talked to the local rep who had worked on the motors over the years and he has glued them many times and nothing holds for long. We have the reduced voc cements in California to save the environment so we get to use them over and over which probably ends up being worse. I tried the flex seal stuff didn't hold. I decided to put some crazy type glue on it and then rivet an aluminum flat bar to hold it, worked very well. I beveled the bar in spots (mostly the back to slide down more easily when latching) after riveting since I have bits and die grinder but would do it before installation if I didn't. Painted and done, shown before paint here.110414120643.jpg110514151523.jpg
 
Nice job! We replace those gaskets, as they shrink over time, and never re-glue well, even with good glues.
If the exciter is way off, and everything else in the ignition is good, you might get a new exciter and test.
Even if the rectifier/regulator is shot (open), the motor would run. Non-electric-start models of course don't even come with a rectifier/regulator. You can disconnect the input to it, and it's not a factor.
If you follow the troubleshooting in the Factory service manual (not an aftermarket manual), there are specific ohm readings for it. Again, you Must use an analog meter, which has an ohm test section powered by 3v or less to get good readings.
 
Am I right thinking it's both alternator & exciter as one part, the exciter can not be replaced by itself. Have you ever taken one apart? Is there an inline resistor connector?
Will do the ignition coil first as that is shot for sure and see what happens.

Thanks for the cowling attaboy. If others try it I recommend bending it first to loosely fit then cut off the excess as you get to the latch plates and before the last rivet. I started riveting close to the middle and worked toward the bends tapping the material into the bends adding clamps to hold it then doing one rivet right at the bend. Material was 2 ea. 1/2 in x 36 in Al flat bar 1/8 in thick.
Nice to have it fit well now. It was the worst of the 4 in the lot and had some sketchy work. I think the recoil mechanism was set on top of the bolt collar and then it wouldn't fit right so the latch clamp was removed or lost. You can see in post 3 pic the duct tape marks on the cowling.
 
The exciter is part of the alternator, which has an MSRP of about $100. I've never tried to split out the exciter coil; even if you did manage it non-destructively, you probably wouldn't be able to buy the exciter separately.
 
Finally got around to putting on the new ignition coil. Had to borrow a tank & then get hose, primer bulb, and bayonet end (old style tank). I think the guy loaned it to me knowing I would buy all the stuff, so he gains. I didn't use the electric start to much trouble to attach cables and wanted to make sure the hand pull worked well. Finally got the gas up to the carb after a minute of pulls. Got a pop with the choke out and then it started.............sounded nice. Shut it off after about 10 seconds as there was no water going into it. Will get flusher kit and then run for a few minutes and then change to oil/filter again. Next will be replacing the broken transom brackets after it runs awhile in case it seizes. Almost there!!!!
 
The purpose of the primer is so you don't have to pull and pull to get the carb filled.
If you have a bayonet-style connector at the tank, it's probably a different brand, but with appropriate connectors will probably be OK.
If you ran for 10 seconds without a water supply, you probably cooked the water pump. Since it was of questionable condition anyway, plan on replacing the wp kit -- not just the impeller.
I would drain the remaining fuel from the carb at this point to prevent varnishing.
Once you get a good tank test, if the compression is good and there are no unusual knocks, you may be OK. Good luck!
 
The bayonet fit well, and I had used some emery cloth on it to take off any bumps that would prevent the o-ring from sealing. The primer bulb was rock hard and I hit it again after some pulls. It just took what seemed awhile to get to the carb and into the cylinders.
When you say tank test are saying with any water connection or needs to be in a tank? Will the earmuffs give a false indication of how the pump is working thus the tank. How strong should the water stream be coming out?
I will run out the gas once I have finished compression tests.
 
Ear muff flushers can work OK. Use as much water to the hose as you can get, because they leak all over the place at the LU. You can also get Pro versions of the muffs, and they leak less, but cost quite a bit more. Or you can tie a light line around them to help them clamp on better. Tohatsu sells a flushing adapter that screws into the area near the upper LU lube "level" plug, and it doesn't leak much. Either way, you must block off the water strainer on the underside of the antiventilation plate (often been done with duct tape) to make the water actually go up instead of just spilling out the strainer. You cannot put any load on the motor unless it's in the water, and that is why a tank test is always preferable to muffs. But if setup properly, they will provide enough water to keep you from overheating near idle.

If the motor will be idle for more than just a few days, open the carb drain screw. If fuel sits there a couple of weeks, you may well get varnishing.
 
I did drain the gas as you suggested. Tight spot for my fat fingers to get the screw out. I got my muffs but also ordered a flushing adapter which has a hose connection for a jet ski, you may be familiar with them, same thread size I believe. I will give it another go when it gets here and also do compression readings.
So to recap: run water into the screw plug hole next to the gear case oil plug and block off the anti-ventilation strainer. Should I also have the ear muffs on so water doesn't go back out or is that not a problem?
The prop is off so does it hurt anything to not have drag/torque forces on the engine, what about when doing a tank test at higher rpm.
 
I usually use an 8mm socket on a 1/4 drive with an extension so I don't have to jam my pinkies into the area. But don't over-tighten the screw (lots of torque with a ratchet).

Yes, if you run the flushing adapter, you will want to block off the inlet strainers on the side of the gearcase as well as the one on the underside of the antiventilation plate.

Don't run over a fast idle without being in water (with the prop on) to provide a load. A tank helps a lot, but even that is not the same as being on the boat in the water.
 
Got a break in the weather with a sunny day and all flushing adapters had arrived so did the run test. Our bad weather is probably a great beach day in your area. Closed everything off, got the gas back into the carb, popped on full choke and then took off. Nice stream came out of the water port on idle. I let it run for 10 mins and seemed to get better over time. Idle a little high so adjusted the screw. I did some fast idle up & back down to see how the carb would respond and didn't feel any lag. Engaged the F & R lever and all was very smooth. Ran the carb dry and put it away to see if any oil leaks would develop, nothing I could find.
A day later I did a compression test. Very hard just hand pulling so only got 59 lbs on both cylinders. I think some gas squirted into the top cylinder and at one point I got 90 with very quick pulls. Need to let the shoulder rest now, lol.
I took a short video just to send to all those that told me it would never run. As soon as I get stern brackets and it's the real water test time.
 
Back
Top