Logo

Anyone diagnose this?

I don't see a video but I suspect the wood in your transom has rotted and turned to mush. There's nothing solid for the shield to clamp to anymore.
You can drill a test hole between the shield and the drain plug there and see what comes out on the drill bit. I suspect water will drain out.

Then you pull the engine and drive and start rebuilding the transom with plywood and fiberglass.
 
ok saw the video. Looks bad. You'll have to decide whether to fix it or part it I suppose. Cobra drives can fetch good money.
 
ok saw the video. Looks bad. You'll have to decide whether to fix it or part it I suppose. Cobra drives can fetch good money.
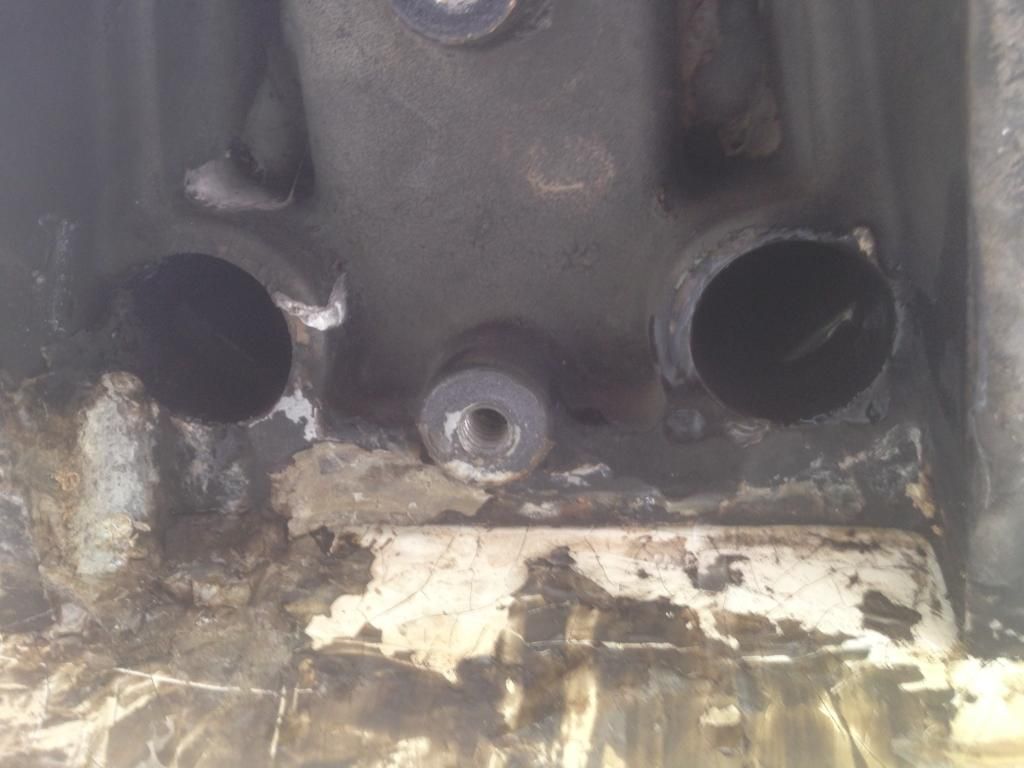
Thanks I appreciate the reply. Whats a running 305 OMC engine and outdrive worth. Is repairing the transom a DIY project or a very expensive deal to pay someone else to do. When I filled the bilge with water the hole on the right in this pic leaked.
 
I suppose it all depends on how much you value the hull. Anything can be repaired. It just takes time, and the ability to do the necessary repairs.

BUT, you definitely need to get good access to the base structure, and go from there.

Bruce.
 
Thanks I appreciate the reply. Whats a running 305 OMC engine and outdrive worth. Is repairing the transom a DIY project or a very expensive deal to pay someone else to do. When I filled the bilge with water the hole on the right in this pic leaked.

Ayuh,.... Diy, All the way,.... Few hulls are worth the Labor Bill,......
 
West Systems used to have a How To for replace the transom core. It might be in their book The Gougeon Brothers on Boat Construction located on this page.
If you can remove the outer fiberglass skin in one piece, you can epoxy it back on, repair the joint with fiberglass tape and gel the repair. You can spray gel over west systems epoxy. Some epoxy you can't but west you can.
http://www.westsystem.com/ss/use-guides/

Thanks i appreciate it. It doesnt leak from the bottom of the transom plate. It leaks about halway up on both sides. I would think the very bottom should be where it would rot 1st. and the y pipe is apparently cracked too as it leaks from the exhaust port.
 
Local marina said $5000 for them to repair it. Lol its just an old bayliner. They told me the engine was prob $900 the drive $900 and the gimbal assembly $300.
 
You should do the demolition now. Allow it all to dry out over the winter and finish the repair early next spring.
 
You should do the demolition now. Allow it all to dry out over the winter and finish the repair early next spring.

Thats good advice. Im gonna have to tear it apart to see what I'm up against anyway. It'd be nice if I could find someone to gimme a couple grand for it as is. Wishful thinking. One thing about teardown I'm unsure of is unhooking the shift cable. The last boat i scrapped was a omc stringer drive. I just cut the shift cable. Like a dummie I sold that stern drive and lower unit for $100
 
The transom on a stern drive does not undergo the same dynamics as the transom of an outboard. invest is some Coosa board to replace the plywood. You'll use epoxy thickened with wood flour to bed in the coosa board. The major challenge is in clamping so that you don't end up with voids. Usually the way to handle that is by putting lots of holes in the panels so the goop can squeeze out as you clamp (and the air bubbles). Same for the outer skin. It's just plastic. Don't overthink it. Recommend that you choose MAS epoxy, System 3 or West system. Thickeners and supplies are available at Jamestown Distributors dot com.
 
I'd be doing a lot of checking of floors and stringers and floatation foam b4 planning a course of action.
 
1...... Is repairing the transom a DIY project
2..... or a very expensive deal to pay someone else to do.
1.... It can be if you have both mechanical and carpentry type skills.

2.... Yes, very expensive, and would most likely kill the deal.

If you can remove the outer fiberglass skin in one piece, you can epoxy it back on, repair the joint with fiberglass tape and gel the repair.
I'd not remove any material from the exterior of the transom area........... there's no need to.
All transom core replacement work for an I/O boat will be done from the interior area, leaving the original hull skin un-touched.

*********************

The demo will be your largest task.
Once past that, it's all carpentry work, with glass/resin work in the mix.


Many will use a router with a straight flute bit, set to depth as to not disturb the original hull "skin" mentioned above.

You'll flute cut the original core material into workable sections.
Remove one section at a time.
A pnuematic chisel can be your friend here.
Once down near the original hull skin area, scrape and disc sand down to the original hull material.


Now here's the important part once past the above:

Layout, cut and dry fit your new first core layer. Fir plywood is best, IMO, and it need not be Marine plywood.
Although Marine grade is of high quality, CDX in Fir, and with a Fir core, works very well.

The strength is in the box beam affect. I.E., the outer hull material, first core layer/second core layer, and the inside-most matting/roving.


Dry fit, dry fit and then dry fit until you obtain a good fit.
Do not cut out for the transom unit yet.... just run the core material right on through this area. (you'll be cutting this out at the very last)

First core layer must lay straight and flat. Often this will require a backer or straight edge affair at the exterior to ensure a nice flat surface for the transom housing to mate up against and to seal well.

Use any and all available holes to pull this core layer into place.... even if you must add several holes. (you can fix these later)

When ready, you'll use one or two heavy layers of resin wet matting between the core layer and the original hull material.
You'll be working quickly, so the screws and fasteners will need to be ready and waiting for you.

Once the first core layer resin has cured, you're pretty much locked in.
The straight edge or backer affair can now be removed.
You'll be "chinking" the outer and perimeter areas with resin wet matting fragments as to fill these voids.

The second core layer simply attaches to the first core layer from the inside area. Screws work well, and they need not be removed later.
Again, dry fit, dry fit and then dry fit again before installing.


Once the fit is good, now you will use resin wet matting again.
Again..... "chink" the outer and perimeter areas with resin wet matting fragments.


To top off the second core layer, matting and then roving over that are typically used.

After this resin cures, next will be the cut-out for the transom unit.


Do this with a good amount of care and skill....... and you'll end up with a much better core than what the boat builder did in 1987.


.
 
Back
Top