Logo

Honda B75 Weak Spark

Seakaye12

Contributing Member
When I hook up the typical neon spark-checkers....I get a decent spark....both cylinders fire simultaneously. However....using another type of tester that forces the spark to jump a decent gap.....the spark looks pretty feeble.

Plus....the engine will not fire.

Any suggestions? Are there connections under the flywheel that might benefit from cleaning? Any other ideas?

Thanks!
 
The old Honda spark IS pretty feeble when it's firing correctly. That's not to say that yours isn't just too feeble to fire your engine but I would not condemn the spark for being the problem right off until I had tried some artificial enrichment to make sure it isn't a fuel delivery problem. Which, by the way, accounts for about 99% of all no starts.

Have you tried dribbling a little gas into the carb throat to see if it coughs or sputters? I use propane right from the tank to see if I have a fuel delivery problem or not. Since the propane comes out already vaporized, the engine will start, run and respond to throttle movement. This is much easier that trying to dribble gas into a carb and is MUCH safer than using a squirt bottle to fog it with gas. THAT can get you burned up or WORSE.

Also, please do yourself (and the engine) a favor and DO NOT use ether for this sort of testing. First off, ether, being as "explosive" as it is won't give you good test info. It WILL ignite with a spark that would be too weak to fire gasoline. And, when it does ignite, it does so with a BANG and will quickly start pitting the piston crown, valve heads and rings.

If you don't want to try propane, you can use use carb spray from the local auto parts store as opposed to messing with gas.

Good luck.
 
thanks jg....

Yeah; I know the evils of ether. I have tried spraying some carb cleaner in the throat of the carb...and also directly into the cylinders. Not a pop.

I'm used to older magneto ignitions on OMC stuff.....they give a nice fat bright spark across a quarter of an inch gap LOL.

Not quite sure what to do next here.....
 
Thought I answered this already but....
Next is to start ohming out the coils. If it's CDI and it has spark, that means the pulsar is, at least working. If it has breaker point ignition you might want to try another condenser (capacitor). It could be the coil is breaking down. As old as this is, it might be beneficial to take the flywheel off and clean the magnets and the exciter coil core ends. If you need the resistance values of the coils just let me know and I'll look them up.
 
It has points and condensor.

As a matter of fact.....when I tested for spark I was in a darkened garage and as I spun the motor over I could observe a slight arcing at the points. (I had the rubber cover removed on the camshaft pulley...and there is an inspection port there....)

I have been told in the past that that's one of the things that a condensor does...is to control arcing at the points. So...maybe the condensor is starting to fail.

I will pull the flywheel and clean things up. If I can't find the ohm values anyplace...I will let you know. The only manual I have is what's on boatsinfo;; not sure if it covers that.
http://boatinfo.no/lib/honda/manuals/b75.html#/0

http://boatinfo.no/lib/honda/manuals/b75twin.html#/0

Thanks so much; I appreciate your help!
 
hmmm.....the forum is acting quirky; I'll try posting again....

Yes; my engine has points and condenser. As a matter of fact....when I was testing spark I was in a darkened garage and I could clearly see a bit of arcing at the points as I cranked the engine over. (I had the rubber inspection cover removed on the cam-shaft pulley.....allowing me to see the points as the pulley rotated...)

I have been told that one of the jobs of the condenser is to control arcing of the points.....so perhaps in fact the condenser is failing. How to swap it though? It shows as NLA....I will need to spec it out and see what can be substituted.

I will remove the flywheel and test the coils and clean things up. The only "manual" I have is the one at boatinfo....I'm not sure if the specs are listed there or not. I will check.

http://boatinfo.no/lib/honda/manuals/b75.html#/0

http://boatinfo.no/lib/honda/manuals/b75twin.html#/0

Thanks for the assistance; not many people are familiar with these early Hondas.
 
I have been having issues posting here. The last couple of attempts have failed; if this post results in multiple copies...I apologize.

My engine is points and condenser. As a matter of fact....when I test for spark I am in a darkened garage and I can see slight arcing at the points as I crank the motor over (I have the rubber cover on the cam pulley removed...allowing visual access to the points...)

I have been told that it is one of the condenser's functions is to control arcing at the points....so perhaps it indeed has failed.

The condenser comes up as NLA though....so I will need advice as to a suitable substitute. Specs call for 0.24 uf.

I will remove the flywheel and clean things up. If you could furnish the specs for ohming the coils jgmo....I would appreciate it. I have read another post of yours that talks about the testing....but I'm not sure if that engine was in fact the same as mine. Mine is a B75 K2 (1975).

The only "manual" that I have access to is the one on boatinfo. I will post the link here for other's benefit.

http://boatinfo.no/lib/honda/manuals/b75.html#/0


Thanks Again!
 
It might just be this thread. I had trouble answering you and your posts aren't coming directly to my inbox even though I KNOW I am subscribed to the thread. If you want/need those specs and are having trouble posting here try private messaging me and I'll send what you need.

You are correct about the condenser (capacitor) being used to "dampen" point arcing. This is the means by which metal transfer at the contacts is prevented so the points don't prematurely erode. Also, the cap aids in the coils ability to meet firing voltage requirements at higher rpm when the "dwell" is shortened and primary winding "saturation" is harder to achieve.

So, you may be on to the problem although I think you might see a bit of arcing at the points in a dark room even with a good cap.
 
The problem with posting seems to have been resolved. I received an email from the admin saying they were having spam issues and were temporarily moderating posts.

Anyway....YES....I would need the specs....and since I am very un-educated when it comes to electrical testing procedures....should I assume that in order to test a component....it needs to be removed from the circuit first....as in all it's leads disconnected? Or....are the tests intended to be done with all the wiring still attached?

Lets try keeping it on the thread as opposed to PM's for now....others will need this information...and I greatly appreciate your willingness to look the stuff up for me. I will watch for PMs though....just in case.....
 
I agree about keeping things on the thread...that's why we're all here.

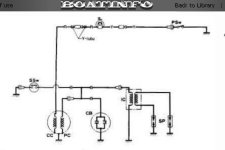
For someone that might not have a lot of background in troubleshooting, you have pretty good instincts because yes, when checking resistance values or "ohm testing" components, they DO need to be "uncoupled" or isolated from the circuit that they may be a part of. Usually you can just unplug one wire of a two wire component, such as a coil, and that will effectively isolate it from everything else. However, if there is a grounded capacitor in the circuit it MUST be disconnected before testing or it will certainly skew the values.

Make sure that, if you are NOT working with an auto ranging, digital multimeter, that you select the proper "scale" on your meter prior to testing. This is perhaps the most common mistake beginners and the experienced alike make.

Also, when looking at resistance, temperature of the component can make a difference and must be taken into consideration. Heat will increase resistance and lack of heat will lower it. So, if your readings fall SLIGHTLY outside the range of specification, consider that most specs are published with a "given" temperature value of about 21C or 70f and a small discrepancy could be because of the part being left in the sun or in a cold room.

Here are the values I believe pertain to your case but if I leave anything out, let me know.

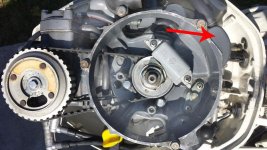
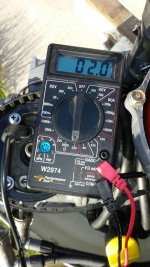
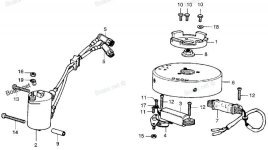
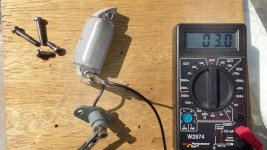
PRIMARY COIL...2.0 ohm. This is the coil under the flywheel that "charges" or powers the ignition coil through the breaker points.

CHARGING COIL...0.130 ohm. This is the other coil that MAY be under the flywheel for battery charging and would be connected to the rectifier under the hood. This has a "tolerance" listed of + or - 10%

If you find that either of these is outside the spec but is NOT OPEN, then I would not necessarily condemn the coil. As you read on, you will know why I say this.

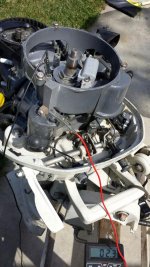
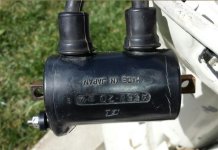
IGNITION COIL PRIMARY WINDINGS...The big, black package with spark plug wires coming out of it. Here's where I need to go over a few things due to "discrepancies" that seem to exist between what is published in the HONDA service manual of that era and what I and others have empirically measured from "working coils" with no apparent defects.
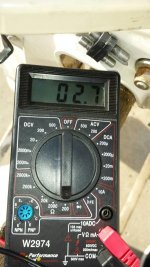
The book says: 0.58 ohm with a tolerance of + or - 10%

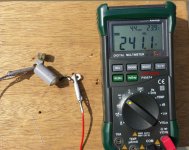
I have measured a couple of operational coils and I believe the spec should be 1.5 ohm for a breaker point ignition coil.
And, for conversation sake, I have measured CDI ignition coils at 0.8 ohm.
So, as you can see, all the coils I have personally measured THAT WERE ON RUNNING OUTBOARDS fall well outside the published data from Honda. This doesn't mean that they are wrong and I am right but I wanted to make sure you have the whole story. NOW, We will see what YOU come up with.

IGNITION COIL SECONDARY RESISTANCE VALUES. Here again, we have a conflict with what is published in the Honda service manual and what I and others have ACTUALLY measured using good technique and accurate test equipment.

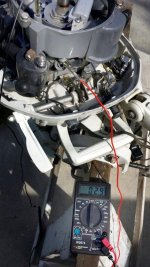
To measure secondary resistance you insert one probe into one spark plug boot and the other probe into the other spark plug boot. Thus, you are measuring the total resistance of both spark plug wires in series with the coil secondary winding.

The published spec from Honda is: 8k (8,000) ohm. with a tolerance of + or - 20%.... Remember to set your scale!

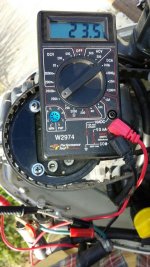
What we have ACTUALLY measured in the field: 31.5k (31,500) ohm.... Remember your scale.

Again, it is plain to see that the published values and what I physically see on WORKING COILS is WAY different.

Finally, we get to the condenser (capacitor)

Honda spec.....0.24mfd. (microfarad)

I have measured a few with my little old cap checker and get anywhere from .22mfd to .36 mfd. I think that if you have a condenser that is around .20mfd to .40mfd you are MAYBE ok. I say MAYBE because I don't know for sure and I'm no electrical engineer. It just seems that these babies will run if "close enough" so if the cap isn't open or isn't shorted to ground, then it will PROBABLY get you there.

Let me know if you need anything else and good luck.
 
Yikes jg....thank you so much!

And...thanks for mentioning that the charging coil **MIGHT** be there...because I don't have one! LOL! I pulled the flywheel this morning and was like....hmmmmm.....something's missing! LOL!

Now if I can figure out how to pull the camshaft pulley.....I don't seem to see the timing marks that I guess must be there somewhere....

How do I get the pulley off while maintaining timing?....there are no puller holes like the flywheel has. Should it just pop off with a bit of gentle pressure or prying from below?

And while I'm asking questions.....what's with the chamber that's a part of the flywheel surround (the grey part).....it looks to have cooling system hoses attached to it? Why is it done like that? What is it's purpose? Red arrow on picture.
 

Attachments

  • Honda_Under_Flywheel.jpg
    Honda_Under_Flywheel.jpg
    66.3 KB · Views: 570
What is that grey coil then?--Is that not part of your ignition system ????--The grey chamber may be part of the crankcase ventilation, nothing to do with cooling.The timing marks are there or you can mark your own if you can not find them.
 
The grey coil under the flywheel is what you have referred to as the PRIMARY COIL. It is described as such on the parts diagram as well.

It is the CHARGING COIL that I do not have on my engine.

Any suggestions/cautions for removing the camshaft pulley?
 
Camshaft pulley lifts off.---Timing marks are likely on the rear support for the recoil and on the flywheel.-Timing marks / dots are also on the cam pulley.--Not hard to find.
 
Be careful with the cam pulley. They get stuck pretty good over time and it's easy to break one prying too much. It's been a while since I was in one of these and if you need more detailed information it will have to wait until I get back home from the Doctor and can think and access my shop manual.
How have your resistance checks gone? Find anything way out there?
 
Hello again....

The cam pulley came off easily; just a bit of an upward nudge. The timing marks were right where you said they would be....once I cleaned the dirt away. They are very small; barely visible...but they ARE there....

I really don't know what I am doing with the meter...and the meter itself is crap. I took readings....but I am not confident that I did it correctly (in relation to the meter scales) or if the meter is adequate for the task.

The pictures show the results. For the black ignition coil.....Primary windings were 01.9 with the meter set at 200. Secondary windings (at the plug wires) gave 23.6 with the meter set at 200k. The primary coil (grey one under the flywheel) gave 02.0 with the meter set at 200.

I will leave it to you to comment if any of that makes sense. I have not tested the capacitor yet.
 

Attachments

  • IgnCoil_Primary.jpg
    IgnCoil_Primary.jpg
    65.1 KB · Views: 193
  • IgnCoil_Secondary_atPlugWir.jpg
    IgnCoil_Secondary_atPlugWir.jpg
    66.1 KB · Views: 177
  • Primary_Coil_UnderFlywheel.jpg
    Primary_Coil_UnderFlywheel.jpg
    62.8 KB · Views: 150
Looks and sounds to me that you did a good job taking the measurements. As far as results??? A bit confusing.

You say that your meter is crap YET, the result you got for the primary coil was 2.0 ohm......exactly what you would expect.

The secondary came in "the middle" of the 8k and 31.5k "range" discussed above so I say that just might be acceptable.

You then list a reading of 1.9 ohm for coil primary but I then see in your picture a reading of 2.7 with no explanation for that.

And, I would also say that a primary resistance of 2.7 seems too high. Even 1.9 falls well outside any that I have measured.

So, I would suspect that the coil primary is "breaking down" as they say. You may want to go back and re test making sure all connections are clean and tight. If you obtain a lower value, then good. If not, you may want to take the coil to someone like a NAPA or AutoZone and see if they will put it on their coil tester for you. Don't expect much "outside the lines" help there though. Their training is minimal and they have orders of "we don't pay you to think."

Then again, the coil may be fine. The VERY GOOD news is that you have no INFINITE readings indicating opens.

One thing the manual doesn't cover and I forgot to mention is...you should check to make sure that the primary and secondary are completely insulated from each other and also each is insulated from ground.

Let's hope that you find a problem with your condenser...The one part of that system you can find a replacement for.
 
Well...I have less than great regard for the meter because the readings seem to jump all over the place...and it takes a while for the readings to settle down. Today I went and got a couple of alligator lead connections so I could make connections easier. I also thought I would go into a bit more detail for you as to exactly how I am taking these readings. For starters....everything is dis-connected. Points and condenser are dis-connected.

(1) The Grey "Primary Coil" under the flywheel. It is still mounted ; but disconnected. One test lead is on the terminal from the coil....and the other lead goes to ground. My meter is set to the "200" scale...and today the reading is 02.9.

(2) Black Ignition Coil. Primary windings. Coil is mounted to engine but disconnected. Red lead goes to the terminal at the top of the coil and the black lead goes to ground. The meter is set to the "200" scale and today the reading is 02.3.

(3) Black Ignition Coil Secondary Windings. Leads are connected to each spark plug boot. Meter is set to the "200k" scale and today the reading is 23.3.

Today I'm going to try and find someone who can test the capacitor for me.
 

Attachments

  • Grey_Primary_Coil_Terminal_.jpg
    Grey_Primary_Coil_Terminal_.jpg
    65.6 KB · Views: 315
  • Black_IgnCoil_Terminal_to_G.jpg
    Black_IgnCoil_Terminal_to_G.jpg
    70.4 KB · Views: 298
  • Black_IgnCoil_at_Spark_Plug.jpg
    Black_IgnCoil_at_Spark_Plug.jpg
    69.8 KB · Views: 280
Does your grey coil (primary) only have one wire? If so, you will need to remove it completely from the engine to get accurate coil resistance and short to ground results.

The ignition (black with plug wires) coil should have two primary terminals. One for power coming in and one for a wire going to the points and condenser (ground). You have to disconnect BOTH of those terminals and place your test leads, red on one...black on the other... to get a reliable ignition coil primary winding resistance test.

Then, you need to leave one lead on one terminal and put your other lead into one of the spark plug boots. You should get INFINITE resistance from this test. This tells you if there is any internal short between the primary and secondary windings.

Then take one lead to one of the PRIMARY terminals and the other lead to any exposed metal on the coil housing. You should get INFINITE resistance. This tells you if the primary is grounded or not

Then take one lead and place it inside the spark plug boot and the other lead to any exposed metal on the coil case. You should get INFINITE resistance. This tells you if the secondary is shorted to ground or not.

Sounds complicated but it's pretty simple. I think it will pass all these tests but you still need to do it this way to know for sure or not.

Long distance troubleshooting is rife with misunderstanding and undue "complexity" but it's just because we're human. I hope I'm not confusing the hell out of you;~)
 
Hey; no way are you confusing me; I'm having FUN! Thanks again!

>>Does your grey coil (primary) only have one wire? If so, you will need to remove it completely from the engine to get accurate coil resistance and short to ground results.

Yes; only one wire. Ok; I did this and got the same results (02.9 or 03.0 on the 200 scale...)

>>The ignition (black with plug wires) coil should have two primary terminals.

Nope; mine has only one. I think my ignition system is somewhat of an oddball. See the picture and the parts and wiring diagrams attached.

>>Then, you need to leave one lead on one terminal and put your other lead into one of the spark plug boots. You should get INFINITE resistance from this test.

Yes; I do get INFINITE.

>>Then take one lead to one of the PRIMARY terminals and the other lead to any exposed metal on the coil housing. You should get INFINITE resistance. This tells you if the primary is grounded or not

Doing this (for my one wire coil) is the same as the initial resistance test. One lead on the coil's terminal and the other on ground. When I do this I get 02.3 on the 200 scale.

>>Then take one lead and place it inside the spark plug boot and the other lead to any exposed metal on the coil case. You should get INFINITE resistance.

Yes; I do get INFINITE

So; now that you know that my black coil only has one lead....does that change any of the tests that you need me to make? Or the readings from the ones I have already made?

Thanks!
 

Attachments

  • Black-Coil.jpg
    Black-Coil.jpg
    55.8 KB · Views: 370
  • Flywheel_Coils_Image.jpg
    Flywheel_Coils_Image.jpg
    39.5 KB · Views: 221
  • Honda_B75_Wiring_Diagram.jpg
    Honda_B75_Wiring_Diagram.jpg
    26.5 KB · Views: 305
  • PriCoil_Detached.jpg
    PriCoil_Detached.jpg
    71.9 KB · Views: 268
Last edited:
Both coils fire at the same time.---One cylinder sparks on the exhaust stroke.--This is very common on 2 cylinder 4 stroke outboards.
 
Well, it is sort of oddball (but maybe not for HONDA) but now I understand how it works. The coil on most systems is fired when the points OPEN. This one, apparently, fires the coil when the points are CLOSED! Doesn't really effect the way you did your tests. The only thing I see that might worry me is that the 2.3 primary winding value. That may be a tad high and COULD cause the coil not to produce as hot a spark as is needed.....just your issue it would seem.

The problem is, it IS producing a spark and it's NOT open so I would be reluctant to condemn it as the culprit. Especially since they are not sold new anymore and finding a used one....that's still good...might be hard. Sometimes they come up on Ebay but it's a crapshoot if you're getting something better...or worse...than what you already have.

At this point I would still be looking at the condenser. If you put your positive test lead of your ohm meter on the pigtail and the negative lead on the metal case, does the reading rapidly go up? And, what happens when you reverse the leads and try the same thing? Is there a reading?

What do the points themselves look like? Are they burned or pitted? Do they come together evenly or are they badly misaligned? Do they have a nice, firm spring closed action?

Let me know and we will proceed to the next thing.
 
OK....today's news.

I went to Harbor Freight and for about $35.00 bought a rather nice auto-ranging meter that also reads capacitance. And relative Humidity and decibels and just about everything else. All for $35.00.

Bad news is...the capacitor tests at 240.6 nano-farads...or 24.6 microfarads.....pretty much precisely on with Honda's specs. It reads open on a standard resistance setting. So much for it being a bad capacitor; I guess.

I re-did the other tests and ended up with almost the exact same numbers;
02.6 for the Grey Primary Coil
02.1 for the Black Coil Primary
23.68 k for the Black Coil Secondary

The points look perfect to me. They are out of the engine right now....so I will dress them a bit before re-installing...just to be sure.

What's next?
 

Attachments

  • Honda_Condenser_Test.jpg
    Honda_Condenser_Test.jpg
    88.9 KB · Views: 156
Shoot! Well, I kinda figured your old meter wasn't lying. AND I was sure hoping you would find the CAP as bad. Simple solution. Because now, we are getting into an area that is kinda sorta above my pay grade.

I can't FIRMLY advise you that ANYTHING is DEFINITELY wrong with your components. I SUSPECT the black ignition coil but I cannot tell you to toss it. 2.1 seems high to me but I just don't know. the 2.6 you are getting for the grey coil is high too but...???

Someone just asked me if I knew what the VOLTAGE produced by the grey primary coil should be and I replied I DO NOT KNOW because, if I did, I would be telling you to test for that next.

I know I have seen around 100VAC from under flywheel coils in the past but I have no specific troubleshooting knowledge nor do I know where to find reference for an alternating current MAGNETO system such as this. It Just AIN'T in the Honda book!

BUT, you can bet your BIPPEE I will be looking. Not just for you but it is something I SHOULD probably already know.
Anybody reading this if you do, please let us in on the secret!

I also have some old motors sitting about in various states of disassembly. It is not a good time for me to put one together for testing but I will try to do so as soon as I can.

All I can definitively say is that the voltage coming from the grey primary coil should rise in direct proportion to magnet rpm. If either I or you were to place a coil under a flywheel and give her a twirl, the volts should rise in direct response to how fast it turns. I'm guessing the ignition coil should then begin producing FIRING voltage at around 25vac output from the grey coil. BUT, I'M GUESSING and that ain't always how you want to approach this stuff.

The other thing that strikes me is that when I go back and read your original post, you DO have spark. Could we be barking up the wrong tree here? You have spark but the engine won't fire.

You said you tried enrichment.....ok. what else?
Did we talk about compression?
Fuel...Air...compression for a little bit o heat....and Spark, delivered at the right time....she should at least cough or sputter.

At this point, I'm kinda at a loss as to what to try next until I know a bit more about how EXACTLY this mag system functions.

ANYBODY ELSE???
 
One other thing...You want to make sure that the points and the wiring are fully insulated from ground. This puppy fires the coil when the points REDIRECT current from the grey coil to ground. Any "bleed" to ground will kill the firing volts. I think because you said you do have a "feeble" spark that all of that is ok but just wanted to throw it out there as a point of order.
 
OK; well I will put it back together; hoping that improved connections someplace will make a difference. hehehe....

BTW...I mis-placed a decimal point above when I converted nano-farads to micro-farads. Should have said 0.2406uF.....NOT 24.6. A rather big difference.

Compression tests OK (120 on each)

I agree with you that it makes little sense to search out electrical components such as this that are used (or even NIB) because they are all as old as mine...and who knows if they would work...and continue working.

I keep hoping that I will find a previously unknown application within HONDA that used the same ignition. Stationery industrial engines etc. Seems odd that they would have a distinct ignition system used only in outboards.

Maybe something is available through the VOLVO channel? They re-branded the Honda engines way back when and sold them as VOLVO's. Also; the Volvo MB2A/50S used this Honda Powerhead; so I'm told.

Maybe VOLVO has parts that us HONDA guys don't know about?
 
Everything is back together and nothing has changed.

I get what appears to be a good spark with the neon type spark tester; both cylinders fire in unison as expected.

But; if I use a gap-type tester....I get only the faintest of spark if the gap is set to nearly nothing.

Plus; the engine will not fire; not even a pop.....with carb-cleaner sprayed into the carb.

My connections look good; aside from swapping known-good parts....I think I've exhausted my options.
 
Back
Top