Logo

...which shop manual for AQ 280?

bazza57

Member
As a person who has some mechancal experience (old British motorbikes) I would like to do some basic maintainance, U joints and seals on my sterndrive.
Since joining this forum I've read a few negative comments about some of the service manuals on offer.
I found a website called, boatinfo, and the manual they had, publisher unnamed, was of limited use to me...I got the impression they expect the user to be a trained mechanic, when what I'm after is something with lots of illistrations and bolt by bolt instructions.
Is the VP item the way to go?,been looking for one of these, either an original or a reprint, with no luck as yet but you can buy CDs on ebay.

The Baby Steps style of book I'm after probably dosn't exist, in which case the people with the knowledge on this forum can expect a few lame questions from me in Kiwi Land, cheers Barry.
 
There will be some errors in both the Clymbers and the Selloc.
OEM is best.


You can replace every seal and/or O-ring in the 280 drive without any risk of a change to the shim values....... both the lower unit and the transmission.

However, with the 280 transmission, there is a seal surface washer that will occasionally require replacement.
Shims that govern the rolling torque are inside this washer.
If/when this is changed, it will cause the need to readjust the main drive gear bearing rolling torque value with a change to the shim value.
The rolling torque value for a 280 main drive gear bearing box is done via the spring scale and string wound method.

Many of us who routinely work on these, rarely remove an entire drive.
Unless reverse latch work and/or pivot tube work is necessary, the Intermediate housing is left in place.


.
 
Last edited:
...this site sells reprints of the VP originals so I'll get one of these ...as a matter of interest, what if any, are the differences between the 280 and the 280A outdrives?
 
...cheers for that , only asking as this sites list of VP manuals lists one for the 280A and one for the 290A/280...I like the idea of a manual that covers just one model (no chance of getting specs mixed up). For this reason I'm leaning towards the 280A one (if you thought it would do the trick), cheers.
 
Barry, most all procedures and most all specs and clearances will be the same between these models.
All of the main drive gears (the bearing box) use the same bearings....... a 30207 and a 31307.
However, the way in which the rolling torque value is measured, varies between the all steel BB (pre- A transmission) and the integral BB (A and later transmission)!

The 280 is going to use the steel BB.
If you are not certain, post a photo of your trans, and I can tell which one you have.

Note:
Re; the transmissions with the aluminum clamping collar and steel bearing box, we consider the clamping fasteners to be "wet areas"! (the O-ring Seal does not protect these threads)
These require very special attention during disassembly!
The threads are often corroded, and if not careful, the capscrew hex heads can become rounded out.
When/if this occurs, the next step is a machine shop with a Bridgeport type milling machine.
I apply heat to the main gearcase as to help with the corrosion....... but it is not always successful!

The later "A" BB uses a gasket style shim pack.
This style shim keeps the fastener threads remaining fairly dry and clean!
I rarely have trouble with an A transmission!


.
 
Last edited:
Barry, to further this some:

If you are doing a complete 280 reseal, the transmission's main drive gear must be removed from the bearing box!
In order to access this, the aluminum clamping collar must be removed.
The 4 cap screws can be problematic if the threads have become corroded or rusted.
These are not Metric....... they are a #8 3/8" NC cap screw.

If you will use a small propane or map gas torch (no Oxy-Acet), and heat the main case where the thread inserts are housed, the heat will expand things enough so that in most cases, the cap screws can be extracted safely.

Caution.... DO NOT even attempt to remove the cap screws without applying heat!!!!

The aluminum clamping collar and steel bearing box, will often be very stubborn.
Again, heat is your friend here!

Once you have gotten this far, the rest is pretty straightforward.
As you remove the seal surface washer, pay very close attention to the small circular shims that are within it.
These shims are what control the rolling torque value, and if this washer is re-used, they must all go back in during reassembly!

If this washer is replaced, you will be required to run back through the rolling torque value adjustment procedure!


Note: although the same seal surface washer is used, the A drive rolling torque value is "tension sleeve" or "crush sleeve" controlled.

The pre-A BB rolling torque is measured via string and spring scale from the circumference of the bearing box.

The A and later BB requires a center rotational force measurement.... (either in inch pounds or newtons).

The two means of measuring do not cross over.
I believe that some people become confused here....... even trained VP mechanics!


Note:
If new tapered roller bearings are installed, the rolling torque value procedure must be performed and adjusted accordingly!

If the existing bearings are reused, the workshop manual will refer to a rolling torque value for what they call "run-in" bearings.
In which case we can typically reduce the shim pack by .001" or so, resulting in an increased rolling torque value.

Note:
While in this far, if we press the main drive gear from the BB, we can take a close look at the 31307 bearing race. This is a very critical bearing, and if it shows signs of wear, you had best replace both of them.


.
 
Last edited:
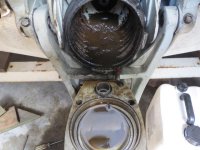
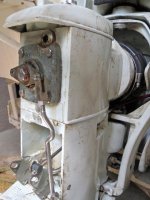
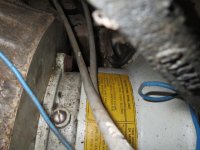
...got the transmission off as per instructions from this forum...easy when you know how, as they say.
What greeted me inside the bellows was not good, oilly, rusty, sludge...

As can be seen I didn't drain the oil from the leg...I should have been more careful as some of the bellows muck fell into the oil pool. hopefully it will all come out when the oil is drained...B.
 

Attachments

  • IMG_0158.jpg
    IMG_0158.jpg
    64.8 KB · Views: 119
  • IMG_0155_edited.jpg
    IMG_0155_edited.jpg
    46.7 KB · Views: 203
Barry, that is most definitely a pre- A transmission, and will have the all steel bearing box, with the separate aluminum clamping collar.
Please take heed of my caution notation in my previous post.
If you can successfully remove the 4 cap screws, the rest will be a piece of cake.


.
 
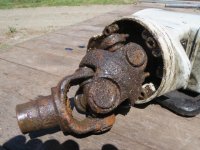
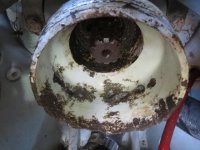
...more of what I uncovered!
What's the name given to the piece on the right that is in the transom ...it has serious corrosion and I am reluctant to proceed any further with the project unless I can find one in good condition, does anyone know of a good used one for sale...I don't imagine they can be bought new unless in exchange for an equal weight of gold...? B.
 

Attachments

  • IMG_0157.jpg
    IMG_0157.jpg
    79.2 KB · Views: 118
  • IMG_0163.jpg
    IMG_0163.jpg
    60.4 KB · Views: 94
...I've been learning a lot since I made the above post and now know that the part I enquired about is the bellows snout on the end of my double bearing PDS housing...I've read that a fix for corroded ones like mine, is to machine them off and get a new piece lathed up.
Has anyone done this...can welding be done without distortion or could it be epoxied on given that its only carrying one end of the bellows?...Barry.
 
...I've been learning a lot since I made the above post and now know that the part I enquired about is the bellows snout on the end of my double bearing PDS housing... I've read that a fix for corroded ones like mine, is to machine them off and get a new piece lathed up.
Has anyone done this... can welding be done without distortion or could it be epoxied on given that its only carrying one end of the bellows?...Barry.
Yes, yes and no.

Go to a salvage yard and pick up good used 4 cylinder flywheel cover for the donor snout.
Have a machinist make both layouts and cuts.
The alignment for the bellows is not critical.
Have this TIG welded on to the old F/C.


.
 
Thanks for that Ricardo.
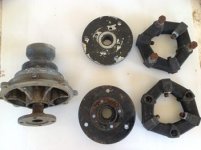
A couple of photos...one of which you've seen before but the other shows some items for sale online here. Spoke to the seller by phone and he thought the PDS adapter was for a V8, but he didn't know which one.
You may recall mine is a SB Ford...are you able to tell from what you see if its for a ford or GM or something else? Barry.
 

Attachments

  • Bruce Adams.jpg
    Bruce Adams.jpg
    17 KB · Views: 83
  • IMG_0151.jpg
    IMG_0151.jpg
    61.8 KB · Views: 72
Your photo to the left shows some very old parts. It shows a rather ridged drive coupler that I would NOT use.

The Borg Warner/Volvo Penta PDS adapter housing will work with any engine that is Borg Warner pattern flywheel cover capable.


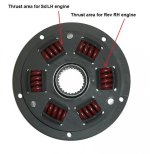
To our left here, I show a Borg Warner drive coupler cushion or damper "hub" system (shown separately from the outer plate assembly).

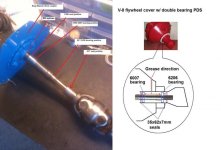
To the right here, I show how the PDS assembly would look via a "cut view".
 

Attachments

  • Borg Warner DC wear pattern areas.jpg
    Borg Warner DC wear pattern areas.jpg
    55.2 KB · Views: 79
  • PDS coupler and drive shaft 4.jpg
    PDS coupler and drive shaft 4.jpg
    47.5 KB · Views: 102
Last edited:
Cheers Rick, you say...."the B.W./VP PDS adapter housing will work with any engine that is BW pattern FC capabable..."

....so are you saying the adapter housing in the " items for sale" pic is indeed a BW item and therefore a direct replacement for mine which you identified as a BW item in another post, or is it unidentifyable?
Were all the bellows snouts the same OD?...B.
 
Back
Top