Logo

New Member: 1973 45 hp

JAKS_MAN

New member
Hey Guys,

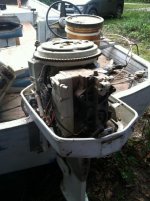
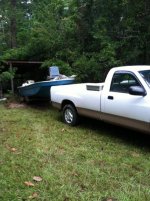
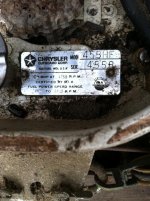
New member here! A friend of mine is giving away his old boat. It has a 1973 Chrysler on it, and it has been sitting(covered) for 20 years, (the last registration expired in '94). It is my understanding the engine was in good working order before it was abandoned. My concern is: once it's unseized, is there any hope of it running without purchasing a rebuild kit and yada yada yada?. I plan to take it anyways because the hull is fiberglass and free of imperfections.

Thank you for your time and I hope to be spending more time on this forum.

- Doug
 

Attachments

  • image (1) (598x800).jpg
    image (1) (598x800).jpg
    73 KB · Views: 30
  • image (2) (598x800).jpg
    image (2) (598x800).jpg
    73 KB · Views: 25
  • image (3) (598x800).jpg
    image (3) (598x800).jpg
    90.7 KB · Views: 22
  • image (598x800).jpg
    image (598x800).jpg
    82 KB · Views: 25
Do a compression/spark test.
Then check the oil in the lower unit.
If those things check out it might be worth fixing.

I like the sound of doing that better. Does this sequence seem like "over-kill" to anyone?

[h=1]Awakening a sleeping outboard; by BoatBuoy (iboat)[/h]
Lower Unit – Remove the prop and any fishing line that may be tangled, wound around the prop shaft. If the shaft is splined, apply a coat of marine bearing grease to it before re-installing the prop. If an inspection of the prop indicates any damage that could cause a vibration or imbalance, replace it or have it repaired. The rubber bushing securing the hub to the prop itself may also need replacing, but that probably cannot be determined until boat-tested.


Remove the drain screw (bottom) from the lower unit and observe the quality of the lube as it exits. If it is milky, there has been water intrusion. If you observe metal shards, there may be gear damage requiring a re-build of the lower unit. If it is empty, there may be other problems. Remove the vent screw (top screw) to allow complete draining. If none of the above mentioned situations exists, fill with lube from the bottom screw hole until lube emerges from the vent hole. Lube should be available from any oil outlet and labeled as suitable for outboardlower units.

Note: Electric shift lower units require different lube than manual shift units. Check your manual.

After unit has been filled, replace vent screw using an appropriate new screw-head gasket. Then do the same for the fill screw, trying to prevent as little loss of lube as possible.

Water Pump – Using your manual as a reference, replace the water pump – if not the complete pump, by all means replace the rubber impeller. This is absolutely necessary on motors of unknown history or on motors that haven’t had a new one in a couple of years. Before re-assembling mid-section (lower leg), see next step.

Cylinder Walls – If not already, lay the motor so the sparkplugs are up. Remove them and put in a few squirts from an oil can filled with TCW-3 oil. Move the engine around so that the oil will contact cylinder walls. Allow it to soak for a day or two. By hand, rotate the flywheel a couple of times. If it resists rotating, allow to soak longer. When flywheel finally rotates freely, install new sparkplugs.

Spark – Pull the plug wires from the sparkplugs. Your spark should jump a minimum of a 3/8" gap with a hot thick spark. If it doesn’t, you need maintenance on the ignition system. Check the sparkplug cables for cracked insulation. Otherwise, the needed maintenance will be determined by type and year of motor you’re working on. Refer to your manual. Replace the spark plugs with the manufacturer's recommended plugs, keeping the old ones as spares.

Wiring – Check all engine wiring for brittle insulation or fraying. This would necessitate re-wiring or installation of a new wiring harness.

Lubrication – Lube all moving parts including throttle linkage (white lithium) and steering shaft (chassis lube is OK).


Carburetors – Remove and disassemble carburetor(s). Soak in carb. cleaner or spray with aerosol carb. cleaner, paying particular attention to all small passages and fuel-ways. Blow dry with compressed air, again, paying particular attention to internal passages. Reassemble using an appropriate carburetor rebuild kit. If kit doesn't include a new needle and seat, get one. If the float is cork, replace it with a plastic one. Some kits include them. If the float is plastic, make sure the integrity has not been compromised. Re-install and link and sync according to your manual. Replace all under-cowl fuel lines.

Fuel pump – Using your manual as reference, remove fuel pump and clean metal parts with carb. cleaner. Install a new fuel pump kit, or replace fuel pump entirely. Replace fuel filter and any vacuum hoses that may be connected.

fuel tank – Replace the fuel line along with the squeeze bulb (OEM bulb preferred). Note: on dual-line tank, there is no squeeze bulb. Drain fuel tank. With a flashlight, inspect for dirt, debris, or rust. If OK, rinse and refill with correct fuel/oil mix. If there are quick release connectors on the fuel lines, check the small o-rings at either end. Replace if necessary.

Controls - If remote control, check throttle and gearshift cables for proper operation. Mine were frayed and rusted and had to be replaced.
 
Back
Top