Logo

Does this mean a total engine rebuild or just head gaskets

Yes rebuilt set o heads same price as my local engine guys - like to support local.

Any comments on putting the heads back on and what to do with lifters - or just put it back the same way it was and the lifters will lube themselves and valve timing will work itself out??
 
Were the heads pressure checked for leakage?
Clean everything and then clean it again. Did you check flatness of heads and deck surface?
Verify nothing loose in the intake or exhaust port. Last thing you want is a bolt or something in an intake port. Maybe tape over the ports to avoid until ready for the intake.
Follow torque procedure for the application. Do the gaskets require re-torque after running?


I would use assembly lube on the cam lobes and lifter bottoms for re-install back into in the same bore they came from. No need to pre-fill the lifters as the oiling system will take care of that. Before installing the rocker assembly look at the ball sockets make sure none are pushing through the top. When installing the rocker shaft assembly continually check that the pushrods haven't fallen out of the ball sockets. Expect the rockers to rattle until the oil quiets them.
 
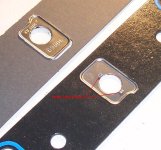
Turns out the other head was cracked so bought 2 re manufactured heads @ 150/ea from cylinder heads international - there on their way to me now. Question (see photo) - I got two air inlet gaskets per side - I metal the other gasket type material. Do i use both? Metal against the head? Or is the metal gasket if it is raw water cooled? (Mine is fresh water cooled)

IMG_1237[1].jpgIMG_1236[1].jpg
 
Either will do--I'd use the non-metal ones--but don't forget those little metal plates that reinforce the gasket at the exhaust cross over passage.

Jeff
 

Attachments

  • Intake Gasket Plates.JPG
    Intake Gasket Plates.JPG
    77.8 KB · Views: 61
Jeff - where do I get those? They didn't come in the gasket kit? From another post it looks like I need Fel pro 17350. There are 4 metal inserts in that package. From your picture it looks like metal goes on both sides of each gasket - i.e. metal insert on each side of the big gasket?
 
Jeff - where do I get those? They didn't come in the gasket kit? From another post it looks like I need Fel pro 17350. There are 4 metal inserts in that package. From your picture it looks like metal goes on both sides of each gasket - i.e. metal insert on each side of the big gasket?

What type of gaskets were on the engine at tear down? Were these restrictor plates on the gaskets you pulled out? They may be standard for marine application intake gasket sets if you search that Fel-pro number .
Looks to me two per gasket, one on each face of the gasket. Fold the tabs over to hold the two together. These are basically a heat crossover restriction and provide blowout support for the gasket. You might be able to make your own from some stainless sheet stock. Use the gasket as a template.
 
I like the fiber gaskets myself. There is a procedure for an initial setting of the rockers in the service manual. I don't remember exactly how it's done, but on 1 setting, you can do 1/2 the valves, and on the next setting, you can do the rest. You only want to snug them up when doing this, for final adjustment later.
 
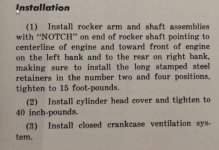
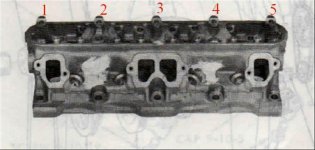
Does anyone know what they mean by " long stamped steel retainers in the number 2 & 4 position..."????I didn't see this when I took this apart??? See below
318.jpg
 
Got it running - no white smoke - couple of coolant leaks where the gaskets meet on the starboard exhaust manifold and t-stat - took those apart and add copper sealant - waiting on exhaust gasket - anyone know if a lebaron gasket works or need the marine gaskets (closed cooling). Rebuilt heads (cylinder heads international, rebuilt starter, rebuilt exhaust manifolds (and pressure tested), broke off many taps which had to be extracted, 5 foot oil change hose, etc.
 
The ONLY automotive exhaust gaskets I've used that work are from early 273 cube V-8s. The ports on auto engines are much larger.

Jeff
 
So ran it for 15- 20 minutes 3 different times on land - sounded great (1500-2500 RPM). Coolant level staying where it should no white smoke out the back. Put it in the water this morning - sounded great for 15 minutes and then this valve tapping (tink, tink, tink) sound started in the port head. Comes and goes but distinctive at low rpm. Do I have the rocker shaft installed wrong? Recall I just replaced the heads - did nothing with the lifters. Got god oil pressure and temp is 160 deg F. Going to check oil level tomorrow (boat is 40 min away). Could it be that the motor level is different in the water? Drove 5 min around the point to the dock at different rpm's - still the same... Any ideas - Thanks in advance
 
Sounds like ticky lifters, that's all. (Too bad you didn't replace them.) I suggest adding Lucas oil additive. t does wonders for my old 360.

Jeff
 
So ran it for 15- 20 minutes 3 different times on land - sounded great (1500-2500 RPM). Coolant level staying where it should no white smoke out the back. Put it in the water this morning - sounded great for 15 minutes and then this valve tapping (tink, tink, tink) sound started in the port head. Comes and goes but distinctive at low rpm. Do I have the rocker shaft installed wrong? Recall I just replaced the heads - did nothing with the lifters. Got god oil pressure and temp is 160 deg F. Going to check oil level tomorrow (boat is 40 min away). Could it be that the motor level is different in the water? Drove 5 min around the point to the dock at different rpm's - still the same... Any ideas - Thanks in advance


Rocker Arm Shafts
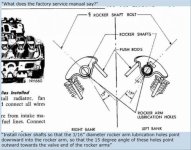
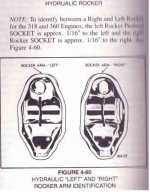
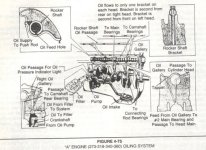
When installing the rocker arms on a shaft type system of a Chrysler engine, the shafts must be installed correctly. There is a difference in the top and the bottom, as well as side to side. The shafts must be installed with the oil holes pointed to the bottom and to the outside of the engine, toward the valve. This is the only way the shafts can adequately oil the rocker arms. Premature wear will result if the shafts are installed improperly.

There should be a notch on one end of the shafts. The notch on the odd bank shaft should be rotated down and over #1 cylinder. On the even bank the notch on shaft should be rotated down and over #8 cylinder.
This orientation should have the oil holes toward the valve side and not the pushrod side.

I would try to isolate the "tick" to a specific cylinder.
If you have "good" oil pressure (approx. 40 psi hot) the lifters are getting plenty of oil.
What were the rocker shaft bolts torqued to?
Did you continually verify all the pushrods were in the rocker sockets while tightening the shaft assembly?

A few things on the "tick" list (feel free to add items)........
sticking hydraulic lifter
worn or crushed rocker shaft
worn rocker and or pushrod socket and or tip
plugged oiling hole in shaft
improper rocker train install
bent push rod (a fairly common issue that can happen if a pushrod is not in the socket while installing the rocker shaft assembly)
short valve stem height
sticking valve
weak or broken valve spring
low oil pressure
exhaust leak
shaft orient.jpgrockers.jpgSAVE0015.jpg
 
Thanks Jeff & Dave 69. Started it up this morning - only a slight tick. Ran it for 20 minutes. Listen to attached video. To answer Dave's questions: Oil pressure over 40. Rocker shafts were torqued to what was in the manual (not here - on boat). Used a stethoscope on each cylinder - they all sound the same. I made sure all the rods were lined up properly while torquing and after. I used a auto cylinder head to exhaust manifold gasket on that side - there may be a small exhaust leak. With the stethoscope on the manifold and each cylinder - all have the same sound signature. Oil is slightly over full but clean after approx 2 hrs runtime. Thanks much for the diagrams!!

 
So I ran the motor some more yesterday - seal around the valve cover gaskets is with felpro rubber. Did not silicone each side but looks like I should have - oil is sputtering out the back of each cover where there is a square cut used to align the gasket. Due to age the lip may not be parallel to the gasket. I will remove the valve cover and make sure the rocker shafts are on the right side and then silicone these gaskets down
 
When you do, turn the valve cover upside down and knock the dimple (where the bolts go) flat with the ball end of a ball peen hammer.

Jeff

PS: Started my old 360 this weekend after it sat for 6 MONTHS. Lifters clattered for no more than 4 seconds before quieting completely, and all thanks to Lucas oil additive! Can't be it.
 
So I ran the motor some more yesterday - seal around the valve cover gaskets is with felpro rubber. Did not silicone each side but looks like I should have - oil is sputtering out the back of each cover where there is a square cut used to align the gasket. Due to age the lip may not be parallel to the gasket. I will remove the valve cover and make sure the rocker shafts are on the right side and then silicone these gaskets down

The rocker train assembly, when assembled and oriented correctly, will work on either bank.

In the links picture note the "notch" down and forward over #1 cylinder. Also note the rocker arm positioning for left and right.

http://www.moparmusclemagazine.com/..._small_block_budget_build_part3/photo_18.html
 
Last edited:
Back
Top