Logo

How to adjust the head valves - Volvo penta chevy 350 V-8 5.7 GL

Alce Deal

Member
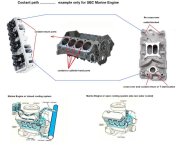
Hello Every one. Am in the process of rebuilding an engine that got a blown gasket(s) due to engine overheating. Got the heads back from machining, installed new gaskets and heads, push rods etc. With the engine in no. 1 firing position I adjusted intake 1,2,5,7 and Exhaust 1,3,4,8. Rotated the crankshaft one turn and adjusted I-3,4,6,8 and E-2,5,6,7; I did everything according to the book, 1/2 turn more after lash was removed... once I was done adjusting all valves I finger tested the initial set of valves I adjusted and most of them where loose... Am I doing something wrong? should I re-adjust again and again? Please help me, I don't want to take a chance with this engine and mess it up... Thanks every one. P.S (this is my second project and is lots of fun working in this engines but am not a mechanic by trade)
 
Alce, you use what's refereed to as the "2 stop" procedure. The 2 stop will work, but I'd never recommend it.
TDC comes around twice per every two crankshaft revolutions. Once at the top of the compression stroke, and once again at the top of the exhaust stroke.
If you're not at TDC C/S (compression stroke) when you begin this procedure, your adjustment will not work.

I'd recommend the 8 stop procedure, of which is very similar, but involves beginning with #1 cylinder TDC C/S, and moves right down the engine firing order 7 more times.
With the 8 stop, you will be adjusting the cam followers (aka lifter or tappet) 2 at a time ONLY.... both intake and exhaust for that cylinder ONLY.

If this is a rebuilt engine (new pistons, rings, bearings, camshaft, cam followers, etc) it's best to make this initial cam follower adjustment prior to the intake manifold being installed, and prior to any oil system priming.

This will allow us to see the follower plunger push rod cup ..............(shown here)
150px-Schubeck_hydraulic_lifter_made_for_zero_lashing.jpg


........ and to watch as the cup just begins to move downward within the follower body.
At the point in which the cup just begins to move... zero valve stem/rocker arm lash will have been achieved.


Basically, with a hydraulic camshaft, we're setting/adjusting cam follower plunger depth.... not valves!

camshaft follower adjustment explained.jpg

There is approximately .100" plunger travel in the SBC hydraulic cam follower.
This GIF file shows a cam follower as it becomes hydraulically active.

[video=youtube;lorANZ1Tptw]http://www.youtube.com/watch?feature=player_embedded&v=lorANZ1Tptw[/video]

Via the rocker arm ratio (1:1.5 for the standard rocker arms), the rocker arm stud thread pitch, and the % of adjustment nut rotation once ZERO lash has been achieved, the cam follower plunger will become set correctly.... of which will be at approximately 50% of it's travel range.
(we don't want the plunger to near it's lower limit of travel, and to bottom out..... nor do we want the plunger to near the upper limit of it's travel, and to top out)


If you use the 8 stop method, and use it correctly, I doubt that any further adjustment will be required.

However, if you use the 2 stop method, I would highly recommend that you back through these dynamically after this engine is up and running.


Your call.... I'm just tossing this out for you.


.
 
Last edited:
BTW, your SBC 5.7L engine will be fitted with hydraulic cam followers (aka lifters or tappets).
You've not mentioned the year, so these could be either flat tappet or could be roller tappets........ but the adjustment procedure will be the same.

For any engine using mechanical followers (aka solid lifters) the procedure is quite different.


.
 
Last edited:
Thank you very much Rick, I will follow your advise. First I have to read your recommendation few times for better understanding; it is 1997 engine. I will post the results soon... good day.
 
once I was done adjusting all valves I finger tested the initial set of valves I adjusted and most of them where loose...

Ayuh,.... Ya did start with the motor at Tdc, #1, Right,..??

Some may feel loose, til she lit off, 'n the oil pressure comes up,....

You can bench start the motor, 'n adjust the valves, Runnin',...
Like Rick said, dynamically,....
 
Good news!.... and really bad news. - the good news is the good feeling I got when I turned the key and Yes!!! the engine started first try and it sounded good, may be a little off on timing but that should it be easy to adjust with my timing gun... engine run for about two to three minutes then I noticed something... the bad news... lots of steam coming out of the valve cover hose... Not normal I thought, I turned the engine off. removed the one of the valve covers... and I saw lots of water mixed with the oil... I FAILED. I guess I need to take this engine apart and try to do some investigative work to see If I can determine what did I do wrong. Am I going to need an other engine? May be? Prior of taken this project I checked the oil and during the process of taking the engine apart there were not signs of any water mixed with oil... but now it looks like I ruined... Sad... Super sad...
 
In answer to your very first question, it is common that after valve lash adjustment with hydraulic lifters and before engine start the push rods will be felt to loosen up after a few minutes. If you adjust them again you will just be pushing the lifter piston farther down and eventually find yourself with a valve that does not close. That is why it is important to do this simple procedure correctly the first time.

As for your coolant into the oil leak it is unlikely (but not impossible) you have ruined the engine in 2-3 minutes. The most likely source of the problem is an improperly installed intake manifold gasket. There are many iterations of the 5.7 out there and you must use the correct gasket with the correct torque for your engine. Sealer is suggested for some engines, forbidden for others. If you pull the intake manifold and it looks like that was the problem, I would thoroughly flush the oil system before putting it back together. Then pressure test the coolant system to see if it will hold pressure to be sure you have cured your leak.

Others will
 
Thanks John, I guess it make sense what you say, finally I understand the valve lash adjustment procedure and I should not panic if they feel loosen a lil and then adjust them again with the engine running if needed. As for the coolant in the oil, I will proceed to flush and drain all the oil system first thing tomorrow, re the pressure testing the cooling system, I guess I need to figure out how to do this procedure. May be is the sealer I used on the gaskets, if that is the problem you think I should remove and reset the heads again?
 
...

What say we back up here, and define a few things, and examine just what all was done to theoretically correct this?


Am in the process of rebuilding an engine that got a blown gasket(s) due to engine overheating..

Define "rebuild" for us if you would.
Was this engine taken down completely, and with all parts refurbished and/or replaced?
Or are we calling a cylinder head R&R a "rebuild"?

Define "engine overheating" for us if you would.
How hot?
Hot enough to warp cylinder heads?
Hot enough to damage head gaskets, but not warp cylinder heads?


OK.. part #2:


  1. finally I understand the valve lash adjustment procedure and I should not panic if they feel loosen a lil and then adjust them again with the engine running if needed.

  2. As for the coolant in the oil, I will proceed to flush and drain all the oil system first thing tomorrow, re the pressure testing the cooling system, I guess I need to figure out how to do this procedure.

  3. May be is the sealer I used on the gaskets,

  4. if that is the problem you think I should remove and reset the heads again?

  1. If the cam followers are oil filled (aka primed), they are essentially hydraulically active. When adjusted correctly, you should not be sensing excessive valve stem/rocker arm tip lash during any camshaft position.

    NOTE: if the followers are absent of oil (such as brand new and not yet primed), you may sense some plunger movement/travel while manipulating the rocker arms due to a very small plunger return-to-top spring just underneath the plunger.

  2. After the "over-heating", did you see milky colored engine oil?

  3. What sealant, and on which components?

  4. When these heads are removed, NEW head gaskets MUST be used.


.
 
Last edited:
I am a shade tree mechanic that does his own boat work (an endless hobby), so keep in mind guys like Rick (an others) that fix these all the time may have some additional information. Having said that let me give you some thoughts. I think Rick's questions are aimed at trying to determine if the coolant into the oil problem is a result of the overheat (i.e. something metal may have cracked open and was not replaced in the "rebuild") or whether the rebuild just was not correctly assembled. So try and respond to those his questions and he may have some further insights.

The immediate coolant leak into the oil is most unlikely to be an issue with the head installation since there is no easy passage between the two. The joint between the heads and the intake manifold is usually the leak issue (assuming nothing is cracked) since there is coolant under pressure in the end "holes" on those gaskets front and back and a coolant leak flows into the galley under the manifold and from there drains into the oil pan. Why would it leak? Well there is the small possibility that the combination of the head machining and the head gasket chosen have lowered the passages into the head enough that the intake manifold no longer lines up correctly with the sealing face on the heads. (I have not seen this in my limited experience but am told it can happen). More likely suspects (assuming the surfaces were clean, the gasket is correct and correct sealer (if indicated) was used) include 1) that when you lowered the intake manifold into place you shifted a gasket out of position. I always us studs (cut off bolts) to provide a guide to insure the manifold sets correctly when it is first lowered. Or 2) you may have a later model engine (after 2000 or so) that uses the plastic/silicon gaskets that require "no additional sealer" and must be torqued to spec (it is a very low torque) or they will crush, shift and leak. Leaks from over torquing have been a real problem for GM. Others will probably suggest some other possibilities.

As for the pressure test, not having specialized equipment, I would pull a temp sensor on top of the intake manifold and replace it with a tee. To the tee I would attach a cheap pressure gage ($10) and an on/off valve. Put a source of compressed air on the valve, crack it and bring the gage to 10 pounds or so. Turn off the valve and wait and see what happens. When it leaks down, if you are lucky you may be able to determine though the hissing the exact location of the leak. If you drained some coolant to have a bigger reservoir the test would last longer and give you a better chance of finding the leak. It would be good if you could do this before tearing anything down. Then when you have fixed the problem do it again to insure a good fix before start up. Others may suggest betters ways to do this test.

Good luck.
 
In rereading my post I would add that you must drain coolant if you expect to hear the leak since otherwise this test will only confirm there is a leak and will push even more fluid into the oil.
 
Hello Rick; Ok, this is the story... My big boat (Sun runner Classic 245 is running just fine) is a sea water only. So, the boat am currently working on is supposed to be my lake boat, I only took this project on after inspecting the oil very closely, I did not wanted to deal with an engine with water in the oil based on my previous experience with my sun runner. So, the guy that had this new boat (20' Larson 1997) told me the engine overheated they managed to get the boat out of the water they turned of and the next day the boat did not start it all. He was not able to tell how hot did it get. During the disassemble process I was happy to see the condition of the engine, it was so clean an no water in the oil, I found the thermostat loose and out of place and sitting at the bottom of the termt housing.
Define "rebuild" for us if you would.
Was this engine taken down completely, and with all parts refurbished and/or replaced?
Or are we calling a cylinder head R&R a "rebuild"? No, I just removed the intake manifold then I removed the heads, sent the heads to a machine shop, replaced the gaskets with new original marine kind. Checked the manifold surface and it appears to be ok.

Define "engine overheating" for us if you would.
How hot?
Hot enough to warp cylinder heads?
Hot enough to damage head gaskets, but not warp cylinder heads? - Unable to tell


OK.. part #2:


  1. If the cam followers are oil filled (aka primed), they are essentially hydraulically active. When adjusted correctly, you should not be sensing excessive valve stem/rocker arm tip lash during any camshaft position. -- Correct, I did not felt excessive valve stern/rocker arm tip.
  2. After the "over-heating", did you see milky colored engine oil? --- No
  3. What sealant, and on which components? --- Used Copper Coat Gasket Compound (K&W)
  4. When these heads are removed, NEW head gaskets MUST be used. ---- Yes new.


I will be doing some investigative work this weekend. - Thanks for all your help, tips and time.
 
Oh, a lake boat. So if it does not have a closed cooling system (using antifreeze as coolant) then forget all that advice about pressure testing. Since you saw no water in the oil on tear down the advice on where to look for the leak is still valid.
 
Hi John, thanks for your suggestions, It makes sense, I like the idea of pressure test the cooling system, I think I can do that using and adapting some simple air hose fittings, I just hope the core is not cracked, I will keep you posted. I wish I had know this before... Thanks a lot again, I sure would not know what to do with out you guys help...
 
I'm picking out some points of interest, and I'm randomly quoting both you and I here.


Define "rebuild" for us if you would.
Was this engine taken down completely, and with all parts refurbished and/or replaced?
Or are we calling a cylinder head R&R a "rebuild"? No, I just removed the intake manifold then I removed the heads, sent the heads to a machine shop, replaced the gaskets with new original marine kind.
Well, in my book anyway, this would be cylinder head work.


During the disassemble process I was happy to see the condition of the engine, it was so clean an no water in the oil,

If the over-heating issue did not cause oil hydrogenation, then I'd be more inclined to suggest that you may have caused this when the cylinder heads were R&R'd.


OK.. part #2:


  1. If the cam followers are oil filled (aka primed), they are essentially hydraulically active. When adjusted correctly, you should not be sensing excessive valve stem/rocker arm tip lash during any camshaft position. -- Correct, I did not felt excessive valve stern/rocker arm tip. Hmmm, then why did I read that you did feel loose rocker arms and had a question about this?
  2. After the "over-heating", did you see milky colored engine oil? --- No This is actually a good sign.
  3. What sealant, and on which components? --- Used Copper Coat Gasket Compound (K&W) Today's head gaskets do not require sealant, unless a shim style head gasket is used.
  4. When these heads are removed, NEW head gaskets MUST be used. ---- Yes new. Good to hear that you understand this... and no offense intended earlier.
 
Alright, this whole thread started when I asked how to adjust the valves properly, I didn't know it's kind of normal to feel some small movement on the rocker arms after few mins of adjustment. -- Once I double checked the valves for proper adjustment I started the engine and a new problem arrived, steam from the engine ... 'oil hydrogenation' milky color kind. -- Following some suggestions I conducted a pressure test in the cooling system, am so glad I did. Using some adaptors and pressurized air I was able to Isolate the leak at the front of the engine near the No. 1 cylinder. (for some reason am not able to upload pictures), Once I did that I proceeded to remove the intake manifold; it would it been impossible to locate the problem with out the pressure test, everything looks so good, I checked the heads surfaces, they are perfect; I then took the intake manifold to the same machine shop I took the heads, they said the intake manifold is straight as it can be....... I don't know what to do. I when back and check the bolt holes for proper deep. Everything looks and checks good, what can I do? What's 'a shim style head gasket? My next questions may not sound very smart and you guys may think am crazy for even asking such thing, but just remember, Am Not a mechanic by trade so I think should ask... has anyone encountered a similar problem before? and ... has any one ever attempted to install a Double gasket? When I was conducting the pressure test, I notice it was a very, very small leak, almost undetectable, in fact I was only able to detected at 60 pounds of pressure, then removed the bolts without removing the manifold and re-torque the manifold then the leak diminish but it did no disappeared. So, considering that all surfaces are or appear to be straight what should I do... I was so close... the engine was even running already.... Thanks for all your help guys.
 
IMO, the thing to keep in mind is just what you made mention of.... "you are not a mechanic"!
Don't expect to know or understand these things that come second nature to us.

Installing the intake manifold requires past experience that you may not have.
You may not have tightened the fasteners correctly, nor in the correct sequence....., and that may have caused the coolant leak.

There is also a cylinder head bolt tightening sequence that must be followed.

You won't be using a shim style head gasket if this engine is Raw Water Cooled.

As for doubling up on gaskets... the answer is simply NO!

************************

One last thing, and a pet peeve of mine.
All too often we hear the term "setting valves".
This is a misnomer when/if applied to an engine with hydraulic cam followers.
We are not setting nor adjusting valves on this SBC engine w/ hydraulic cam followers, we are ultimately setting the correct depth of the cam follower plungers.

Once this is understood, the procedure will make more sense to us as to what we're actually doing.


.
 
Last edited:
Ok, Understood. I will start again. 1. reset the depth of cam follower plungers using the 8 stop procedure. I tightened the fasteners of the cylinder heads and intake manifold following the recommended sequence from the book, starting from the center and according to the torque specifications.
I plan to re install the manifold with new gaskets but I will check the heads and manifold surfaces again, after installation am planning to do an other pressure testing prior to start the engine again. (NO double gaskets, that was just an idea) I don't think I will be using any sealer this time. Is there an schematic to better understand how does the coolant travels through the intake manifold?
Thanks Rick,
 
Alce, just an FYI... We will continue to see this refereed to as "valve adjustment". So call the adjustment what you want to.
Like said, it's my pet peeve, not anyone else's. :D

Is there an schematic to better understand how the coolant travels through the intake manifold?
Thanks Rick,
You are welcome.

See if this helps you.
I drew these up a while back, and just now added a bit of clarity.

Open it up and click once more on it... it should go full screen for you.
 

Attachments

  • SBC cooling-system 4.jpg
    SBC cooling-system 4.jpg
    62.7 KB · Views: 511
Last edited:
OK, you found where it was leaking and nothing seems to be broken so you are 90% of the way there. As suggested earlier, take one of the attachment bolts to the store and buy four just like it but about an inch longer. Cut off the heads and install them in the corner holes. Use these as guides to insure you lower the manifold evenly and into the correct position. Pros don't need to do this but since shifting the manifold around after is is down is a no-no it is a good idea to take the trouble. I do it. You can slot the top of the bolts if you are worried about getting them out. The generation of your small block 5.7 (can be determined by the year or bolt pattern) will determine the type of the manifold gasket required, the advisability of sealer, the correct way to seal the flat front and back areas (gasket material or rtd) where the manifold almost touches the block [I think some sources recommend using rtd on all generations since that way all of the bolt torque is going to compressing the gaskets in the manifold/head juncture] and the correct torque and sequence for the bolts. So get these right. Look it up on the internet or ask more questions. If your pressure test was useful I guess that means you have a closed system so by all means do it again to see if the engine holds pressure.

Good luck.
 
Just another thought. If you have a latter generation engine note that the intake manifold torque is usually given in inch-pounds, not foot-pounds. Do not over torque!
 
John, his 5.7L GL is likely a Vortec engine.
If so.... the Vortec intake manifold gasket system is superior to the earlier styles.
Again if so...... there will be snap in detents that ensure that the gasket will not slip or slide out easily.

.
 
Rick, All true if Vortec. So is mine and I did once drop a manifold on crooked, straightened it and then thought I better look. Gasket had popped out and shifted. So that is why I go with the guide bolts. I try and be careful but golly, that manifold with all the stuff on it is heavy and my angle is awkward (and I am not as big of a boy as I was some years ago).

Also if Vortec, then that means no sealer, rtd on end flats and most of all, do not over torque!

Next time (if there is one) I will ask about closed or open cooling and engine generation before spouting advice. In this case my (unconscious) guess was more or less right (we think).

I go back to Mexico next week for a 3 month stay so I can start asking questions to the Crusader forum about my own boat. I am sure there will be some! I was down in October and discovered, upon close examination, that the starboard prop was bent (it looked as if it had backed into mud or sand). Hoping the resulting prop job will resolve the performance difference between the two engines that I have been chasing.

CaboJohn
 
Back
Top