Logo

OPTIMAX Fuel pressure regulator diaphragm

captdale

Member
2010 , 200 hp, DFI. Fuel Pressure Regulator Diaphragm has a tear. I understand Merc. will not sell the diaphragm as a single part because of some "EPA" restriction. I think this is major BS so sent a FOIA request to the district 5 (WI) EPA director requesting clarification if this is so or not. Geez, I can buy a FPR diaphragm for chev, buick, suzuki, BMW, AEM, Holly, Mallory for about $4.50 rather than a complete fuel rail for what, $1500 from Merc. Also sent a e-mail to merc for official clarification. Yeah, Pelican will "rebuild" the diaphragm for ....... now get this................ $300.00 minimum advertising that "you save 100's of dollars". So I guess the question is that if Merc. can't sell the diaphragm why can pelican . Both are ripping off the consumer. Greed pure and simple. I seriously doubt that the EPA is the reason.

One other complaint about Merc. Don't get me wrong I think Merc's are great. In particular the DFI's. However many other modern outboards have a NMEA 2000 buss that connects directly to things like Lowrance Gen2 devices that will display motor information. Not Merc. You have to buy a merc gateway for again big bucks or buy again merc smartcraft guages for big bucks. This is just pure and simple greed.

Well thats enough venting for one day ;) Geez, don't get me started. CD
 
Either hang on or have a look through recent posts about Opti's.

A similar issue came up in the past few weeks and I'm thinking someone posted a source for the diaphragm (I tend not to work on these so I didn't take note of who it was).

And I hear you on the proprietary stuff. Merc is top of the pile in North America so they can get away with stuff like that (and I note you said "Lowrance" - try owning a legacy Garmin product :() - the others throw you "bones" to try and cut into that.
 
Old bearings ?? What bearings in a fuel pressure regulator. Thay don't have bearings. Yeah, I know pelican will make you a new diaphragm. Out of "superior" material. BS. When I called him to inquire on the price he said he has a machine shop and "rebuilds" yours. For (as I recall $300.00). Shoot, I also have a machine shop and can do that for signicantly less than that. Bottom line the part should be readily available for about $5 - $10 max. There are HUNDREDS of fuel pressure regulator diaphragms on the market for that price. What you want to bet I can't fine a drop in replacement for not more than $10 !! . Like I said.... greed pure and simple from both pelican and merc and my experience with greed is that it will bite you in the butt every time. Stand by... I'm not done with this by a long shot. What the .... has happened to my country ? I'm sick of this crap. And thats's what I'm saying .. CD
 
I believe USA patent law allows the owner of said patent to have exclusive rights to mfg. and sell the item. After that it's up for grabs for anyone to copy it and sell it.
 
Hi Guy - You know, your absolutely correct. I have a couple of patents and it would , well, upset me if someone copied the product so I agree with you there. However, it is still major greed and I would hope merc stood behind their warranty and replaced the defective item at no cost as long as it is in warranty. But ... once its out of wattanty there is nothing in the world preventing me from modifying the original with a less expensive part. As far as that goes I can modify the product any way I want any time I want. It is after all just a stinking diaphragm. In my shop, I can modify the case to accept a slightly different diaphragm that costs $5.00 and still be just fine. It's just a diaphragm. The spring tension on the seat is what makes it a regulator. Makes you wonder how pelican gets away with it. Apparently on engines out of warranty ?? Perhaps. Even then they would apparently be infringeing on Merc's patent. Bottom line it's major greed from both. I like Merc motors and I like the DFI's BUT next time I shell out that kind of money I will ask more questions concerning just this topic. I.E. - shafting the consumer for $1500 vs a $5.00 replacement part and not including a NEMA 2000 buss connection. I understand that it's just like TV. If you don't like what the commentator is saying just change the channel. If you don't like the way merc is doing it then don't buy the product. Nothing will change until the consumer stops buying the product because of issures such as these so at least I hope forums like this one helps shed some truth on the subject. Buyer beware was never a more appropriate statement. I should have kept my old 89' 200 hp, carb, Black Max and been better served. Cost of one DFI injector would have paid for the extra fuel it used for a couple of years and it ran just fine for 24 years !! When it finally blew it was my own fault for letting sludge accumulate in the remote oil tank.. Complete rebuild about $3000. Screw me once Merc shame on you. Screw me twice ain't gonna happen !! We will see what Merc and the EPA have to say.. CD
 
I know a solution... The tracker valve diaphragm is exactly the same as the pressure regulator diaphragm. The only problem is that the stainless steel node in the center is different. So - I bought a new tracker, (Purple material) ground off the swedge on the back of the backup washer and popped off the washer... I now have a new diaphragm in my hand. The problem is getting it on the regulator node. I cut off the old regulator diaphragm and used a compressing Colette to drive the swedge inward to get the washer off. I cleaned the surfaces, put the diaphragm on the node stud, placed the washer on top. I ground a socket out inside to miss the bearing housing, ground a champher on the outside, yet still create a swedge on the stud tail with a press. Took me about an hour including making the tool. Make the tool by chucking a 12 point thinwall socket up in a drill press. I used pointed grinder to make the cut inside for bearing clearance, then ground away enough of the outside 40-45 degree angle to press swedge. If buy 3 trackers at a discount, you will have 3 new valves.
 
Now all you have to do is send the fuel rails out to be calibrated.

Not so. The pressure is regulated by the spring pressure forcing the bearing end of the node into the seat of the orifice. All the diaphragm does is to support the node and keep it aligned against the torque of the spring. Since you are using exactly the same machined piece with exactly the same spring cap, the pressure should not change. Mine did not, it is spec and the engine runs fine. Although there may some difference in the ductility of the material used in the new versus the old diaphragm, that would change the impulse frequency of the regulator - not the pressure. Since the tracker valve controls impulse balancing... and the volume of fuel available at pressure, the injectors would never see it. That is one of the reasons the old impulse pumps had to be replaced with discreet constant volume gear pumps for the larger engines to work with fuel injection.

I might add that since all the parts are machined to (I would hope uniform tolerances), the only reason the adjustment stud is used, is to account for variances that may be present in the spring tension under compression. Although the springs are made from the same materials, perhaps even the same machine, heat treated and annealed the same same way, there will be variances from batch to batch. That is why after the pressure is set, the stud is capped to prevent adjustment.
 
Last edited:
I know a solution... The tracker valve diaphragm is exactly the same as the pressure regulator diaphragm. The only problem is that the stainless steel node in the center is different. So - I bought a new tracker, (Purple material) ground off the swedge on the back of the backup washer and popped off the washer... I now have a new diaphragm in my hand. The problem is getting it on the regulator node. I cut off the old regulator diaphragm and used a compressing Colette to drive the swedge inward to get the washer off. I cleaned the surfaces, put the diaphragm on the node stud, placed the washer on top. I ground a socket out inside to miss the bearing housing, ground a champher on the outside, yet still create a swedge on the stud tail with a press. Took me about an hour including making the tool. Make the tool by chucking a 12 point thinwall socket up in a drill press. I used pointed grinder to make the cut inside for bearing clearance, then ground away enough of the outside 40-45 degree angle to press swedge. If buy 3 trackers at a discount, you will have 3 new valves.

I've been researching fuel pump diaphragms for BMWs and I ran across this - if it helps.
http://shop.advanceautoparts.com/p/...pressure-regulator-diaphragm-prd6/10300376-P#
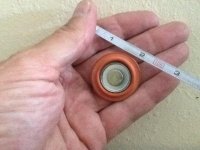
What are the dimensions for the diaphragm you need?
image.jpg
 
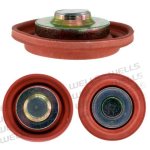
Is this the Optimax regulator diaphragm you need?
OD 1 5/16
approx. 13/32 center

image.jpg


Standard part #PR152
BWD part #21735
$20
 
Last edited:
If you are having or had fuel issues with your Optimax, you probably have read about the fuel regulator and how it is not serviceable and Mercury would have you order a new port fuel rail for somewhere between $1200-1600. There are a couple places that will “service” your fuel rail for prices ranging from $380 to $950 and for that price you will magically get a new fuel regulator diaphragm.

I was all set to send my fuel rail to Florida for a new fuel regulator when I read a post on a couple of forums from a user called OKByMe. In a few lines he described his procedure to rebuild the fuel regulator diaphragm assembly with the rubber diaphragm from a tracker valve. I PM’d him for a bit of clarification and then set to work to duplicate his efforts. And it works! I was able to rebuild my fuel regulator diaphragm assembly and get the motor back to running condition at factory specs for fuel and air pressures. Here are the detailed steps to rebuild the fuel regulator diaphragm assembly.

First let me clarify the terminology I will use. When I refer to the ‘fuel regulator assembly’, I am talking about the rubber diaphragm itself and the metal ‘core’. Together they are the ‘assembly’. The fuel regulator diaphragm is the piece of rubber. My original fuel regulator diaphragm was turquoise (see photo). The new one is purple.

The rubber diaphragm of the tracker valve on the starboard fuel rail is EXACTLY the same as the rubber diaphragm of the fuel regulator. The only difference between the assemblies is the metal core. One metal core does work in both. The metal cores must be disassembled to remove and replace the rubber diaphragm.

Secondly, here are some DO’s and DON’Ts that I highly recommend you pay close attention to:
DO – disconnect the negative terminal of the battery
DO – remove lower cowling before trying to remove fuel rails
DO – remove fuel rails from studs
DO – remove all fuel, water, and air lines
DO – use anti-seize compound on the screws when reassembling
DO – use a torque wrench when tightening screws and nuts
DO – torque screws to a maximum of 70 in lbs
DO – torque fuel rail studs to 33 ft lbs
DO – check all connections and covers for fuel leaks when the engine is running
DO – fix all fuel leaks IMMEDIATELY. TAKE NO CHANCES.
DON’T – over tighten screws – even if using a torque wrench
DON’T – attempt to service the diaphragm while fuel rails are mounted on engine (that is how I got in this mess in the first place)
dsc01007-640x360-jpg.285


I got the new rubber diaphragm from a new tracker valve. I needed one tracker valve because mine was torn (after 12 years of wot runs) and I ordered a second to repair the fuel regulator diaphragm. I removed the diaphragm from the tracker valve the same way I removed it from the fuel regulator diaphragm assembly.
dsc01044-640x360-jpg.292


dsc01045-640x360-jpg.293


To disassemble the cores, I made a tool to fit in the groove of the fuel regulator diaphragm core. I used a 10mm socket and opened up the inside diameter to clear the round ‘bearing’ in the center of the core, and shaved the outside to fit inside the flange or ‘swedge’ of the core. I used a grinding stone in a dremel-type tool to grind the inside diameter and a file for the outside diameter. I shaved the outside of the socket high enough to accommodate the wrench I used to squeeze the swedge. I mounted the socket in a drill (or you can use a drill press) to help hold the socket and increase the apparent rpms of the grinding tool. I made this tool to prevent the swedge from folding in while I squeezed the swedge to a vertical position. I am not totally sure you need this tool but I am sure according to Murphy’s law that if I didn’t take the 20 minutes to make it, something would have happened to make me want to have it. The same tool can be used to open the swedge on the new tracker valve.
dsc01026-640x360-jpg.289


The swedge is holding down a flat metal washer on top of the rubber diaphragm. By straightening out the swedge, you will be able to remove the washer and the rubber diaphragm. I used a 6” Bionic Wrench from LoggerHead Tools to straighten the swedge. It is a six-sided wrench that you squeeze like channel-locks.
dsc01017-640x360-jpg.287


dsc01021-640x360-jpg.288

You can use a collet of some type like a drill chuck, or pliers that are very flat on the side. There is not a lot of material to grip so you don’t want to use a tool that has rounded edges. By rotating the diaphragm assembly and squeezing firmly but not too much, in a few rotations I had the swedge straightened up enough to remove the washer. Remember you are working with stainless so you need a bit more strength than for mild steel and the stainless is much less forgiving if you do not have the swedge vertical enough.

dsc01027-640x360-jpg.290

Once the washer is off, replacing the rubber diaphragm is a snap. Then you replace the washer and using a different tool, you bend the swedge back in place to hold the washer. The second tool you will need is another 10mm socket. Grind out the inside diameter to clear the center bearing, then chamfer the outside to 45°. I then placed the tool in the proper location and put the tool and diaphragm assembly in a 4” vise and squeezed everything into place.

dsc01015-640x360-jpg.286


I made sure that the swedge was bent the right amount by comparing the original height of the assembly at the swedge to the ‘repaired’ height. The washer sits on a shoulder on the core and ensures a perfect fit to the rubber diaphragm.

img_20140712_184944-640x360-jpg.291

After I reassembled the fuel rails and mounted them on the engine, I primed the fuel system according the owner’s manual and then cranked the engine. In about three seconds it was purring like she was brand new. I checked the fuel and air pressures on the port fuel rail and everything was in spec. I shut down the engine and waited 20 minutes to restart it. When I did, it fired and purred smoothly.

As far as I am concerned, I saved at least $300 and probably more. I hope this post helps someone else in a similar situation. At the very least, know where I can find the instructions if I need to help someone work on their boat ;^)

Sincerely,

Mike
2002 Nitro NX882DC with 175 Opti
 
you have to be more specific to make a believer out of me. I provided my details. How about you? There have been too many "suppositions" about this and no hard proof about what works and what doesn't. My engine hit 63mph yesterday, starts like a dream, and purrs like a kitten.
 
I just wanted to let you know that you are not alone in your opinion on this matter and I completely agree with everything you said. Ten minutes before I found this forum I was on the phone with Mercury telling them I was going to sell my Mercury motor and never buy another one because the are not keeping replacement parts available. I can't even buy a high priced fuel rail (now discontinued) let alone a $10 diaphragm. I am going to fix my motor and sell it.
 
We tried Pelican to rebuild our fuel rail and don't recommend using them. Very rude and after sending payment to them via payal we were told that the fuel rail was thrown away and he would not refund our money. People stay clear of The Pelican Services...total rip off
 
you have to be more specific to make a believer out of me. I provided my details. How about you? There have been too many "suppositions" about this and no hard proof about what works and what doesn't. My engine hit 63mph yesterday, starts like a dream, and purrs like a kitten.

You did a great job on the detail... My info was just enough for a mechanic to do it, yours is good enough for a school teacher AND it looks just like mine. I have put over 120 hours on the engine since I did this and have since rebuilt the air pressure regulator as well... all my diaphragms are the new purple stuff.


IMG_20150512_205641_620[1].jpg
attachment.php
 

Attachments

  • IMG_20150512_205632_144[1].jpg
    IMG_20150512_205632_144[1].jpg
    21 KB · Views: 16,511
Back
Top