Logo

Repairing engine cover and upper cowling on BF 225

chawk_man

Silver Medal Contributor
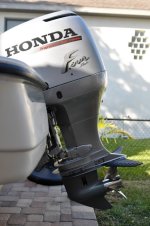
Had my boat tied up at a private slip in Hatteras. When a nor'easter blew through, one of the mooring ropes slipped and the result was a seriously gouged engine cover - multiple deep scratches on the back - and a bunch of nicks and rubs in the upper cowling. Does anyone have any experience in refurbishing these externals? It looks like I will need to sand and fill the deep scratches, but fill with what? If I end up having to repaint the entire cover (which I guess will be necessary because of variations in paint pigments) where can I find replacement decals?
 
Mike,

That's great. Would appreciate hearing anything you learn. My biggest challenge appears to be the filler that needs to be used. Those decals are pricey on boats.net if I end up needing a whole set.
 
Ask your paint supplier as well. evercoat has a flexible filler poly-flex or something for plastics though i've never used it.

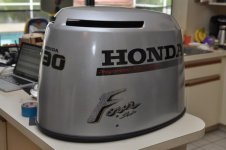
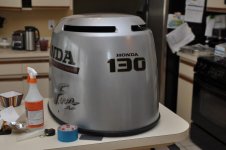
When i redid my 130 motor and cowling, alot of minor scratches you can sand out as the plastic is so thick, though I tried not to sand through the original
adhesion promotor but i did in a few large areas due to clear coat failing...no problems so far. I primed with house of colors kd2000 but they have an epoxy one as well. kd2000 is more of a epoxy acrylic. If you don't reduce it, it's a surfacer, reduce it and you can use it as a sealer. works really nice as a surfacer, shoot then sand (air DA will really make it baby bottom smooth), i pretty much use that on everything now. Low voc, no isos

For the decals, i'll vouch for these guys! http://www.outboarddecals.com

quality is excellent! I'll be using them again on another boat i'm planning to clean up. No better aftermarket ones imho, awesome! The decal material is really top notch feeling. When you apply the decals, i used the same technique as clearbra's are installed, distilled water + couple drops of soap for slipping solution, and a 2nd bottle with some dist water+ isopropyl alcoho for tackingl. The isoprop allows you to tack spots down. So if an edge isn't laying flat, hit it with the alcohol solution and it will stick and the soap solution let's you slide it around until positioned. Like this:

http://www.autopaintguard.com/install.asp

Then squeegee (hard or soft), the decals are so tough i just used a hard squeege from the auto store (for tint) and a credit card, they don't really scratch. Have a microfiber towel for drying. Squeegee the water from inside to out. Don't worry about a couple of *small* like pinhead bubbles here and there, there will be many, though try not to have huge ones (like couple of eraser size ones, keep working those. Once the sun hits it, the small ones , water will evaporate out from under the graphic and they go away.


2012041614424800.jpg2012041614425500.jpg

If i was to do it again and if the motor was newer and worth more, i'd probably take it to a painter with a paint booth, just get a better finish though mine came out pretty damn good, i just used a single stage but you could base, apply decal, then clear.
 
Oh just a quick followup, i didn't use honda colors as I was repainting the whole engine, i just picked something close. But primer color may play a role in the metallic. And metallic is hard as hell to shoot and get right but sounds like maybe you've done it before or have a paint shop in mind. I hadn't and repainted twice after i got the hang of it =) luckily i didn't install decals until I was happy. Would have been better off taking it to a shop, but it came out good after 2 tries!
 
Swade - That's awesome! Thank you so much for all that detail. As I was closely inspecting the engine yesterday, I also noted the infamous Honda paint peeling on the upper cowling. So it looks like I will need to do that also. The information you gave allows me to intelligently make the trade-off between trying it myself or hiring it out. Not sure which way I will go, yet.
 
just keep in mind that silver metallic seems really hard to paint, i said i'd never try to paint metallics myself again, or at least that light silver, you really have to vary your spray pattern, basically criss crossing every coat, to not get noticeable tiger stripes...that's why I painted it twice. In hindsight and my lack of painting experience, considering the cost of decals i'd have hired it out. Not putting you off
from DIY, just relating my experience. I'd diy again a solid color or a dark metallic though for sure but i found that one a pita. It's so light unless you hit it just right, it's really easy to get
darker stripes.
 
Next time i'd probably base + clear, that way you can fuss with the color until you get it right. But that light met silver is a pita for my inexperienced self. This is how the whole thing turned out!

2013050816590600.jpg

Just keep in mind though, you need the primer, + paint + degreaser (wipeout or something or the other). A pint of each + degreaser would be plenty but the primer will only come in a qt i think. Depending on the brand of paint and clear, you're probably already at 150.00 easy.

So just keep that in mind, i'd get some quotes.
 
Sounds like epoxy is the answer and it also sounds like you have a plan.

The fiberglass guy down the uses epoxy to fill the gouges and apoxy x for primer.

Then paint, then clearcoat.

Mike
 
Thanks all for your insight and help. I'm starting to check around on prices, but there is very limited options here in the Northern Neck of Virginia.Still may end up trying to do this myself.
 
Back
Top