Rick aka Rickardo:
In further review of the manual, am I supose to have shim stock in the area "Dim D"? I don;t have any , it apears they just pressed the race in to wher eit needed to be. (Drive was rebuilt by Marie Parts Express about 2 years ago)
Thanks,
Tim
Volvo Penta did shim behind the bearing race in the beginning. There were some issues with the shims shifting and becoming damaged.
With the later drives..... the shimming was relocated to forward of the roller cage.
To change the bearing carrier, technically the shimming process should be performed again.
However, with precision measurements, you can calculate the different dimensions between the current damaged carrier, and the replacement carrier.
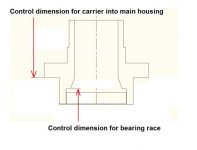
See my note where I point out the the control dimension from the carrier into the lower unit gear case.
Then look at the control dimension for the bearing race "stop".
This dimension will not be the same between any two carriers, but you will be able to calculate the difference between the two.
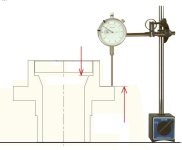
Take both to a good machinist.
He'll clamp each one to a table, and he'll use a precision dial indicator to check the difference between the two surfaces.
The difference in these two dimensions, will be the difference in the shim value.
It may cause the need for an increase to the shim value, or it may cause the need for a decrease to the shim value.
This will very likely mean shimming behind the race, or the removal or the roller cage, with a change to the shim value forward of the roller cage.
As long as the previous shimming was correct, you should be able to acheive the same bearing preload.
Since this affects one bearing ONLY, No other changes become necessary.
BTW, there is no OEM procedure that suggests using this method.... so you're on your own..... but it will work.