Logo

Wandering Ignition Timing

pugetsounder

Advanced Contributor
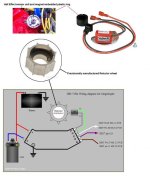
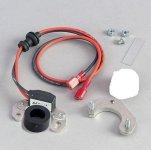
I've got a head scratcher. 1981 AQ120B with Hot-Spark Ignitor. I've noticed in the past year my ignition timing moves. Not all at once but from one or two trips out to the next. Once the timing is set, the boats starts easy, idles great, revs like it should. Get great gas mileage too. Then after a couple of trips out I notice harder starting and lots of pinging. Timing is off, I reset the timing and again everything is great til a couple of trips out. Once it was so far out I had to move the dizzy one tooth. But once it was set again it ran great. Weird!

In October I did a light winterizating on the boat, motor, and outdrive hoping to start it up once a month and warm everything up. Last christmas week it started up and idled no problem. This past weekend I could not get the thing to start. It will turn over and spit and sputter. I tried starting fluid with no success. I suspect it's out of time again severely this time. I will diagnose everything this coming weekend if I get time but I am wondering what are certain things to check? I know the timing belt is spot on. I know the distibutor is good and tight, no slop. The rotor and cap are in good shape. I suspect the Hot-Spark but I want to make sure I've checked everything else first before I call and try and get a warranty replacement. The Hot-Spark is only 1 year old and there is a 3 year warranty. Anybody hear of anything like this?
 
If you will pull the cap, gently turn the rotor in the direction of ignition advance. The flyweight return springs should bring the advanincing mechanism back to BASE advance postion. Do this several times.

It's not uncommon to see that the distributor flyweight return springs have become compromised. When rusted, stretched, weak, etc, they may not be pulling the flyweights completely back to BASE advance position. If so, your BASE advance may be erratic, which means that when you set the BASE advance, it may not strobe at the same crankshaft angle each time.
This will often cause low speed RPM hunting, so to speak.

BASE advance is where the progressive advance begins of which determines the TA (total advance).

Bring #1 cylinder up to TDC C/S..... (important that this is during C/S).

Pull the distributor and take it to a shop who owns/operates an old school Sun, King or Allen distributor machine, and ask them to test it and make the corrections.
They will need the Volvo Penta OEM ignition curve.

Also make sure that the Pertronix sensor's height is aligned with the magnetic unit.


.
 
Last edited:
I was a bit too pooped last night to go into more detail.


The flyweight spring values control the degree of progressive advance as RPM increase.
(BASE advance is a result of the distributor housing's position only... in other words, no progressive advance is used during idle RPM)

The flyweights swing outwards under centrifugal force as RPM increase. As they do, the upper portion advances over that of the main drive shaft. This is what creates the progressive advance and eventual TA (total advance).

As RPM return to idle speed, these same springs must also pull the flyweights back in as to put the advance mechanasm back to ZERO.


Here's an example of a flyweight advancing system.
Note how he is simulating an RPM increase by pulling outward on the one flyweight.


Here is an example of mildly rusted flyweight return springs...... they can much worse.

If you can image that the springs are so rusted that their value has changed, then you can understand what this would do to not only to the progressive advance, but that they may not fully return the flyweights.

This is what may cause the RPM "Hunting" that you may be describing.


I'd strongly encourage you to NOT haphazardly replace these small springs without the aid of a distributor machine.
The spring value and correct adjustment that creates the progressive advance curve, is simply too critical.
Wrong value, and you may detonate the engine, causing severe damage.

These are suggestions only. Your issue may be completely unrelated.


.
 
Last edited:
While you have the (Dizzy) out check the roll pin on the gear, seen several the have stripped but still worked for awhile! Makes u wonder if u have time chain problems but if I'm thinking correct your 120 should be gear to gear. But my middle name is Murphys-law. Good luck
 
This is a 1981 Volvo Penta AQ120B OHC 4 cylinder engine. The counter shaft and camshaft are belt driven.

His distributor is also fitted with the Hot-Spark Ignitor, of which in itself could be problematic.
 
Kim, perhaps I'm not understanding the OP's original comments, but here's what I read.

I've noticed in the past year my ignition timing moves. Not all at once but from one or two trips out to the next. Once the timing is set, the boats starts easy, idles great, revs like it should. Get great gas mileage too. Then after a couple of trips out I notice harder starting and lots of pinging. Timing is off, I reset the timing and again everything is great til a couple of trips out. Once it was so far out I had to move the dizzy one tooth. But once it was set again it ran great. Weird!

If the timing belt had jumped a cog, I doubt that it would it correct itself.
By moving the distributor one gear tooth, he may have corrected an incorrect installation from previous..... but none-the-less, he was able to re-set the timing.
One jumped cog at the counter shaft ONLY, would not affect cam indexing... and the distributor could actually be corrected..... although not ideal due the housing rotation limits.
Also, one jumped cog that changed camshaft indexing, would not allow for any engine power.


If what he's describing is accurate, I'd be more inclined to look at the flyweights that I mentioned.
BASE advance that is inconsistent will cause a change to idle RPM.
Any change while re-seting his initial timing, may cause a change to his TA.

The test is rather simple.

If memory serves me, BASE advance for this engine is 4*, and the TA for this engine is 29*
Back out BASE, and the progressive (aka mechanical) is 25*.
25* divided by 2 (allowing for the 2:1 crankshaft/distributor ratio) is 12.5* of progressive advance at the distributor.
IOW, the rotor should offer 12.5* of movement from BASE to TA, and should return again.

So you'd first want to see if the rotor moves against the flyweight return springs to the tune of 12.5 * (or so) and fully returns.
This would represent the progressive advance (i.e., 2 x's 12.5* = 25* progressive at the crankshaft)

Then you may want to fire it up, and strobe the BASE advance.
Rev it up, and see if it returns to the same BASE where it had been previoulsy set.

If there is any inconsistency at low RPM, the engine will ressemble "hunting" as this is sometimes refered to.

Add to this how often we'll see the flyweight returns springs all rusty and compromised, and it can easily expain RPM "hunting" at/near idle RPM.


It's very tough to help diagnose something like via mouse and keyboard.


.
 
Last edited:
Kim, I may not be following you. Let me take a stab here.
Hey rick bite me!
What is this suppose to mean?
If someone disagrees with you, or perhaps has another theory to share......, this is your grown-up adult-like responce to that??? :mad:


If the timing belt is climbing up on the counter wheel and skipping a tooth is the only way he would have to turn the distributor a tooth
Remember, this engine drive belt drives two shafts.
1.... counter shaft.... (i.e., distributor, fuel pump and oil pump)
2... over head camshaft.

On this engine, the counter shaft indexing could be set in as many positions as there are cogs on the driven wheel, and none of the compoents would be the wiser.
However, on this particular engine, Volvo Penta has predetermined a relationship between the counter shaft drive gear and the distributor driven gear .... and it all has to due with the distributor housing limitations.
If not for that, it would not make any difference.
The distributor housing could simply be oriented as such to provide the correct firing order, and yet offer some rotation for timing corrections.

If you are familiar with the SBC (example only), you'll know that this distributor could actually be indexed in as many orientations as there are teeth on the gears.

As for the camshaft...... the OHC 4 camshaft indexing does NOT lend itself to any deviation what-so-ever.
So yes, in this regard a jumped cog would cause a tremedous performance issue.


unless it is skipping a tooth on the distributor gear.
Show me a counter-shaft "drive" gear and a distributor "driven" gear set that has skipped a tooth, and I'll show you a gear set that has either become destroyed, or I'll show you two shafts whereby the support bearings dimension has changed considerably.

Unless the reluctor magnet is turning on the shaft.
I highly doubt that this has occured.
There's no force against this wheel that would cause one to slip, unless the wheel itselft was split or cracked.


I`m just giving him stuff to look at the way I see it sitting here with coffee in hand:)
As am I.
 
So, I had a old cruddy AQ120 dropped off to my place for repair about 8 years ago. This boat was a complete pig. Looks like the oil was never changed. The timing was always needing to be reset. The shaft in the distributor was so crudded up it was dragging on the housing and turning the distributor when it got hot.
 
Easy does it boys!

Thanks for all the suggestions, it will give me lots to look at when I get to diagnosing all this. I just bought a remote start switch that should make things a bit easier.

First thing I'll check is the timing belt but last time this happened it was spot on. The T-belt is new last year and I used a brass wheel to clean all the grear teeth. The pump was leaking but it's because I put a seal in crooked but I straightened it out and all is good. It only leaked for a few hours of run time. I had the dizzy out once and it all looked really clean.

Then I'll check the dizzy and possible pull it if necessary. I do have an extra one I could have rebuilt.

Hey Kimcrwbr1 do you know of any shops around here with a distibutor machine? Most shops here in Seattle are all geared for modern electronics. I know what you mean about being stranded out on the sound that's why I always have a kicker motor :)
 
Pugetsounder, your thread title "Wandering Ignition Timing" implies an erratic advance, and I made the assumption that this was during idle speeds.
Can you confirm this for us?

If I did understand you correctly, this is precisely why I mentioned the flyweight system and return springs.
At and just above idle RPM, there should be ZERO mechanical advance occuring.
I've seen this a number of times whereby the return springs were not bringing the flyweights back to the ZERO advance position. Instead, the springs were just weak enough to allow partial flyweight action, causing an erractic advance at low RPM. We may see 8* degrees for a few seconds, then we may see this jump to 12* for a few seconds, and then back again (examples only).

Depending on which BASE advance appeared duing intial setting, your progressive and TA will be thrown off by a similar amount.
Whereas if the springs were pulling the weights back in fully, the idle advance would be consistant.

As said, good working mechanical advance should hold ZERO advance until just outside of idle RPM range.
On this engine, a good working mechanical advance system should also offer a fairly linear progressive advance curve, and up to the "Full In" RPM.

Again, I'm not suggesting that this IS your problem, but it's certainly something that is easy enough to either find or eliminate.

As for finding a shop with a distributor machine, check with the classic car guys in your area.

And again, you will need to provide the specs for them. Not specs seen by strobing.... I'm talking about Volvo Penta OEM specs for your particular engine.

*******************************

I'm gong to suggest that you double check your model Pertronix installation instructions.
Some of these require two voltages. One for the triggering unit, and one for the ignition coil.

In either of these below, the triggering unit receives 12 volts.
However, the standard coil receives resisted voltage, whereas the Flame Thrower receives non-resisted voltage.

None of which should have anything to do with the RPM "Hunting" that I'm thinking you are describing.
That would pertain to the mechanical advance flyweight system only.


.
 
Hey Rick,
What I meant by wandering timing is that once the timing is set it will stay put and everything is fine while running around for a weekend or more. But after a few trips out the boat starts running worse: Harder starting, less power, pinging at higher RPMs. I check the timing and its off by quite a bit sometimes 10 - 15 degrees. I reset it and all is fine for a few hours of running time, which for me equals a couple of weekends on the boat. Then it goes through the same scenario. Once it was so far out I had to move the dizzy one tooth to get it right. Once the timing is set everything works awesome. It starts easy, it idles and revs smooth and WOT is just under 5000 RPMs. That is until the timing changes itself again.

I just tried to start it up two weekends ago and it won't start. Its got fuel and starting fluid did nothing. It spits and sputters and backfires through the carb. To me it sounds like the timing is way off again. Unfortunately I haven't had time to go out and diagnose it thanks to work and home renovation projects but I'm hoping this weekend I will.

As I said before I believe its the Hot-Spark ignitor but I want to eliminate everything else possible before I call Hot-spark on this. So I'm looking for things to eliminate that could possible cause a change in ignition timing. Thanks for all the tips.
 
Last edited:
This is your ignition distributor, or very similar.
Note the slotted hole. This slot represents the limit at which the housing can be adjusted for a change to timing.
What this slot cannot correct, requires the gear to be re-indexed with the countershaft.

$(KGrHqZHJCgE-edmB9lLBPoBhR,0SQ~~60_12.JPG


This is your counter shaft.... or very similar.


Look closely at the the distributor "driven" gear (above) and at the forward countershaft "drive" gear.
Since this distributor "driven" gear does not additionally drive an oil pump, it requires very little force to rotate the vertical shaft.
In order for these two gears to slip a tooth on each other, something majorly wrong would need to occur..... and I doubt that the system would recover.


This is your timing belt tensioner.
Did you replace this along with the timing belt?
Did you adjust and hold the correct tension on the belt?


.
 
Last edited:
Thanks Ricardo,
I finally had some time to go out and tinker with the boat. I checked timing, spot on all around: T-belt, ignition timing. Checked for spark got that too. I pulled the dizzy and found that the hall erffect magnet does not fit snug on the dizzy shaft! It is pushed down as far as it will go but it moves back and forth as much as 3/16" without the shaft moving at all. That would explain the wandering timing. Feeling that my dizzy might be worn out I had another dizzy with hardly any hours on it and checked the magnet on and that same thing only with about an 1/8" of back and forth play. So now I'm thinking warranty since I bought the Hot-Spark Nov. 2011 and they say a 3 year waranty so we will see. If they don't honor it then I guess it will Pertronix next time.
 
When I did the hot spark on mine there were two magnets one fit the cam like you said and the other fit nice and tight. Did you use kit number 3BOS4U1.

Yeah the hot-spark guy sent me the correct one. The problem with buying off of Fleebay is you get what the ad says. It said Volvo-Penta 4 cyl. and that's what i got. But he said I should've got the deeper magnet for VW it fits better. And it does.

i still haven't got this thing to start yet. I went out yesterday and played around for a couple of hours. I'm getting a super erratic spark at the number one wire. It fires once in about 3 to 5 revolutions. I tried starting fluid with nothing, I tested my timing light on a car so i know it works. I've replaced the coil with a 3ohm, I've replaced the wires, I've replaced the magnet and ignitor thinking I fried it with the wrong coil. (I found a broken wire at the ballest resistor and the coil only had 1.5 ohms of resistance. When I tested it before I bought the hot-spark it was producing 3 ohms.) The only thing I haven't replaced is the cap and rotor which I have ordered now.

Just curious about all the purple wires attached to the coil. I know one on the neg (-) side goes to the condensor so I removed that since the condensor is gone. There is another at the (+) side I think goes to the ballest resistor which is attached to my alternator. I removed that and got no spark at all. I attached it and get erratic spark. I shouldn't need that wire with a 3 ohm coil right? Is there something I'm missing? Is there a fuse or link somewhere that might've blown from the low resistance? Scratching my head over this one.
 
There is one purple wire coming from the ignition key switch to the + of the ignition coil. The red wire to the Hot Spark or Pertronix ignitor should now come from the + of the coil.

And if you have a SEV Marchal brushless alternator, then there is a purple wire going from the ignition coil to the alternator's field coil.

In all the cases, I am referring to a 3 ohm ignition coil, which is wired directly from the ignition switch (that is, there is no ballast resistor in the circuit).

Clear as mud? :D
 
Thanks for the tips. This will give me some diagnosing direction.

El: The Hot-Spark is directly wired to the coil, red to (+) and black to (-). I had a purple wire on each coil terminal. The negative one goes to the condensor which is no longer there. The positive one goes to either the ignition switch or the alternator? They are all purple wires, so much for clarity. That's what i havent figured out. All I know is when I pull the purple wire off the (+) coil I don't get any spark going to the plugs. The alt is a Delco three wire and is new last year. (The previous was a Paris Rhone). The purple wire going into the alt has a resistor in the line. this wire was broken so I fixed it but no change. The coil is new and is a flamethrower 3ohm coil which has an internal resistor. Should I disconnect the purple with the resistor or by-pass the resistor because of the new coil? As far as direct wire form the ignition switch, which color wire is that? BTW The magnet and ignitor are all new in the past couple of weeks, as well.

Kim: The tach wire is the gray wire? I think the hot-spark ignitor is all preset but I will check the air gap. Thanks for the tips I will print them out and try and figure out why no or erratic spark at the wires.

the funny thing is the motot ran great in December and in february I just wanted to start it up and run it and it wouldn't start at all. Just from sitting. I think I am tracing a bad/broken wire or connection somewhere just not sure where yet.

its a good thing its still winter but boating season is coming fast.
 
Last edited:
Interesting:
"If the rotor is too tall, about one mm or so can be ground from the bottom of the rotor button, allowing the distributor shaft to spin freely. A belt sander or rough sandpaper on a flat, smooth surface can be used to grind a little off the bottom of the rotor."
I wonder if the new magnet is too tall to let the rotor seat properly? It seems tight but I was wondering that in the back of my mind. Not to mention I put some tephlon tape on the dizzy shaft as the hot-spark guy recommended but it might be causing the problem.

And let me get this straight, with a 3ohm coil I want to have the (+) side of the coil going directly to ignition switch? Anybody have any ideas what I should do with the resistor at the alternator? Should I remove it and hook up that purple wire directly to the alt, without the inline resistor? Unfortunately all the wiring diagrams I found on 4 cyl VPs don't even list purple wires.

yes the weather has been great, that's why I want to get this thing started and ready for some nice weekends on the water! I love going to Blake Island early or late in the season.
 
Pugetsounder, please go to post #20 and connect your Hot Spark module as indicated in the 3rd drawing (the lowest of the 3).

In your old points system, the wire going to the points came from the (-) of the coil. With Hot Spark forget about that arrangement: the Hot Spark red wire goes to the + of the coil and the black one to the - of the coil. No guessing. Since you are using a 3 ohm coil (internal resistor), then connect its + directly to the ignition switch. The wire should be purple, but could also be red (you may have to trace it). In case of doubt, just run a new wire from the switch to the + of the coil. And if you have a purple wire going to the alternator, also connect it to the + of the coil. This means bypassing completely the external resistor, as you don't need it any longer.

That should do it.

Cheers.
 
Last edited:
It really helps to have the correct wiring diagram. I finally found ther correct one for my motor. Everything makes sense. I see there are two resistors one for the coil and one for the alt. And it shows purple wires going to the coil and the alt and where they end up inside the harness. makes life a bit easier to understand.WiringDiagram AQ120-VP270.jpg
 
Well this thing is going to drive me bonkers! I did all the tests, check the coil, good, check the spark to the plugs, good, 2X checked the plug wiring, good. I finally got it fired up after some fits and starts. Got it to idle after it warmed up. Set the timing to spec. After a few minutes it stops and won't start again. I noticed the starter motor turns faster than it used to like the saprk plugs were removed. I suspect a loose wire somewhere but jeez where does one start?
 
I'm still not sure what is causing your timing to jump around or change, as you have described.
Even with poor triggering, this should remain fairly consistant once set.

Is it safe to assume that you have looked carefully at the flyweight system and at the flyweight return springs?


Pugetsounder, please go to post #20 and connect your Hot Spark module as indicated in the 3rd drawing (the lowest of the 3).

The wire should be purple, but could also be red (you may have to trace it). In case of doubt, just run a new wire from the switch to the + of the coil. And if you have a purple wire going to the alternator, also connect it to the + of the coil. This means bypassing completely the external resistor, as you don't need it any longer.
Listen to Eduardo..... he knows what he's talking about.

Also, if you question the ignition power lead, there's no need to run an entirely new ignition circuit from the Helm to the Engine.
Peel back the black plastic cover that protects your Engine/Hull Harness connector (the white rectangular looking multi-pin connector typically found at the inner side of the transom).
It is NEVER a bad idea to look at this connector anyway!

Replace the "Ignition" lead right at this location. Test for voltage.


Couple of notes here.

The gap, or "air gap" as it's being referred to here, is important. The gap between the Hall Effect magnetic unit and the sensor determines "dwell". Yes, there is a dwell to these Hall Effect triggering units, just as there is a dwell with Photo-Eye and VR.
(see attached images)

The up/down height of the sensor in relationship to the Hall unit, is also important. This is why for some installations, a shim is included in the kit. However, they don't offer us much in the way of checking or testing this in terms of a method or dimension.
(see attached images)

Re; Kim's comment about the alternator field circuit.
The OEM Ignition circuit is shared with the field circuit, but as you can see, there is a small diode (V/P calls this a resistor) in this circuit once it leaves the coil. This is actually a "diode", as to prevent a reverse current flow. (if you've ever experienced an engine that will not shut down, it's likely this diode that has failed)
 

Attachments

  • Pertronix kit AQ260A  Jeffnick 1.jpg
    Pertronix kit AQ260A Jeffnick 1.jpg
    56.5 KB · Views: 109
  • Pertronix 1.jpg
    Pertronix 1.jpg
    21.8 KB · Views: 72
Last edited:
Thanks Ricardo,
Lets say for optimistic sake I fixed the wandering idle with the new magnet from Hot-Spark. Now it's a matter of getting the thing to start and run dependably.

I have checked and rechecked the ignitor wiring at the coil, good. I've checked the voltage to the coil from the switch, 12v good. I've checked the spark by putting a spark plug in the #1 plug wire and laying it on the engine, good spark every revolution. I noticed the engine would fire after checking and pushing on the spark plug wires at the cap. When the motor conks out I recheck and press the wires on the dizzy cap again and get it to fire. Maybe something going on in the cap? I checked and rechecked the hall effect magnet and rotor to see if they were seated all the way down, good. The cap looks good as does the rotor. I do have new ones on the way.

One thing I didn't do when it concked out the last time was remove the tach wire from the coil. Just to eliminate that. I will take the wire block apart and clean everything as well. It really seems like something that's intermittant. It will run good and smooth then it won't.

As afra as the air gap I'm not sure how to set it. the ignitor is fixed as is the magnet. It looks fine, nice and even all around. Not sure what the exact measurement would be. I'll keep plugging away it as long as you guys don't run out of ideas!
 
A few tests you may want to conduct:

1) Hotwire the + of the coil directly from the battery. That would eliminate a wiring problem, faulty ignition switch.
2) Rut at around 1500 RPM idle and see if it stalls. If it does not, then you will have to properly adjust the idle mixture and idle speed.
3) When it stalls and it doesn't start no matter how much you crank the engine on the starter, try putting the speed lever (with the shift in neutral) at about 75%. If it starts, either yo have a flooding carb problem or you need to adjust the idle mixture (or an air leak).

You are getting closer to success. :)
 
Thanks for more suggestions. After trying some more diagnosis I believe my electrical and distributor are fine now. I hotwired the coil directly from the battery, unplugged the tach wire. As before I got it run for a few minutes, enough to check the timing and make sure the advance is working, then it shut off again. While cranking trying to get to start I put a spark tester inline (not a gap tester) and I am getting good spark to the plugs. I pulled a couple of plugs and found them to be black as can be. I think what's happening as El_Pesc mentioned, is my carb is dumping fuel to the point of fouling the plugs. This carb has never been quite right. BTW its a Solex Downdraft from a AQ125 motor. It worked last year but it never idled very smooth. I took it a part and put a new kit in it. then not satisfied with my work, I took it to a carb rebuilder and they cleaned it better and it worked better but not perfect. Its always run on the rich side. You can smell it and see it in my water tub the outdrive sits in. These carbs really don't have any adjustments to them other than the idle screw. I've tried that in all positions and it still runs rich. The thing that stumped me is when the boat quits and won't start again I try starting fluid and get nothing. Does that sound right? Too much fuel, fouled plugs, starting fluid has no effect?

There is a good carb guy here in Washington (Mikes_carburetors or www.carburetor-parts.com) about an hour away from me. I could go buy another rebuilt carb from him but I would like to test mine before throwing more $$$ at this boat. I'll buy another set of plugs tonight and see how long they last.
 
Pugetsounder, I have seen the symptoms you describe many times. The problem may be simply your idle mixture adjustment and not setting then the idle speed properly. There is a procedure indicated both in Seloc and in the OEM that should work for you. Basically, if your carb is the early model, set the idle mixture screw (screw A) around 2 turns open; and 9 turns if it is the late model. How to know which model you have? If the replacement idle mixture screw that came with your overhaul kit fits the carb, then you have the early version, in which case the setting is 2 turns open from the fully close position. The idle speed (screw b) is supposed to be set at 2 turns open as well. Just remember that sometimes due to wear, etc, you may have to tweak those settings a bit to obtain a satisfactory performance.

And when everything else fails, then get a Weber carb, throw the Solex in the garbage bin (or put it for auction at ebay) and move forward. :)
 
I must have the old style because there is no way I can 9 turns out. the idle jet will fall out at 8 full turns. I've been running at 3 1/2 turns out since last year. that's the best it runs for now. Thanks I'll let you know how it goes.
 
Back
Top