Logo

Replacing PDS Bearings

douglcfl

Member
I have my bell housing removed with the PDS sitting on my bench. This is off an AQ 225d with 280 DP drive. It is the red housing with the dual bearing PDS. I have removed three snap rings, one aft and two forward. The only one I still see in place is the small aft compression ring on the shaft. Should the whole PDS now come out aft? And does it typically require a lot of force? Not sure what to do next. I have tried tapping on the forward end of the shaft using a a wood block and hammer. I have seen the threads that talk about the single bearing PDS coming out aft but it is unclear to me on the double bearing PDS.

Thanks for any help you can offer.

Doug
 
I have my bell housing removed with the PDS sitting on my bench. This is off an AQ 225d with 280 DP drive. It is the red housing with the dual bearing PDS. I have removed three snap rings, one aft and two forward. The only one I still see in place is the small aft compression ring on the shaft. Should the whole PDS now come out aft? And does it typically require a lot of force? Not sure what to do next. I have tried tapping on the forward end of the shaft using a a wood block and hammer. I have seen the threads that talk about the single bearing PDS coming out aft but it is unclear to me on the double bearing PDS.

Thanks for any help you can offer.
Doug, my little V/P biz is pretty much with the AQ series exclusively. I've changed so many of these, I no longer recall how many.
I see the failures and what caused the failures, and I know what leads to longevity.
I've pulled these apart after an alleged V/P mechanic had previously installed new bearings, only to find that the mechanic did not pre-fill the grease cavity........ which means that the next XX pumps of grease never made it's way to the bearings. :mad:

I've found sealed bearings used where open bearings should have been used, and I've found open bearings used where sealed bearings should have been used. I've found mixed grease chemistry used that caused the grease to break down and turn into a liquidly substance.
I've seen damage anywhere from bearings only, to broken universal shafts, to extreme damage where it took out the flywheel cover snout, the PDS, the universal shaft and the transmission front bearing box clamping collar. Not pretty!

You can trust me on this...... you do not want to undergo a failure here!
You are wise to be replacing these!!!!! :)

Here's what I'd suggest to you:

Yes... the two bearing PDS is easiest to remove from AFT.
Remove seals, remove the two large AFT snap rings.
With a rather large brass drift and good sized hammer, drive the PDS AFT..... it will come out.
If need be, apply heat the flywheel cover in this area.... the heat will expand it some, and most often will release the bearing so that it can slide out freely.

Once out and on the bench, then you remove the small C-clip that secures the 6206 bearing to the shaft.
Install the new "open" 6206 at this time.
Once the FWD snap ring is removed, the FWD PDS 6007 bearing can now be driven FWD from AFT.

Clean out the grease cavity.... purge the grease port.... and install the PDS in the reverse order.
DO NOT install seals yet.
You'll want to pre-fill the grease cavity first, until you see grease come through the ball cages.
Do this while spinning the PDS to purge any air.
Now and only now, are the seals installed.

NOTE:
Excessive grease pressure can dislodge the FWD seal, so I've been either staking them, or gluing them into position.
If we loose the FWD seal, no future grease will make it's way through the AFT bearing.... the more important bearing!

NOTE:

The fwd seal installs in the conventional direction with the seal "lip" and tension spring facing towards the grease area.
IOW, this oposite side is facing towards the engine.
images

The aft seal installs in a non-conventional direction with the seal "lip" and tension spring facing towards the transmission area.
IOW, the same side also faces towards the engine making the lip and tension spring face the transmission side.

Reason:
the lips hydraulically lock (to a degree) when pressure is against them, so between the two, we want the AFT seal to breach excessive grease pressure..... not the FWD seal.
The AFT seal is NOT intended to be a water seal anyway. If we have water in this area, we have a bigger problem.

Parts:

Industry Standard 6206 and 6007 bearings in the open version in an electric motor grade...... about $14-16 each or so.
Japanese, German or US made................. NO BBQ'd Pork bearings.:mad:
The two seals are a 35X62X7mm in TCM or Timken. These are fully rubber encapsulated...... about $6-8 each.
If you need a snap ring, these too are industry standard.... NAPA will have them.

I suggest to people that these are lubed at around the 40 hour mark... or perhaps to not exceed an oil change interval.
Grease these with the engine running.... (dynamic -vs- static).
With the grease cavity properly "Pre-Filled" and purged of air....., three/four pumps should do it. :)

The shaft comes out thru the engine side. It does need a little help out with the deadblow hammer.
The PDS can be removed from the front area, however, in order to do this, the small contraction type C-clip ring must be removed since the 6206 cannot go forward within the flywheel cover......... and it's a real bitch to get to the small C-clip from AFT while still installed.

You can do as Boatdoc says, but IMO, it's best to remove the PDS from the front towards the rear. As it comes out, so will the 6206 bearing come out along with it.
Once on the bench, now the 6206 can be removed and replaced.
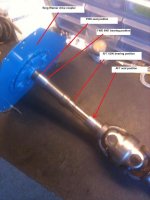
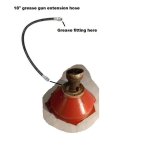
Here's two images.
First one shows the position where the bearings/seals are on the PDS and female yoke.
Second one shows what I've been doing to every F/C that leaves my shop. This hose gets fastened somewhere on the engine where it will be visible and easy to get to for greasing.
The OEM grease zirk location sucks.... people forget that it's there!
 

Attachments

  • PDS coupler and drive shaft 2.jpg
    PDS coupler and drive shaft 2.jpg
    49.8 KB · Views: 403
  • flywheel cover grease hose.jpg
    flywheel cover grease hose.jpg
    23.1 KB · Views: 285
Last edited:
Thanks Ricardo you've already answered my next set of questions before I asked. I did get them out just as you suggested and will be going back in with the new bearings over the weekend. I will follow the procedure you've described here.

I already have the bearings, they are SKF, the 6206 says Made in America and the 6007 says Made in Argentina. Waiting on the seals to come in.

Thanks for the help.

Doug
 
Clarification to the PDS and bearing installation sequence:

Once out and on the bench, you'll then remove the small C-clip that secures the 6206 bearing to the shaft.
Remove the 6206 bearing, and install the new "open" 6206 onto the PDS at this time.
Replace the small C-clip.

Once the FWD large snap ring within the flywheel cover is removed, the FWD 6007 bearing can now be driven forward from AFT.
Once out of the way, the PDS and new 6206, as an assembly, are installed into the F/C.
The two large AFT snap rings install at this time.
Now the new "open" 6007 bearing can be driven into place, followed by it's large snap ring.

Now we can do the pre-fill etc. etc.

Sorry.... I may not have explained the correct sequence earlier.


.
 
photo2.jpg

Installed the new bearings tonight. Everything went pretty smooth. Thanks Ricardo for the excellent step by step procedure. I have another question. Looking for advise on a problem with my transom shield. I have finished a repair to the transom and plan to install the transom shield on Tuesday. Problem: there is some corrosion in the area where the shield seals against the hull. I am attaching a photo. Want to know if this will keep this from getting a good seal.

Also would be interested in any ideas on a method to repair this.
 
Last edited:
That does not appear to be a standard AQ 225D 280 DP transom shield.
Can you post more photos of it for us?

I'd poke at this area to make sure that it's not about to breach. There's not all that much thickness here. A breach here could sink your boat if left moored or unattended.
Better yet, find a good used shield and replace this one.

The corrosion is caused by a poor fit during manufacturing because the shield contacted the transom core........ or if not completely touching, the gap has filled with debris, and the moisture in the debris caused the corrosion.
I've seen this several times.

You can re-use the rope gasket if it sits proud of the groove.
You'll want to apply a sealant like "Boat Life" Life Caulk in both the groove and against the transom.

The rope gasket gap will always be at the top. Be sure to seal between the ends of the gap.

The bolts are a different story.
Notice that the bolt pattern sits outside of the perimeter of the rope gasket seal.
There is a special Volvo Penta fat O-ring that fits around each bolt shank.
The transom will be counter-sunk (chamfered) at each hole for each O-ring seal.
The fat O-rings becomes compressed into the chamfer and are then squeezed onto the bolt shank...... similar to how an old outdoor faucet packing gland seals against the faucet valve stem.
Dope these O-rings up with Life Caulk also.

The carriage heads do not need to be sealed against the shield...., but it will cause no harm if you do.


.
 
Last edited:
This is the hydraulic trim unit. I've looked for used ones seems hard to find. It is very solid, I don't believe there is any danger of a breach. Just concerned about the ability to achieve a good seal. I have new bolts and the fat O Rings. The rope gasket I have is like new.


That does not appear to be a standard AQ 225D 280 DP transom shield.
Poke at this area to make sure that it's not about to breach.
Better yet, find a good used shield and replace this one.

The corrosion is caused by a poor fit during manufacturing because the shield contacted the transom core........ if not completely touching, the gap has filled with debris, and the moisture in the debris caused the corrosion.
I've seen this several times.

You can re-use the rope gasket if it sits proud of the groove.
You'll want to apply a sealant like "Boat Life" in both the groove and against the transom.

The rope gasket gap will always be at the top. Be sure to seal between the ends of the gap.

The bolts are a different story.

.
 
Last edited:
This is the hydraulic trim unit. I've looked for used ones seems hard to find.

It is very solid, I don't believe there is any danger of a breach. Just concerned about the ability to achieve a good seal. I have new bolts and the fat O Rings. The rope gasket I have is like new.
Ah... that would be the 280 PT drive, and would be difficult to find these days. However, I do see them listed on e-Bay occasionally.


As for the six bolts..... these are nothing more than a galvanized 1/2" NC carriage bolt.
However, they must have a smooth shank at the area of the O-ring seals.... or the O-rings may not seal correctly.

.
 
Last edited:
As for the six bolts..... these are nothing more than a galvanized 1/2" NC carriage bolt.
However, they must have a smooth shank at the area of the O-ring seals.... or the O-rings may not seal correctly.

.

I purchased new bolts from VP, they are very proud of their bolts... What are your thoughts on welding to repair the transom shield. I know a very good welder that welds aluminum.

Thanks. Doug
 
That would involve a TIG weld. All Volvo Penta aluminum is very capable of a TIG weld repair.
However, TIG weld material must be very clean.... and I doubt this would be clean enough given the corrosion affected area.

You could sure see what the guy has to say about it.

.
 
Hey Guys,

I am also in the rpocess of replacing the PDS shaft bearings and seals. '86 Bayliner 2450 with (I Think) a 290 Sterndrive and the penta 260a (GM 350) Engine.
Felt some serious vibrations getting worse and worse, thought it was U-Joints. Well, when removing the stern drive, I discovered the PDS bearings and seals to be completely disintegrated. The shaft is there and moves up/down all around about 1/2 inch. I am replacing the U-Joints anyways too.

My issue is this, seems like many on here have tackled this repair. what are the part #'s or specs for the AFT and FWD bearings? 35mm(ID) X 62mm(OD) X ?? (width) 6206 and 6007 bring up sooo many different sized bearings, plus i would prefer to use sealed bearings (2RS). Same thing for the seals, specs??
If Timken is preferred, what's the part # for the seals?

Sure, I could buy this stuff from price gouging pentastore.com or whatever the URL is, but really, $23 bucks for an oil seal that is MAYBE $4-$6 ??

If anyone could chime in here, Rick especially, with the components, part#'s, specs and heck...the place YOU got the parts from, would sure be helpful. I have searched these threads high and low and see some conflicting "opinions".

And, if anyone can CONFIRM the sterndrive model by the numbers I found on a plate on the drive: PZ NR 2821160 D

Thanks, gentlemen!
 
This thread was started back in November of 2012.

It is always best to start a new thread for your specific questions.
But since we're here........................

Hey Guys,

I am also in the rpocess of replacing the PDS bearings and seals. '86 Bayliner 2450 with (I Think) a 290 Sterndrive and the penta 260a (GM 350) Engine.
Felt some serious vibrations getting worse and worse, thought it was U-Joints. Well, when removing the stern drive, I discovered the PDS bearings and seals to be completely disintegrated. The shaft is there and moves up/down all around about 1/2 inch. I am replacing the U-Joints anyways too.
Look closely at the AFT PDS bearing bore. See if the new 6206 bearing fits nicely and snugly into the bore.
If not...... you will want to replace the flywheel cover.


My issue is this, seems like many on here have tackled this repair. what are the part #'s or specs for the AFT and FWD bearings? 35mm(ID) X 62mm(OD) X ?? (width) 6206 and 6007 bring up sooo many different sized bearings,
I you have the red 1 pc flywheel cover and the double bearing PDS, the 6206 and 6007 are the correct industry standard bearings.

The seals will be a fully rubber encapsulated 35x62x7mm single lip, in TCM or Timken.
All of these can be purchased from a major bearing supplier.


plus i would prefer to use sealed bearings (2RS). Same thing for the seals, specs??
The 6206-2RS and 6007-2RS are the same bearing but sealed.
You DO NOT want to use the sealed bearings. You will want to use the open bearings as to take advantage of the grease porting system.
As you install the PDS with the new bearings, you will spin the PDS as you pump the new grease in.
DO NOT install the AFT seal until you see new grease coming through the ball cage.
The AFT seal is stopped against the AFT snap ring.
It also installs in the Non-Conventional direction..... i.e., lip and tension spring facing AFT.

If Timken is preferred, what's the part # for the seals?
These are industry standard bearing and seal part numbers. Timken would be a good brand.
I would steer clear of any Chinese bearings.


Sure, I could buy this stuff from price gouging pentastore.com or whatever the URL is, but really, $23 bucks for an oil seal that is MAYBE $4-$6 ??
For the most part, Volvo Penta uses industry standard bearings and seals, and simply assigns their own part number to them.
From a major bearing supplier, you can expect to pay around $16 each for the exact same bearings, and perhaps $8 each for the exact same seals.

If anyone could chime in here, Rick especially, with the components, part#'s, specs and heck...the place YOU got the parts from, would sure be helpful. I have searched these threads high and low and see some conflicting "opinions".
Please post the conflicting info.... I am curious!

And, if anyone can CONFIRM the sterndrive model by the numbers I found on a plate on the drive: PZ NR 2821160 D
The PZNR number represents the entire drive when it was installed at the factory.
The 2821160 D will be a 280.
The D designation represents the 2.15:1 over-all reduction (for the 4 cylinder engine).
Your 5.7L engine requires the B designation.... of which is the 1.61:1 over-all reduction.
It may be that someone changed the transmission ONLY to a D...... of which is quite common.
(all of the 280 series transmissions are of the same reduction)

Pull the prop, remove the line cutter/spacer, remove the ring anode and wire brush the AFT face of the bearing carrier.
This will expose a few numbers of which will stamped into the carrier.
You will be looking for 1.61.


By the way, most of the info you need is already posted in this old thread.
If you need more info, I'd be happy to help.

Thanks, gentlemen!


.
 
Last edited:
Back
Top