Logo

Help with Carrier Bearing Install

jcrump

New member
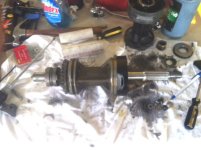
carrier bearing.jpg

I searched the forum for this topic, but only found topics relating to removal of carrier bearing not installation.

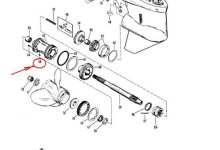
My son and I are working on a (1987) Mariner 115hp outboard, the original carrier bearing was cracked at the two tabs that bolt to the LU. That carrier bearing came out without any problems, but I'm having trouble getting the replacement back in (it is the correct/identical part). We can get it almost all the way in, but it's not seating ... about 3/16 - 1/8" left before it mates up to the LC.

Is there a trade secret to getting the carrier bearing to seat all the way? We've already gone through one replacement, breaking the tabs in the identical place by torqueing the nuts down too much ...

The shift cam seems to be working properly.

Everything is intact, I can feel the spring engage when we insert the assembly, but it just won't seat all the way.

any help on this would be greatly appreciated.


-Jay
 
Last edited:
I should add: Serial # is 0C134977 -

Should the Prop shaft assembly (carrier and associated bearings, parts) be put in with the unit is neutral, foward, reverse?

again, thanks in advance ... -Jay
 
Other then cleaning,oiling,greesing it.May have to contact the manufacturer.Maybe the wrong part.Nothings a simple task working on a boat.
 
You might have a part assbackwards. Try to find a blow up of the parts and see.

Jeff

Thanks for the replies:
Ive been working from the exploded view, double checked everything. Does the prop need to be on the shaft to install ... How does everything maintain proper spacing without moving?
 
And clean the inside of the housing thoroughly FIRST. All that carbon and crud that gets inside there can hold up the parts.

Jeff
 
Put it in forward.------You may need to turn the propshaft to get gears to mesh properly.-------------If reverse gear is not " meshed " with the pinion and you tighten the bolts --Something will break !
 
That can only be put back with a piece of pipe stuck on the shaft and locked with the prop nut. The thurst washer and bearing have to stay still and be centered up in the hole.

You did put the ball bearings back in the shift cam plunger/follower right? It is a microscopic part.
 
Last edited:
Yeah. Good call on the bearings we greased to hold in place. We used some PVC pipe to lock everything in place. Prop is on and everything works as it should. Thanks -jay
 
Didn't see a square key. Where is it located on the prop shaft assembly. We assembled using factory diagram and the parts that came out with the carrier bearing... I'm not sure which key you're talking about. -jay
 
There's usually a square key/ keyway at the bottom of the carrier to prevent it from rotating. Probably not needed if you left it out.

Jeff
 

Attachments

  • Key.JPG
    Key.JPG
    28.6 KB · Views: 729
Last edited:
Ooooohhh! It's one of them. Those are easy!

On the keys that ARE used in the LU pictured, I've always thought they were ridiculous--no way that sucker is gonna rotate. I suspect the key was there to align the openings where the ehaust gas goes through, more than prevent rotation, but no other Merc LUs found this necessary. Go figure.

Jeff
 
Last edited:
Didn't see a key for this unit. Went back and double checked everything again, and seems to be working fine ... again thanks everyone for supplying answers to this thread. - Jay
 
I have a few of those lower units ( black and oyster silver too ) and the bolts keep the carrier from rotating !------Very good units as the design was used / chosen to be used on the 4 cylinder HONDA outboards.
 
Quick update for those interested:

The issue was two-fold as to why the unit would not seat correctly - Cleaning, and the Thrust Bearing and Washer moving out of place when the assembly was put into LU. Once the inside the LU was cleaned (read carbon) and greased, we used PVC pipe to "hold" everything in place then "carefully" placed the carrier bearing assembly in the LU ... a little finessing and everything dropped into place. And the part diagrams are essential to any work on these engines I found out. Forward = prop lock CCW, ratches CW - Neutral = prop rotates freely both directions - Reverse = Prop locked both directions.

A little background - we essentially took over this boat from a family friend - with the knowledge that it would need a little TOC. We hope to have it in the water by mid-August.


OFF TOPIC: the engine needs a new starter then we'll be firing it up.

Thanks again, everyone ... the help was appreciated.
 
Yes, those two bolts that hold the guts in (instead of that hard to remove at times ring nut that breaks, usually) align the guts properly. Great design, and I wish the older ones used it.

Are you sure the starter is toast? I've resurrected a bunch of them by cleaning the commutator with fine sandpaper, filing the brushes (that never wear out) and lubing the bushings at each end.

Jeff
 
It's the very bottom that looks like a pie cut into 12 or so pieces. Don't use emery cloth or steel wool...just a 400 grit sand paper. Then use a razor knife and clean out the debris between the pie slices on the commutator. You'll need the brush installation tool that holds them in place during assembly of the starter...there is a drawing in an OE manual that you can use to trace over a piece of aluminum flashing and then cut it out and bend into shape. It looks like half of the letter "H". Use electric motor 20 weight oil...2 drops per bushing and no more. Take a chisel or an awl to mark the end caps for reassembly...1 mark on one end and two on the other across the seams for correct alignment. If you need I can scan my tool picture and email it to you...send me a PM.
 
I just came in from tearing into the starter...the end cap was pretty rusty along with commutator. I used 400 grit dry to clean wire assembly that rotates, I did carefully clean all the small copper ends towards the brush end. The end cap looks too corroded to save. I'll get som pics and post later tomorrow. What kind of luck have you had rebuilding starter . It maybe cheaper to replace. Also before I took it out I tried to turn the engine over to verify ... The relay is clicking away, but that's about all I got. -thanks jay
 
I just came in from tearing into the starter...the end cap was pretty rusty along with commutator. I used 400 grit dry to clean wire assembly that rotates, I did carefully clean all the small copper ends towards the brush end. The end cap looks too corroded to save. I'll get som pics and post later tomorrow. What kind of luck have you had rebuilding starter . It maybe cheaper to replace. Also before I took it out I tried to turn the engine over to verify ... The relay is clicking away, but that's about all I got. -thanks jay btw the starter only has four brushes.
 
Use your handy ohmeter and go from the armature copper segments to the armature shaft.------Should read infinity---------I replace brushes on these all the time.-Armature ( part that spins ) is normally bad too on motors that have been abused.
 
UPDATE:

Well, we replaced the starter solenoid with a new one, bumped the motor, but still clicked. I revisted the OEM starter and took it apart again and did a better job of cleaning, lubing, and making sure there were good electrical connections within the starter ... got everything installed and connected back up, I bumped it again, and lo and behold the starter was able to turn the flywheel. Didn't start the engine, just a little bump.

I haven't replaced anything in the starter. The end cap and it's connections, even after cleaning are not in the best of shape, read corroded.) It does work, however.

I guess I'm looking for some advice on whether or not to refurbish the starter or just bite the bullit and get a new one.

If I refurbish ... the parts I'm going to replace are the brushes and end cap. I think the armature and everthing above that are good.

thanks again for all the advice ... this forum is a good one - Jay

After refurbishing, are these starters reliable, or should I just replace with a new one?
 
dress it up with fine emery cloth
It contains fine metal particles and is not recommended for use on commutators because the particles can cause a short between the armature coils. Use 400=800 sandpaper instead.
 
Back
Top