Logo

how to clean VST tank

aristakat

Regular Contributor
Hey guys,
I know I have seen posts on clean VSt tanks but can find it can som one help me with that post or just refresh my memory please.... CHAWK I think it was you who explained it awhile back ..


thanks
Jamie
 
OK, You will need a good 1/4 drive Metric socket set and a good extension a Phillips driver and a good pair of needle nose pliers.. You need to remove all the bolts around the lower engine cover and spread it open. You need to remove the connector bracket for the cover at the rear of the engine, the release cable for the cover is attached to it.
Take all the bolts from the back intake cover out (8mm) remove the vacuum line from the bottom and remove the cover.
Loosen the hose clamp from the throttle plate air hose. Disconnect all sensors on the intake cover and throttle body and unbolt the intake from the engine and remove it. Be careful with the intake gasket, you can reuse it.

Now you have exposed the VST. Make note of where all the lines connect to it and start removing it. Once you get it removed, do not turn it upside down, spray all the top cover screws with PB Blaster, Hopefully they will all come loose. Remove the screws and top cover. Now you can clean the inside. You will need a new gasket for the top cover and a new HP filter. I recommend that you clean the fuel rails while you have this apart.


Are you sure you want to do this yourself. It is very involved.
 
Last edited:
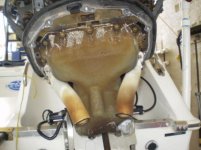
P1080105.jpgalready have everything exposed and ordering hp filter and gasket Monday.. I changed hp filter few years back but have never clean vst and have seen lots of reccomendations to clean
 
Wala found post I was looking for thanks for help...... below is copy of it


The Vapor Separator Tank is in place to assure an adequate amount of non-turbulent fuel is available to the high pressure fuel pump. (The fuel in the VST tank is kept under pressure to prevent vaporization, thus preventing the fuel from becoming too lean under variable demand.) On the back starboard side of your motor, you will see a plastic tube looped around a holder. Unhook it, and look down at the base where it connects. Beside the connection is a small set screw. Use a long flat blade screwdriver to open the set screw - slowly. With the end of the hose extended downward into a clear container that will hold at least a quart of liquid, start opening the set screw. Do not open too far - if it comes out, you will need to remove the lower cowling to retrieve it. Anywhere from two to three pints of gas, and maybe some water and gunk will come out of that tube. Be patient, the last stuff to come out is usually slow, but drain out as much as you can. If there is water, or any gunk, then your fuel-water separator and low pressure fuel filter have failed and need to be replaced. At that point, you should also change out the high pressure filter which sits on top of the fuel pump and is held in place with three 5 mm screws. If you are still having problems, then it may be necessary to remove the VST and clean it out and clean the screen on the outflow tube.
 
Agree with Chris. Given how you use those motors and their age, a thorough cleaning is called for. I chickened out and had dealer do it when I hit 1000 hours. (Actually, I was too damn busy on a consulting job.)
 
I would pull the vst and physically clean it. You will probably find rust scale on the HP pump inside the VST.

Chris,
I am assuming the Vst is the black tank, to me it looks like only outlets I see beside screws holding it to motor is two hoses connecting to it ? Do I take out and just dump all fuel out of it and that how its cleaned ?
Not sure what cleaning it intails ? sorry for questions just want to do it right, ordered hp filter and gasket today..
I also noticed on one of the line to vst tank there looks like a mini filter/white bracket in between line going to vst connection which I have never done anything with before ?

thanks
Jamie
 
Chris,
deceided to pull apart manifold and get to vst and clean but noticed some bolts,groumets,and water hoses degrading/rusting so went ahead and ordered those as well what a ordeal, called boats.net twice today to add more parts but once parts get here going to attempt and get to VST clean and change filters,orings etc....
thanks again for imput to all
 
Yes the black tank is a vaccum tank. Behind it is the VST. Make sure you have a good pair of long needle nose pliers, you will need them. Mark all the lines, so you know which ones go where. Take the three screws out of the filter cover to disconnect the Fuel exit line. Once you get it out, you can drain it and remove all the top bolts. once all the bolts are out you will see what to do from there. You will have to replace the top cover gasket.
 
thanks will update when parts arrive and get job completed. decieded to have painter go ahead and paint gear cases and one used midextension case so after that both motors will look like day I bought them new...
 
Jamie - If you have the time and inclination, it would be helpful for all of us if you posted pictures and description of the process of removing and cleaning the VST.

Chris - isn't there a needle valve in the VST that needs to be cleaned and checked? Seems like I saw a discussion on that awhile back.
 
Mike,
will try and take pics etc... and I did find post of stuck needle valve from 2010.....

CAN anyone make suggestions what to use to mark vaccum lines and where to put them back connections ?
What kind of marker or stickers they seen used or key tags ? I am at a lose and I know for sure that could mess me up big time so want to be carefull there for sure
 
Jamie - If you have the time and inclination, it would be helpful for all of us if you posted pictures and description of the process of removing and cleaning the VST.

Chris - isn't there a needle valve in the VST that needs to be cleaned and checked? Seems like I saw a discussion on that awhile back.

Yes there is a needle valve and a float just like in a carb. It's very simple to take apart and clean. After you clean the needle valve and the seat, you want to make sure the needle valve moves freely in the seat. The seat is not replaceable and the needle valve is little north of $20. No need to replace it if the rubber on the tip is not marked up.

As for marking the lines. Draw a diagram of the lines then use a white paint pen to mark the lines with dots and put the info on the diagram. Most lines will fall back in the position where they were when you remove the vst. You will not have any problems doing this. So don't worry.
 
P1110116.JPG

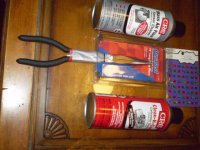
Thanks for help Chris I went out bought a pair of 11" needle nose plyers and crc carb cleaner and was told to use crc mass air sensor cleaner, also bought some sticker to try on helping identify vaccum hoses but going to use diagram also not sure these stickers will stick to tubes but only 87 cents so I figured I'd try them also.. Now I am just waiting on parts I figure should be here next couple of days shipped fed ex on 17th


Yes there is a needle valve and a float just like in a carb. It's very simple to take apart and clean. After you clean the needle valve and the seat, you want to make sure the needle valve moves freely in the seat. The seat is not replaceable and the needle valve is little north of $20. No need to replace it if the rubber on the tip is not marked up.

As for marking the lines. Draw a diagram of the lines then use a white paint pen to mark the lines with dots and put the info on the diagram. Most lines will fall back in the position where they were when you remove the vst. You will not have any problems doing this. So don't worry.
 
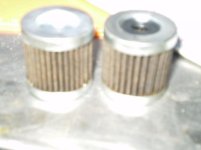
P1150129.jpgOkay parts from Boats.net showed up today :),,, Chris I took advice I figured between you and Mike I decieded to chicken out put manifold,breather,cables etc..... So Instead I was able to get to bracket bolts to VST that were rusty and replaced all bolts that I could see that were rusty........ I also changed HP fuel filter and o-ring looked like it was good call they needed it last time changed was 05/26/10 almost 400 hrs ago.... thanks for advice but I had to replaced bushing for mid case , replace one whole extension case, and service bull #56 on two enigines plus my other help was now show ....:(
 
Jamie - at this point you could probably hang out your own sign! Your posts have been invaluable. Thanks.


Thanks very glad to hear that I have learned alot off here from using all on here as a sounding board...

On a side note if you look at pic of HP filter one side has a rubber boot and other side has a metal indent, we'll I almost put them in backwards lucky for me when putting first one in noticed the cap didn't seal good so when I jumped over to second motor I payed close attenion to how filter came out.... the correct way was for rubber boot side to be facing out and metal side to be facing in tawrds spring etc...
 
Last edited:
Extremely helpful thread, gentlemen. Thanks!

Two quick questions:

1)) When (HOW OFTEN) would one bleed/drain the VST via hose and set screw and;

2)) After how many hours would oned start to consider cleaning the inside of the VST?

I have a 2007 BF150 with approx. 500 hrs.

thanks again for putting the time into such a constructive thread
 
Every time I pull 100-hour maintenance, I drain the VST via the set screw and tube. When I take it to dealer for 400-hour maintenance and check-up, I have them pull the VST, clean it, and replace the HP filter. I use a dealer for the 400-hour maintenance for several reasons - Motor is still under extended warranty; I get an HDS readout; they have the equipment to check belt tnsion; they have the equipment to check valve clearances and make adjustments if necessary; and they do a thorough overall check-up of the engine. My BF 225 is approaching 1200 hours and still runs as well as it did new.
 
Every time I pull 100-hour maintenance, I drain the VST via the set screw and tube. When I take it to dealer for 400-hour maintenance and check-up, I have them pull the VST, clean it, and replace the HP filter. I use a dealer for the 400-hour maintenance for several reasons - Motor is still under extended warranty; I get an HDS readout; they have the equipment to check belt tension; they have the equipment to check valve clearances and make adjustments if necessary; and they do a thorough overall check-up of the engine. My BF 225 is approaching 1200 hours and still runs as well as it did new.

Thanks for that chawk_man. So based on your recommendations I called my local Honda shop today to ask about cleaning the VST, checking belt tension, and checking valve clearances. "No need to do any of those things until you have at least 1,500 hours on your engine", was the reply.

I had money in hand. Take my money, I said. We don't want your money was the response.

I guess I could insist that they do these things. But I'm left wondering---overkill at 500 hours or good preventative maintenance?
 
The Honda maintenance schedule says to check/adjust belts every 200 hours. Also check/adjust valves every 200 hours. The fact that when you drain the VST into a clear glass jar using the set screw, you will likely see some "gunk" come out at the end. Don't know what it is or how it got there, but it's there. So a periodic cleaning is called for.

As I've posted earlier, I've got close to 1200 hours on by BF 225 and it runs great. Been in the Gult Stream off Hatteras for the last two days and will likely go again today. Under no circumstances do I want to take any chances with a failed engine in those conditions. So I maintain that engine as best as I possibly can.
Youcan download an owner/operator manual free at this site http://www.honda-marine.com/owners/OwnerManuals.aspx

 
I believe Honda America has "wee little " problem with some of their repair facilities.

Obviously chawk_man knows of what he speaks and it would seem that he has built a good relationship with a competent dealer's service department. The one you just had a conversation with marketic would appear to be one to steer clear of.

As a professional mechanic, I might advise someone not to change the oil in their car at 1500 mile intervals because it is a waste of money and resources. However, I would never turn them away if that's what they wanted. And, "overkill", as it were, is usually what most folks in the repair and maintenance business, at least those that care about the machinery, are leaning toward.

I would have walked away from the encounter you had with these guys with a queasy feeling about taking my machinery there for maintenance. Good on you for checking up on their advice.
 
Thanks for that chawk_man. So based on your recommendations I called my local Honda shop today to ask about cleaning the VST, checking belt tension, and checking valve clearances. "No need to do any of those things until you have at least 1,500 hours on your engine", was the reply.

I had money in hand. Take my money, I said. We don't want your money was the response.

I guess I could insist that they do these things. But I'm left wondering---overkill at 500 hours or good preventative maintenance?


I have pounded this into my customers over the years, "MAINTENANCE, IT'S A LOT CHEAPER THAN REPAIRS"
 
Back
Top