Logo

Aq131d cylinder head question

Well I guess I'll swap the two and see what happens. They look the same, just not sure if the valves are different. We shall see
 
Hi guys.

First of all, sorry about my absence from the forum. I hope that, soon, I will start again with my regular contributions.

Regarding the original question, the heads are identical on the AQ131 and AQ151 engines, but the cams are different. The AQ151 has a V cam installed and the AQ131 has an A cam. Just install the head from the AQ151 with the AQ131 cam and you should be fine.


Cheers.
 
Last edited:
That's what i was hoping for, I have the A cam already out, will install it in the 151 head. Is it really that simple...meaning just remove the cam and then reinstall it. anything special about reinstalling as far as where the lobes end up? or will that be addressed when the cam pulley is back on and I adjust the timing mark back to the groove. Thanks. Dennis
 
That's what i was hoping for, I have the A cam already out, will install it in the 151 head. Is it really that simple...meaning just remove the cam and then reinstall it. anything special about reinstalling as far as where the lobes end up? or will that be addressed when the cam pulley is back on and I adjust the timing mark back to the groove. Thanks. Dennis

Yes, it's as simple as that. There is a special tool you can use (9995921-4) to make the camshaft installation easier, but you can do without it with no problems.
 
Last edited:
I appreciate the help on this. As always, this forum helps alot for diy. I took the entire 131 head apart today, was simple, noticed that the #4 cylinder not only has a corrosion problem at the exhaust port, but also once I removed the valve, it too was pitted out pretty bad, could be the actual cause of the back fire. Even if it wasn't, I now have a new carb, fuel tank, lines, head, put electronic ignition in, and completly cleaned the entire engine and components and gave a fresh coat of paint over the block, looks great (eventually, it won't but for now it looks new!). Since it was completely torn down and cleaned of any corrosion or grime, hopefully, all parts will fire just fine and run like a champ. I learned a lot through the entire process and the volvo engine is extremely easy to work. Thanks again. Will let you know if I have any issues. Dennis
 
Ok took the head apart and found some unexpected stuff, first, I need to have a machine shop fill a few divets then resurface. Second pulled all the valves and on the intake valves, there was some orange rust (wiped right off), the cam was a V which I plan on swapping with the A from my old head. Can I also swap valves and use a lapping compound to reseat? The block itself is good, no cracks, etc. just needs to be cleaned and I want to have it resurfaced to remove the small corrosion spots.
 
Ok took the head apart and found some unexpected stuff, first, I need to have a machine shop fill a few divets then resurface. Second pulled all the valves and on the intake valves, there was some orange rust (wiped right off), the cam was a V which I plan on swapping with the A from my old head. Can I also swap valves and use a lapping compound to reseat? The block itself is good, no cracks, etc. just needs to be cleaned and I want to have it resurfaced to remove the small corrosion spots.

If you have a look to the OEM manual you will see what entails to do a proper valve job. Personally, I would suggest that you let the shop resurfacing the head do it. They probably have the proper reamers and they are in better position of replacing valve seats or valve guides if needed. They will also ensure that the tappets have the correct washer sizes to keep the proper valve clearance between cam and tappet.

I am sending you a PM about this.
 
I do have the manual. thanks. If I pull an automotive head, I believe it may be a cast #1000530? I don't think this head has the coolant hole at the rear of the intake. Also, would I need to do a valve job on that head or will the swap of the cam be ok? Just asking because I don't know this area very well and want to attempt to learn. The shop I called today quoted me about 350 to do the welding, resurfacing, cleaning and they said they grind the valves to seat, then pressure test. He said he has done a lot of the volvo heads, even asked me how the #4 exhaust port looked. I believe that adjusting the valves is nothing more than accurately measuring the clearance between the washer and the cam lobe? and ensuring the correct washer is installed to achieve the proper clearance. If I wouldn't need to do anything other than replace the cam and then I will probably go ahead and do that this weekend. I already bought the other head and will be out 130. But not an issue, just want to get back on the water. even thought about buying a completely refurbished one, cast is 1000530, but not sure about the coolant port at the rear of the head.
 
Hi. Quite a few questions, so I will try to answer all of them.

I have suggested automotive heads when a so-called "marine" head is not available or it needs major repair. Here is an old thread involving and AQ131 and the installation of an automotive head that will shed some light on your questions, including the coolant port:

http://www.marineengine.com/boat-forum/showthread.php?84522-AQ-131-A275-Cylinder-Head-exhaust-port

For what I know, the 1000531 has better flow than the 1000530 and you should get better performance, but either will work. In other words, if your 1000531 is beyond repair and you can only find a 1000530, it should be an easy decision if you want to have your bopat in the water in running condition .;) If you want to dig more about the differences bethween those two heads, you can find a lot of info here:

http://forums.turbobricks.com/search.php?searchid=6446350

It is always wise to clean and inspect and rework if necessary a used head before installing it. Otherwise, you are taking a gamble.

In your case, you probably don't need an automotive head. $350 for resurfacing, welding, grinding, reseating, pressure testing, etc the one you have looks like a great deal. Don't be surprised, though, if the bill is somewhat higher if they find some defective valves, seats or guides (that's not uncommon). Also, remember that the valve surfaces are stellite and should not be ground, just lapped to seat (check the manual).

Yes, you are correct regarding the setting of the valve clearance.

Cheers.


El Pescador
 
ok. I appreciate the info. Will try and make an informed decision about what to do. I want to do it right and ensure many more years of fun on the water, although my first three have been spent mostly on this site. :( But, I have learned a great deal from you and expect that if I follow your lead, I will indeed be back on the water and not spending so much time in the research mode. thanks again for the info, i will post what direction I take and see if it is a good one:)
 
One thing I forgot to add. The coolant port on the head has no use whatsoever in the AQ131. When you remove the intake manifold, you will notice that the gasket and the flange of the intake manifold by cylinder #4 are blocking that port.

 
Thanks El. Question, how many valves should be open on the assembled head. I put my old one back together exactly per the manual and also the parts were also labled and put back where they came out of. What I didn't take notice of when I disassembled was how many valves were open. I have two that are down and 2 that are partially open. installed the cam pin up and when I attached the pulley, it was also in the top dead center location. Thanks. Dennis
 
I don't understand the relevance of your question. Why do you need to know that? No matter how you install it, no valves will touch the pistons, since yours is a non-interference engine. But if you have the valves for #1 cylinder positioned for the piston being on TDC, since the firing order is 1-3-4-2 and the cranks are off 180º, you should have open #3 intake, #4 intake + exhaust, and #2 exhaust.
 
Last edited:
Since this was my first time, I didn't quite pay attention to what it looked like before so I didn't know if what I ended up with was what I started with. when I reassembled it, I followed the workshop manual and when I finished I noticed that there were two valves open and two semi open. Wasn't sure if this was correct, I thought only two valves would be open at a time in each cylinder as the cam rotated. Just wanted to make sure I didn't have something wrong. I am goint to recheck later today after work and then I will be checking the valve clearance. Exhaust side has been redone with the steel insert and welded. I also plan to pull an automotive head this weekend as a back up to the head I have now.
 
On a OHV cylinder head, all valves are closed before installing it on the engine. However, on a OHC head, once the cam is installed, the valves stay in the positions they would have relative to the cam's position with respect to the crankshaft, regardless of the head being installed on the engine or not. Since you had #1 cylinder cam lobes corresponding to #1 crank throw on TDC at the end of the compression stroke, and the firing order is 1-3-4-2, that means #3 cam lobes would be at the end of the intake stroke; #4 at the end of the exhaust stroke; and #2 at the end of the power stroke. Since yours is an A camshaft, after looking at this table

http://www.nord-com.net/stoni/docs/volvo_camshafts.pdf

you will realize that when the camshaft is in the position for #1 piston on TDC at the end of the compression stroke, #1 intake and exhaust valves will be closed; #3 intake will be still fully open; #4 intake has started to open 12.5º BTDC and #4 exhaust will completely close 12.5º ATDC (that's why both are slightly open); and since # 2 cylinder would be at the end of the power stroke, its exhaust valve should be fully open. This animated GIF of a 4-stroke engine will let you see it in graphic mode.

http://en.wikipedia.org/wiki/File:4-Stroke-Engine-with-airflows.gif

I think it is a good idea to keep an automotive head as spare. You never know when you will need it, and they are usually in better condition than marine heads from junkyards. I just saw a couple of them listed at eBay below $140 each (both of them seem to be the 1000530 casting).
 
As always...you are an awesome help. My offer for a beer still stands from a few years ago..if you find yourself in. Va bch. Thanks for the links and good solid advice and teaching
 
New question...so I pulled the head from a 92 - 240, cast 1000530, matches perfect, inspected, and cleaned. What I noticed after pulling all the valves, etc. was that the springs and washers were smaller than my 1000531. The valves are also not reusable in my opinion..they are all gummed up and have some excessive build up on the bottoms. The valve seats were pristine, and actually looked new.
Can I take the tappets, springs and valves from my 531 and swap them over to the 530, lapping the valves to the seats? I already test fitted everything and they fit as if they were in the 531 head. I don't see any reason why not as long as when the cam goes in...the meausurements are in spec? I'm excited too.. the head looks great now that all the grease and crud had been removed.
 
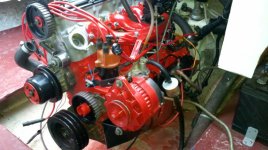
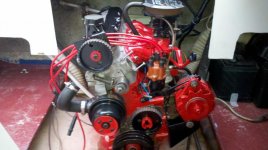
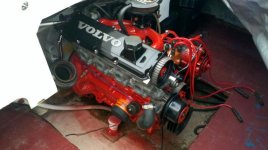
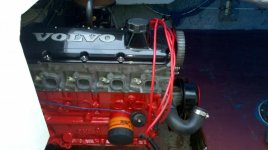
Waiting on the gasket for the head and valve cover as well as a few plugs to come in. But here is what she looks like after a few months of cleaning and restoring. engine2.jpgengine3.jpgengine4.jpgengine1.jpg
 
Wow. I must be one screwed up DIY'er. Got the engine together, finally had a nice day to start the thing. No issues, fired right up and idled around 1100 rpm. I adjusted the idle screw back to 900 rpm, turned the distributor a bit to get the 6 degrees. It idles up and down...first sounds like its going to stall (rpm dropped to about 800) then revs up to about 1200. Not sure what is going on, this has been a 2 year project, I completely stripped the engine and cleaned and greased everything, even ordered a new carb and put on a new cylinderhead, ensured all timing marks were lined up and then hoped for the best. Well I at least got it to start. What I did notice when putting it together was that when all marks were aligned and the engine was at top dead center, the timing plate went on and said it was at 6 degrees, should this have acutally been 0 degrees first and then adjusted to 6 degrees when running at idle? I have no idea what I am doing wrong. starts great, try to apply throttle slowly and it wants to stall. If I quickly apply throttle it chugs a bit then goes, just can't apply it slowly or it dies. Not sure what would happen if it was under load. Please help. I hate that it looks this good and I can't use it again. Thanks. Dennis. I have two videos but they are too large to attach.
 
I have a new carb or at least a newly rebuilt carb from a dealer. It was supposed to come set for idle. it is also the older model. The book says two turns. I will check this later today to ensure that it is set correctly. I have the electronic ignition. Can I swap the distributor from an auto and use the marine cap if the dist. needs to be worked? I am positive the marks are aligned, the only thing I noticed was that with the #1 cylinder at tdc checked this when the head was off (piston was at the top of the block) and the crank pulley was aligned to the timing mark, once I put the head on and lined up the cam to the correct position, put all the parts on, the timing plate indicated 6 degrees, should that actually have been at zero and my timing is still off? or is that correct that it read 6 degrees. Not sure. Thanks again. I am hoping to get this resolved as it has been 2 yrs since its been out of the water. It sounds nice, just can't throttle up without it dying.
 
Thanks, I will spend all day tomorrow working this issue until I get it running good. I have the old carb with the screw on the side, the one I sent back was the new carb style with the small screw in the front. I am going to resent the timing as you indicated. and see what I end up with. Our weather here has been wierd for Feb as it has been extremely warm. 78 today it should be in the low 50s or snowing. Want to get this done so I can get an early start on the water. thanks again. I will let you know how it turns out. Dennis
 
No joy. Have the battery recharging as I drained it trying to start it all day. All timing marks are aligned correctly, plugs are new and properly gapped. Carb is a rebuilt carb from a reputable dealer, distributor has an electronic ignition (hotspark). I got close to it starting, but then nothing, it starts after giving it some gas then dies. I pulled the distributor out completely and placed the rotor pointing to the number one plug on the cap and then rotated it clocwise 1/8 of an inch and then placed it in the block, it wanted to start, i moved the dist back and forth and kept trying to start, it will crank, fire and die, then depending on which way I move the dist it will just crank and not fire. I realize this thing has no choke and is hard to start when cold, but this is rediculous. I have been spending so much time trying to fix the issue and get it to crank and run with no luck. Not sure what else to do, the cylinder head is rebuilt, the carb, new fuel pump, tank, lines, plugs. I can't believe that it is this difficult to time the engine. I have great compression, spark, and fuel. I had it running the other day, but once it stopped, I couldn't get it restarted. So frustrated. I timed and retimed this thing so many times with no luck. Any other ideas would be appreciated. Thansk.
 
Hi,

It seems to me that the problem is either your carb adjustment or the fuel is bad.

If the gas is not fresh, get rid of it and try with new gas.

Regarding the carb adjustment, it is better to go on the rich side for starters and set the idle speed higher until you find the sweet point.

A couple of other things to check. Are you using the right type of coil? It should have 3 ohms of internal resistance and no external resistor. Also, what is the condition of the ignition wires, distributor cap & rotor and coil?

Another question. Since you have put all that effort into rebuilding your engine, have you considered upgrading to a Webber carb? All the feedback I have seen about retrofitting the OHCs with Webber carbs is good.
 
Back
Top