Logo

BF130 - Power trim/tilt unit repair

ringram2077

New member
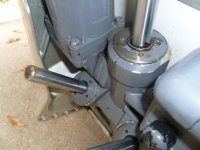
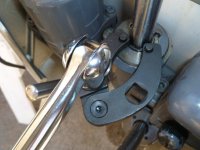
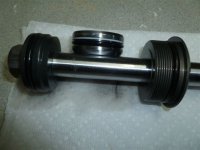
I have read the posts concerning how to unscrew the cylinders with the special tool but I need to know if it is possible to make the repair to the center tilt cylinder (leaking fluid at top) without removing the trim/tilt unit from the motor. I was surprised to find that the unit does not come loose as simply as it appears. I don't want to take the motor loose from the boat to remove it.:confused:
 
You may or may not want to try this. If you do, you need to be very cautious so that you don't get injured. I have not done this on an outboard this large but it looks as if it will be a similar operation. You have to be the judge. I don't think you can effectively work on the trim unit while it's on the boat. It will come off much easier than you think but it involves taking the pivot tube (item # 23 in the link below) on the bottom of the swivel bracket off with the tilt unit.

You need to separate the left stern bracket (item # 13) from the assembly and move it just far enough to the side to take the trim unit off with pivot tube. This requires that the bolts securing it to the transom be removed so be aware that only the starboard bracket will be left to support the weight of the outboard. DO NOT TAKE OFF THE STARBOARD BRACKET BOLTS!

The motor needs to be tilted up pretty much as far as you can get it and then secured in that position. Again, not too difficult as the weight of the power head tends to counter balance the weight of the extension and gear case in this position to the point of being almost neutral when it gets up there. I usually just take a section of anchor line and run it from one stern cleat across the top of power head to the other stern cleat to hold it securely in place. Looks gnarly but it works like a charm. Just take your time and figure it out like a puzzle 'cause that's all it is.

http://www.boats.net/parts/search/H...300001/STERN BRACKET + SWIVEL CASE/parts.html

With the trim unit off, you can now clamp it in a vise and do your repair. If you come up with a better solution, I hope you let us all know.
 
jgmo, thanks for the reply! This is very good information and after looking over the situation I agree with you that trying to repair the trim unit on the motor would be very difficult if not impossible for me. I spent some time yesterday looking at how I could remove the unit and as you said it appeared that loosening just the left bracket would allow the trim unit to be removed. I was concerned that the remaining bracket would not adequately support the weight of the motor so I was considering a small hoist connected to a floor joist in my garage to help support the motor. I will let you know how it works out. Thanks again.
 
I have changed the trim piston seals with out removing the unit. Just disconnect the shock mount from the engine. Get a long board and screw a ratchet strap to it and attach it to the lower unit to hold it up. Getting the gland nut loose while the trim unit is mounted to the engine is a lot easier than trying to do it in a vise.

Get the correct tool for the gland nut. Snap-on (although expensive, but worth it) makes a nice adjustable one that will accept a 1/2 drive breaker bar.
 
ringram2077,
I know from reading quite a few of his posts that Chris knows his stuff. So, if he says it can be done on the boat then I believe him.
If you do choose to take it off, then I would agree that any additional support you could get from your hoist would be great.
Either way, I wanted to say that when you get it back together and fill it with fluid, it take quite a while to work all the air out of the system before it will lift and lower the motor reliably. You need to be patient and not second guess yourself through this because, at first, it might seem like it's not working and you think you screwed up. Not so! Just air.
Good luck.

Right on.
I bleed all the air before I reinstall the top shock mount pin. When the pistons stop moving remove the fill plug carefully because it will purge some air, top it off and keep going up and down. Repeat as many tiles as necessary.
 
Again thanks for the replies guys! When I get a tool I will try to remove the caps with the unit on the motor. I have been applying penetrating oil to maybe help free up the threads. Will I need to use heat (electric or torch?) to get them to break loose? Also, what would be best tool to use, the honda version (two tools required) or something like the Snap On tool which I assume would work on both the cap sizes? I am attaching a pic of the power trim unit.
 

Attachments

  • power_trim_unit.jpg
    power_trim_unit.jpg
    60.5 KB · Views: 1,287
I have changed the trim piston seals with out removing the unit. Just disconnect the shock mount from the engine. Get a long board and screw a ratchet strap to it and attach it to the lower unit to hold it up. Getting the gland nut loose while the trim unit is mounted to the engine is a lot easier than trying to do it in a vise.

Get the correct tool for the gland nut. Snap-on (although expensive, but worth it) makes a nice adjustable one that will accept a 1/2 drive breaker bar.

No heat. Just a high quality tool and a long breaker bar for leverage and maybe a second set of hands. It will either come right apart or you will have to use some more persuasion like a longer breaker bar.

Also, by the looks of the wipers on the trim pistons, you nay want to do them too.
 
I have no recommendation as to what tool to buy because I fabricate my own and use them as "striking" wrenches. Just works better for me.

I wouldn't say not to use heat but NO TORCH HERE! An electric heat gun might be of some help to work your penetrating oil in but that's about it. Make sure you are using something effective like PB BLASTER or AERO KROIL.

Liquid wrench and many of the others just don't seem to work all that well.
 
I have made progress! Have could not find a Snap-on tool so I took a chance on one I saw on ebay. It was about $30. Has 1/4" pins and they fit the holes in the tile cylinder perfectly. I attached a pic of the setup. I also made a wood brace to keep the tool pushed down on the cylinder so it wouldn't slip off. Picked up a cheap 18" breaker bar and shazammmmmm, it broke loose with a good tug. I had used PB Blaster daily for about a week prior. Now to get the insides out and order parts. Will post my progress.
 

Attachments

  • Tilt_Cyl_Tool.jpg
    Tilt_Cyl_Tool.jpg
    60.6 KB · Views: 1,655
ringram2077
I appreciate your posts on this topic as i expect my day is coming for the 130's on my boat. Since I try to do my own repairs I need all the help I can get! Keep posting the good info.
 
I managed to get the tilt cylinder internals removed. There is just barely enough vertical space to pull it out of the main body. I had to prop up the motor just as high as it could go to get the clearance. Then I had to get the free piston out. This was not easy for me since I had never done it before. There is nothing to get hold of on the free piston. I found that if I pushed down on the trim cylinder it would force the free piston up the cylinder. Still could not get hold of it with the slippery fluid. I finally got it out but later thought that a strong magnet would probably work nicely to get it out. I would have preferred to get all the old fluid out but I cannot pour it out with the unit on the motor. I had a large syringe so I put some tubing on the end and sucked out as much fluid as I could. It was pretty dirty looking. So now I am looking at the free piston. The manual says to inspect the free piston for wear and replace if necessary. Thre is some very slight wear that you can see on the closer view. I wonder if it is realy necessary to replace fro another $50 for the part. Yes, I know that would be cheap if I have to go back into this thing again. I haver the part numbers ready to place order tomorrow. I am thinking that I might not mess with the two trim cylinders. They are not leaking. They could use a new dust seals on the top. I wonder if thay can be replaced (how to get the old ones out).
 

Attachments

  • tilt_cylinder_internal1.JPG
    tilt_cylinder_internal1.JPG
    47 KB · Views: 2,243
  • tilt_cylinder_internal2JPG.JPG
    tilt_cylinder_internal2JPG.JPG
    43.7 KB · Views: 760
Hi ringram.
Good progress so far!
I agree with Chris about replacing the piston. You certainly wouldn't want to put it back in service as is. If 1500-1800 crocus cloth won't clean up the piston then it needs to be replaced. Otherwise, you will probably have operational problems before too long. Also, do what you can with crocus cloth to clean up the piston rod and cylinder walls. DO NOT USE SANDPAPER, EMORY CLOTH OR STEEL WOOL! Use the crocus soaked with hydraulic fluid and rinse thoroughly with clean fluid when done.
Good luck.
 
Yep, the Dexron OR Mercon OR DexMerc will work fine but I would advise that you do all that you can to flush out the old fluid because if your unit contains the universal 10w20 hydraulic oil that Hondas (SHOWA CORP.) usually have in them, they don't mix all that well. In addition, some moisture has probably gotten in there over the years so a good flush is really a necessity for reliable operation after you've completed your repair.
Have fun.
 
Looks like I have opened a can of worms. Can't get the pistons out because the manual valve is froze solid. Been PB Blasting for over a week. Stripped off screwdriver slot. Tried to drill and use easy-out. Broke off easy-out. Now considering removing unit from the motor so I can take the pump off and hopefully relieve the suction pressure. I am also considering buying a complete unit vs repair since if I have to replave the pump manifold because of the manual valve I will end up with at least $1300 in parts. New unit is $1910. Question, does a new power trim unit come filled with fluid and ready to mount or does it have to be filled ?
 
OUCH, just when things were going so good!
I can't tell you if a new unit comes wet or dry, never bought one. But, I would think you can get that manual valve moving if you don't give up. Try using a prick or center punch on the outside edges of the screw head and try to hammer in a counter clockwise direction. I've boogered a few of those slots up before but I just use a Dremel cutoff wheel and grind a new slot in the cap so that I can still use an impact driver to loosen her up. The punch technique will act pretty much the same way as an impact driver and then the valve will be junk but it's less than $100 and THAT'S only 5% of a new unit.

A bit more destructive but higher tech and fast approach is to use an air hammer/chisel with a pointed bit and use the same "move the perimeter" method. Only thing is, if it slips it can cause collateral damage in a hurry.

Good luck.
 
OK I'll look at that. For now I need to proceed to remove the trim unit. I plan to put a strap around and under the raised motor and hook it to a comealong to hold it when I take the left stern bracket off. I will tie some lines on the motor to the front of the boat and take other precautions so no one (mainly me) gets hurt. Time for my luck to change for the better.
 
Do you have an impact screwdriver? I can't tell you how much easier it is to remove philips or slotted screws using one versus manual. I got mine from Sears and it didn't cost much - and have used it many times over (motorcycles have a multitude of screws that can't be taken out manually...but come out easily with an impact). Plus, the bits are hardened - and tend to fit better. The tap on the perimeter can work - but the impact wrench is my preference and has led to more successes for me. Keep at it, you're almost there!
 
I got the power trim unit removed. It was easier than I imagined. I made an eye hook for the top of the motor and used a comealong up to the floor joist above my garage fro extra support. Also cut a block of wood that wedged to the top of the transom. Got the new one installed and works great. I think I did the right thing to go with a new unit. I have been working on the old one trying to get it apart and there are several seized bolts. I broke one off already. I don't think any amount of work would get the manual valve out of the hyd pump. The cylinders and trim pistons are in good shape but the manual valve is a PITA. Someone who does this for a living would have had much better luck than me. But thinking back on the whole process where I took something than worked but leaked a little and turned it into something that didn't work makes me feel a little on the dumb side. Live and learn but don't run out of money. Thanks for all the help!
 

Attachments

  • IMG_3414.jpg
    IMG_3414.jpg
    32.5 KB · Views: 805
ringram,
Thanks for letting us know what you ended up doing. It's a costly fix but I can tell you're satisfied and it will probably give you trouble free service for years. You might try to recover some of the cost by selling your old trim to somebody that would want to try and do the repair.
 
Back
Top