Logo

Swapping Powerhead 1988 Force 125

jerold

Regular Contributor
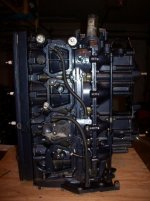
I will make this thread as complete as I can, with pictures along the way, of swapping my current 1988 125 with a stripped, working 1987 head. The new head is coming from Illinois, 135-140 compression, freshwater, a retired fire/rescue boat motor, city maintained. Looks brand new in the pics, especially compared to my current blown head. It should be on my front porch within a couple weeks.
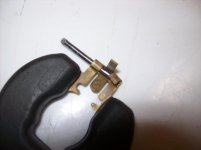
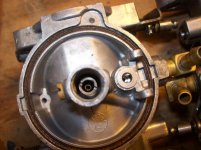
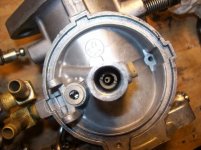
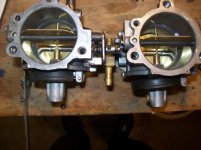
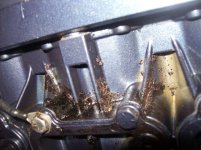
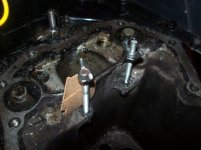
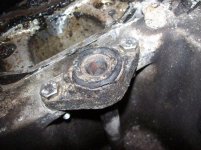
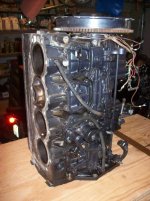
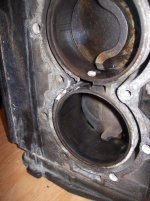
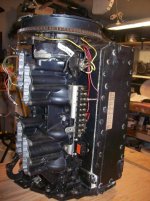
For now, my blown head is benched and ready to have all the goodies transferred to the new head. I have attached some pics of the blown block. Notice around cyl #4, the head gasket had a 1" hole in it at that spot also.
Any help along the way will be greatly appreciated! The Seloc manual I have is very vague in a lot of areas.....


More to follow in the coming weeks.
 

Attachments

  • 100_9441.jpg
    100_9441.jpg
    84.2 KB · Views: 1,980
  • 100_9442.jpg
    100_9442.jpg
    84.5 KB · Views: 456
  • 100_9443.jpg
    100_9443.jpg
    81.2 KB · Views: 3,212
  • 100_9444.jpg
    100_9444.jpg
    76.5 KB · Views: 288
Last edited:
Took carbs apart tonight, found a few things that are questionable.
First, I found one of the float hinges bent. How the heck does that happen?? Bent it back straight, now moves loose and free.
Second and third....look at the idle tubes. Why are the visible ends chewed up/bent slightly? Does it matter?
Last, these are the set "closed inlet position" of the floats. Notice the one on the right. WAY out adjustment. I'll fix that.
Blew stuff out, everything looks peachy to me. Gonna get a couple new bowl gaskets and call it good. Anything I'm missing on these carbs? They seem pretty simple...
 

Attachments

  • Bent.jpg
    Bent.jpg
    28.6 KB · Views: 138
  • Bent 2.jpg
    Bent 2.jpg
    67.7 KB · Views: 154
  • Bent 1.jpg
    Bent 1.jpg
    66.5 KB · Views: 140
  • Float Levels.jpg
    Float Levels.jpg
    62.4 KB · Views: 152
Make sure the float levels are right when you reassemble.You have a manual?I think most have the carb/float settings.
On iboats.com First post in the Force Forum.There is a post by FrankA called a linc and sinc.Do what he suggests when you re-assemble.
They are chewed up cause someone has taken them apart and screwed up the ends.As long as there is no blockage it should be ok.
Keep the gaskets in the carbs moist don't let them dry out.They will shrink and crack and dry.A bit of white lithium or silicone spray.Anything to keep them from drying out.J
 
Last edited:
I ordered new bowl gaskets, and bowl plug gaskets, and carb mounting gaskets. Is there more I should be concerned about drying out?
 
Yes, have an online Seloc manual. In the picture, the float height is correct on the left carb. The Link and Sync post is great info indeed!
 
Last edited:
When I removed the powerhead from the exhaust plate I noticed that RV sealant was used with no gasket. I see that there is a gasket available for this spot. Is the gasket a better way to go, and if so, do you use permatex or something similar with the gasket or just dryfit?
 
I use black RTV silicone,no gasket.
Try to retourqe the way it is.20ft#s
Did they remove the head to inspect the cylinders?Was it a freshwater motor?
I think I'd be curious to see what the inside looked like.Just to be sure.
The gasket's not that much.
 
Motor is here. Yes, it is a freshwater motor. Clean as a whistle. So far, bolts come right out.
Tonight I checked the water passages with air, re-torqued the head (got about an eighth turn out of each bolt). Installed the fuel pump, shift linkage cam, wire terminal, tell tale, and cd/coils.

There was some crud around the #2 transfer port cover. Is that just normal dirt that couldn't be cleaned off because it's behind the cd boxes, or is this some sort of leak? It's kind of dry hard and crispy. See the pic.

Ordered a new thermostat and gaskets to go with.
 

Attachments

  • 100_9532.jpg
    100_9532.jpg
    87.7 KB · Views: 239
  • 100_9528.jpg
    100_9528.jpg
    75.8 KB · Views: 243
  • 100_9524.jpg
    100_9524.jpg
    64.1 KB · Views: 205
Last edited:
Put the starter on and do a comp test.
The junk behind is no big deal.
Looks real nice!!!Very clean looks like very low hours!!!
It even has a pee tube already!!
To make yoiur future repairs easier.You might want to remove the water jacket screws and head bolts and use some kind of grease on the threads.Anti-sieze will become perma-sieze when you add salt water and heat.
 
Are you saying aniti-seize should not be used and grease is better?

Installed the trigger, stator, starter, little bits n pieces tonight. It would appear that the crank end nut (holding the flywheel on) is a different thread than my existing? Really? An '87 and '88 have different threads? What's the deal? Now I need a nut that fits this crank....
The starter is on. So, using a jumper cable, can I attach the battery negative to the mounting bolt of the starter, and the positive to the bottom post on the starter to crank for a comp test? Is that OK?
 
I thought they were all the same(nuts).I never found any difference.You sure you got the right nut?Your old too small or too big?Pics?
No anti-sieze.
Yea use the jumper cables and any ground.
Cheap jumper cables might not work as well.The originals are #4 wire.J
 
Tried my piece of crud ancient old jumper cables.......sparks, smoke, very slow cranking. Only getting 60 lbs on comp. But the engine is turning very slow.

Pretty sure it's the jumper cables. Will remove the actual cables from the boat tomorrow and see if we can get an accurate test.....
 
Yes, I took the starter apart and cleaned it. It looks good. Yes, all the plugs are out. Will attempt the different battery cable later today.
 
YES!! 150 lbs comp X4!!
I'm hearing more and more that there is only 1 size thread for the flywheel nut. I'm going to check the crank threads and see if they need to be cleaned up.
 
Yes indeed the threads on the crank end were slightly bent. I cleaned them up with a small file and carefully twisted the nut on, back n forth. All better, Flywheel is on.
Can't do much more for now until the carb gaskets I ordered get here.
 
Got the boat into the garage today. Looking at the leg housing, I noticed the seal from the water inlet tube looked really bad. I'll take pix later. Ordered a seal and a grommet for the top of the tube. However, I don't know, do you have to remove the bracket on top and remove the inlet tube to replace the top seals? Or do the seals just go on top of the tube? Because I am afraid I will snap the 2 bolts that hold the bracket....I have them soaking in PB.
 
Get ready to drill and tap.Gotta remove the screws to replace the gromet.
if it tscares you too much.Some people just build it up with silicone(not recomended).J
 
Jeez....you weren't kidding. Snapped both. Started drilling. Went thru many bits. One was broken bit got stuck and I had to alter drill path. Then a tap snapped off. It got pretty ugly on both holes. About half of the threads remained in each hole, just enough to hold the bolts in. So I cleaned it all up, placed some temp bolts in, (had to straighten one with a spacer), filled the gaps thoroughly with JB Weld. Hopefully I will be able to unscrew the temp bolts, then use new SS bolts that thread in and also put a nut on the bottom with a washer to "sandwich" the bracket on instead of relying on the home made threads alone.

Very frustrating.
 

Attachments

  • 100_9540.jpg
    100_9540.jpg
    58.2 KB · Views: 218
I let the JB Weld dry for 24 hours. Broke the temporary bolts free and cleaned up the excess JB on the housing with a flat xacto blade. The new stainless bolts went right in and tightened up just fine. I will also add a washer and nut underneath to make the whole thing more secure. I think it will be fine.

Next, how do I install the new seals, 3 of them I think, onto the water tube?
 

Attachments

  • 100_9544.jpg
    100_9544.jpg
    82.7 KB · Views: 163
Still waiting for the water tube gaskets to arrive. In the meantime, I've been cleaning the leg housing up, engine cover, and tilt/trim. I put the tilt/trim back together with the new collar. Sorry Jerryjerry, he didn't have any more. I am waiting until the powerhead is back on before I bleed and check it.

I also cleaned up all the wiring in the boat, as nobody removed any of it when the motor was switched at some point in the boats history. I think it came with an 90hp Force. 1998 16' Bayliner Capri LS1600. Anyway, I got everything working, lights, horn, guages, bilge, and guage lights.

Thermostat and seals came today. They sent me the wrong impeller. How hard can it be? Don't all the 80's Force 125's have the same impeller? I destroyed my last new one trying to crank and crank and crank and crank the old worthless powerhead before I checked it for compression. It WAS new. Now it's in pieces. I had no idea how fast it could be wrecked. Now I know.

Still waiting for the CORRECT float bowl gaskets to be sent to me too. A "mislabeling problem". Riggghhhtttt.......
 
Where you getting your parts?
Hard to find stuff(if you can't buy it here)boats.net has a good supply.Don't order on the net call them and ask for availability.
Franzmarine has stuff too.
 
I don't get my parts here because for some reason, they don't list a 1988 Force 125 in the parts diagrams. They got 1987, they got 1989. No 1988. Decided not to deal with the confusion.

Putting in the thermostat today.
 
Back
Top