Logo

6HP Tohatsu - drive shaft won't seat correctly after water pump impeller replacement

gallilaw

New member
After replacing a worn impeller, re-assembly became impossible because the drive shaft won't insert all the way. I have tried everything I can think of.

This morning I tried to insert the drive shaft ONLY without even a bothering with the shift linkage clamp. I turned the lower unit 90 degrees so that only the drive shaft was inside the shaft housing and the lower shift rod was outside the housing. I inserted the drive shaft and, as usual, it encountered a hard bump. Whatever it bumps into forces the shift lever into the forward position so that the lever doesn't move even though the shift rod is not connected to the lower unit at all.

I have tried to insert the drive shaft with the shift lever in rear, neutral and forward, and same thing happens: the drive shaft pushes the shift lever forward and the system locks even before the drive shaft is fully seated. Something invisible in the linkage is making life miserable for me.

I thought reading online instructions and watching a video would make the project doable in not much time. Ouch. I am going to order a factory service manual, obviously, but I would appreciate some help getting the system back together in the meantime.
 
Try slowly turning the flywheel with one hand (clockwise) as you hit this dead spot. More of a rocking and right hand turn motion. Do not try and slam it up in there though, your bumping the shift shaft too hard I think. Some do it in forward gear(think its suggested), but I find neutral to be better becuase it cannot change on the boat and the forward sometimes has some/alot of twist play in it. So set the lower in neutral, if doing it right it should not shift. Just run throught the gears afterwards(not running,, spinning the prop between shifts) before you call it ok.
May be a better way, but this has worked for me. Also while you have three hands, make sure when the shift shaft starts meeting up, (you may have to reach in there with a long thin screwdriver or something) crouch down, still holding it in place, and look up in there at the shift shaft and the water tube. Make sure all is lining up, if not, manipulate it..
 
I would never recommend changing only the impeller; the price of a wp kit is reasonable, labor is the same, and you will get much more life from the repair if you do the whole kit.

That said, there is a certain "feel" that is required to mate the driveshaft up with the crankshaft. Clearly the driveshaft is striking the shifter linkage in your case. You are not centered where you need to be. Some people have that "feel" naturally, but the rest of us need to learn patience and develop the dexterity to do the job. You are missing the location by over an inch. Review the parts catalog, figure 7, and you will see that the internal shift lever is quite a distance from the crankshaft center. That "feel" is one reason why outboard shops charge the labor rates that they do.

On the MFS 4/5/6, you will want the shifter down in Reverse so that the shift coupler will be accessible through the grommet opening in the side of the driveshaft housing. Then, as you raise the LU, you engage the shifter, driveshaft, and water tube, in that order.
 
OMG!.......always sounds so easy, I bought a 1989 NS5B 5hp Nissan used from a guy quoting he had no problems, even ran it for me....well not being familiar at all with outboards I decided to do the right thing and get a new water pump kit.....Watched a you tube video,, seemed easy.....well the impeller was easy, also got one extra seal in the kit for the lower end below the water pump for the plate to the lower end, so I took off the cap to the lower end and installed it.....I noticed that oil seems to come out around the shift linkage on the lower end....when you move the linkange up and down changing gears you get oil coating the linkage shaft.....I dont think it should leak....is there a repair kit for that, or do I just need to get the rubber o rings and put new ones in? Another problem......I too spent the better part of my day trying to get the lower end back together.....that was 4 hrs of my life I want back....when I finally got it back together, linkage hooked up, It would shift once, then it would just jam up.....Also, after installing a new impeller and seals, I still cant get water to come out of those 2 little holes like it is supposed to....instead, water comes out a hole at the base of the engine.....I really need help getting this thing to work.....It purrs like a kitten, just would rather have it on my boat instead of a lawn ornament.......anyone have suggestions?
 
Last edited:
First, your problem, while related to the OP's, is not the same (not even the same kind of motor), so ideally should be in a new post, rather than a reply. But...

It's always prudent to have the Factory service manual on hand. That can help you understand how the shifter operates. You cannot expect to shift if the gears in the LU are not moving, as the clutch dog is a mechanical engagement item, not a friction disc.

The most frequently overlooked seals in the LU are the shifter bushing o-rings (both inner and outer). They are available in part# 369873210M LOWER UNIT GASKET SET, $21.23, available from any dealer, including me. Yes, you can change just the o-rings. They are available separately. But odds are that the driveshaft and propshaft seals are also due; It's a good idea to get the whole seal set. No, the cam rod should not be dragging gear lube out with it; that's an indication that it's leaking, and will allow water into the LU.

Regarding the telltale stream, it is in fact supposed to come out of the base of the motor, not the two idle relief ports in the driveshaft housing. That too will become clear when you review the Factory service manual, Part# 003-21035-1, $44.17, available from any dealer (including me). There is also a flushing port in the base; If the plug is removed from it, water will pour out of there, and probably will not circulate well through the powerhead.
 
Sorry for posting in the wrong spot.........................just recognized someone having the same issue as me so I thought I would reach out for some help too.......I would really appreciate a price for the seals you talk about and do you think realistically I could do it my self?.......I really want to learn how to work on this motor......I do have a service manual but it is for 1992 nissan/tohatsu and newer.....couldnt find a older one, I also have a manual and parts catalog, still need help with exactly which seals or o-rings I may need? Thanks for your help
 
Year is irrelevant; model is everything. You probably have an aftermarket POS manual. The Factory manual covers all the old 1- and 2-cylinder 2-strokes, including the 5B. The prop shaft housing comes out with 2 bolts, and the shift bushing with 1 bolt. Just be careful not to lose the push rod and associated stuff as you pull out the prop shaft housing. The lower wp housing fits tightly to the LU, so will take some patience/skill getting the driveshaft seal replaced. The small o-rings for the shift bushing will also require patience and skill, as one's fingers are (relatively) a bit big, so an o-ring pick and a blunt punch may help you.
 
369873210M LOWER UNIT GASKET SET for 5B $21.23
SERVICE MANUAL 1 & 2 CYLINDER 2-STROKES Covers all 1 & 2 cylinder 2-stroke models. Part# 003-21035-1 $44.17

Available from any dealer, including me.
 
I would be interested in the manual, also, I replaced the lower unit gasket, I need to tear it apart again and see what I need, the fluid is coming out along the shifter rod in the lower unit .......that would need a bushing or o-ring, I have a parts diagram, I will look at that.....that is a great price for that service manual though.....how do I order it from you?
 
Replacing this waterpump is an absolute nightmare for one reason. Nissan solved the shifter coupling problem by hiring some drunk junkie fake engineer, instead of doing it the way every other OB builder in the world does it.

What throws everyone is this. You have to shift the motor into reverse to position the coupler block in the middle of the hole on the shifter side of the shaft case, (closed up with a black rubber grommet). Loosen this up and the lower unit slides off. Ahhh, easy? Yes. Diabolical? Yes. You will note a dog leg in the shifter lever, which turns freely. Why, you might ask yourself is this dog leg here? Quite simply it is there because the fake engineers couldn't line up the UPPER SHIFT LEVER GUIDE with the lower one. It is up to you, grasshopper to do this. I have never even seen a shift lever guide, especially one that doesn't do anything and is totally unnecessary, but prevents the lower unit from going back together. Now it gets interesting. When you do look up there with a flashlight you see this hole that the shifter lever goes into, and you think, well, if I get the dog leg headed the right way, the shifter rod will slip in and the lower unit will go back together. How, naive you are grasshopper. The real disaster is yet to come. You of course reason that the lower unit must be in reverse, that is with the shift rod all the way down in the lower unit to re-assemble, but no. They made the shift rod just short enough, that the only way it will go in is in nuetral. It has to go in first, before the drive shaft goes into the power head, then the water pipe. OK, so, when you put the shifter in neutral you can't tighten down the bolt on the shift rod block, as it's up above the hole, which is in the wrong place. Anyway, you must. So you find a slim 10MM wrench, tighten it up just a little, then shift the engine into reverse, and if it doesn't slip, you can tighten it up. This is a horrific design, and these are lousy engines. We had another one develop a quarter size hole in the crankcase due to a washer left in at the factory. Do yourself a favor and avoid these engines.
 
OK I understand replacing the lower unit might take 3 hands and a bucket of patience. I am having trouble getting the lower unit OFF. Followed the brief instructions in the factory service manual and the lower unit wouldnt slide completely off the drive shaft housing. I spoke to it in loving terms and it did finally move about 10-12 inches but now it is stuck and wont move any further. The shift rod is disconnected but the drive shaft is hung up on something and wont pull out.
I am trying to replace the impeller. After reading this thread, i am a little concerned that i will be able to get it back together but my immediate challenge is getting the lower unit OFF the motor. Are there any tricks?
I sincerely appreciate your help!!!
Mike
 
You should have started a new thread, as this is a different motor, with a different issue. However, assuming your model is NSF4A2, the problem is likely that you have crud on the driveshaft, and that is holding the shaft where it passes the drive shaft bushing. Pull a little harder, and it will come out.

I would recommend replacing a complete water pump kit, as it's the same labor as doing just the impeller. It will pump better and last longer if you do the cup and plate when doing the impeller.
 
is it solved?
the problem is in under powerhead ,
under powerhead is adapter that holds 2 drive shaft seals,
while fitting the drive shaft after impeler change you just hit the seal and lifted the seal.
now the seal is blocking for drive shaft entrence to the crankshaft
only to pull powerhead and reinstal this seal
 
racsekp1, you are incorrect. It is impossible to knock one of those seals loose:
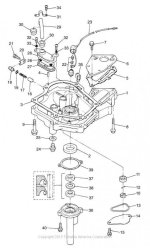
002-21046-3_FIG04.jpg
The problem was that he was having an issue pulling the drive shaft DOWN. And... they seal against the crankshaft, NOT the drive shaft.
 
Last edited:
i had this situation 2 times with seals lifted.
i write about seals no.37 from drawing

seal no.2 is sealing crankshaft, but seals 37 is sealing driveshaft.
Been there and done this
 
Um No. Those seals go in from the top of the crankcase head. They are captive once the head is bolted on.
One would have to be horribly ham-fisted to damage one, as the driveshaft is inside the tube of the head fitting as it's inserted.

Sorry but You are wrong.
I had this 2 times.while bolting L.U to midsertion
I didnt fit into midle of seal no 37 and puśh up this seal by drive shaft and block entrance to crankshaft.

Finaly power head lift and bush back those seals
Into seal housing and bolt back the powerhead
 
You must have really slammed that driveshaft in there to dislodge those seals.

Sorry but You are wrong.
I had this 2 times.while bolting L.U to midsertion
I didnt fit into midle of seal no 37 and puśh up this seal by drive shaft and block entrance to crankshaft.

Finaly power head lift and bush back those seals
Into seal housing and bolt back the powerhead
 
I put a screwdriver under the lever that stops the engine form being started in gear. Now you can pull the cord and turn the motor while the shift shaft is in gear. That helps in aligning the shaft with the engine, and getting the shift shaft to go into it's hole. The problem now is, now that the shift shaft is in the hole, I cannot get the grommet back in because it won't compress enough to fit in the hole with the shaft in it.
 
I put a screwdriver under the lever that stops the engine form being started in gear. Now you can pull the cord and turn the motor while the shift shaft is in gear. That helps in aligning the shaft with the engine, and getting the shift shaft to go into it's hole. The problem now is, now that the shift shaft is in the hole, I cannot get the grommet back in because it won't compress enough to fit in the hole with the shaft in it.
You have to flex the access grommet to replace it.
 
Back
Top