Logo

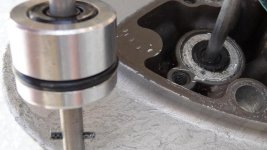
Lower shift rod removal-cant get it out (see pic)

Tall Pine

Member
seal holder (2).jpg

396977841.jpg


You can see the replacement part in my hand. How the heck do I get the old one out? I have searched for hours and only 3 suggestions so far. Drill it out, hammer it out, or heat and lube repeatedly and tug on it.

I am weary of drilling it out for the shavings getting in the lower unit.

I am weary of hammering it out for fear of breaking the casting, or shearing off the little spring pin into my lower unit gears.

So that leaves heating it. Can someone suggest how much heat to use with a handheld propane torch? I am worried that the cast metal socket this thing sits in cant take too much heat, its not all that thick of metal.

Are there any other options other than taking it to a shop? I just dont trust a random tech with this. The tech will probably do exactly what I can do, just not as patiently.

Thanks for any help,
Tall
(...cursing honda for not engineering a sane way to get this thing out)
 
Last edited:
No. Its all together. The lower unit is 100% fine, it has no issues. The reason Im replacing this rod is while doing the impeller service I noticed the previous owner broke off 1/2" of the threaded top of this rod and welded the adjusting nut to the lock nut to ham hand it all together with the upper rod. Im just trying to get it back to stock so the two rods come together as they are supposed to with the stock adjusting nut and lock nut. This rod must be replaced. This rod's seal is now buggered up from me trying to get this thing out so it really has to come out now.

Ive tried heating it for a few minutes but of course nothing. I seriously am at a loss for how to get this stuck pig out of its hole.
 
This looks like a 9.9 or 15 HP.

Soak it with pb blaster for a few hours.

If I understand correctly that there is still a nut at the end of the shift shaft....

Fasten the lower unit in some sort of holding device, vise or something that will not allow the lower unit to move.

Put a vise grip around the end of the shift shaft up against the nut.
Take a hammer and hit up on the vise grip, which should pull the shift shaft up to where the pin below the shaft holder will be up against the shaft holder.Just keep tapping and it should eventually work it out. Like you are using a slide hammer.


One other method that might be less abusive, would be to build up something solid from the mating surface of the lower unit like a 2 x 4 up to just below the nut at the end of the shift shaft. Then take a claw hammer or similar pry device and put the end under the nut and pry it up. If you have good leverage, it should pull the shift shaft holder out.

Mike
 
Thanks Mike. Its a BF30. I will try the prying technique after 24 hrs of PB blaster soaking. One thing, in my large photo you can see the "spring pin" below the bulbous seal holder which will be taking the brunt of any and all of the force (as I pry or hammer "up" on the rod it will be this pin that contacts the seal holder to drive it up and out of the hole). This spring pin does not look extrememly strong. I guess I have no choice but to trust it, but I worry about shearing it and having little pieces of it floating in my lower unit, necessitating a total lower rebuild to clear the pieces. Do you think the spring pin can take these forces?

Thanks so much for your reply.
 
That is your only hope at this time. It has worked for me in the past. Although, I work on mostly fresh water motors. If it shears, you still have the pin on the end of the shift shaft as a backup.

If the pin does go into the drive, you will just have to flush it out.

Mike
 
Thanks Mike. Sorry but I thought of one last thing. To prevent this type of seizing on the new part, do you suggest applying anti-sieze compound to the new seal holder? The shop manual calls for honda marine grease which I do have, but I also have anti-seize. Which do you think will work better?

Thanks again.
 
Man, I am having zero luck. I rigged up a nut and big washer on the top of the rod like Mike suggested and have tried to pry and pound the rod up and out, with absolutely zero luck. The 14" flat pry bar is already bent. I then moved onto a 3 ft crowbar. It still wont budge. I am now onto the 3 lb hammer and have struck it a few dozen times. Still no movement at all. I continue to use heat and PB blaster lube to no avail.

Is it possible the seal holder part of the rod has fused itself metallurgically with the frame around it? The seal holder (bulbous part) is aluminum, but so is the cast frame (I think). I dont know if aluminium on aluminium in a marine environment could alter something chemically. I have heard of electrolisis and corrosion, but I thought that was when aluminium was in contact with steel. I dont see any corrosion, but I obviosuly cannot see inbeteen the seal holder and the frame. I am not the sole owner. It may have seen some saltwater.

If the experts think some kind of metallurgic bonding has happened over the years, and pounding and prying is futile, I guess my only other option is cutting off the rod, pushing it down into the lower unit, and drilling the seal holder out from the center in increasing diameter drill bit sizes. That is what some other poor guy suggested after struggling with his. Here is his account: http://forums.iboats.com/showthread.php?t=468692&page=1

Thanks to anyone with any tips or answers, especially on the metallurgic bonding possibility.
 
Sorry you are having so much trouble....

Can't help on the bonding issue....

Make sure that if you are using the hammer method that the lower unit is locked solidly into something that has no give at all. If the lower unit moves at all, the piece will not budge.

If you can drive a couple of holes in the piece and you put a couple of screws into it, they may provide a bettery place to pry...as long as you protect the gearcase surface.

Maybe JimmyD might tune into this. He always seems to have some creative ways of doing things.

Mike
 
Thanks. I did lock it down tight. Keep in mind this lower rod has an s bend in it near the top which acts like a spring. Mine is somewhat straight with all the yanking going on.

But bad news to report, just a minute ago the spring pin gave way, it wasnt strong enough. I now have the spring pin shards in the lower unit. The rod has now pulled out to where only the bottom triangular looking "push rod" piece (BF 25/30 shop manual pg 12-8) is the only thing left on the extreme bottom end of the rod. If this breaks off I will have no choice but to drill.

But with as much force as has been applied already, Ive got to think this thing is so fused to the frame that to get all of it out, even in pieces via drilling, may risk taking some of the frame with it. That would not be good! Im hoping for a simple miracle now.
 
Well, the last pin broke off and the rod came thru like a straw out of a cup. Heres a pic of the sad seal holder still stuck in its hole, and a pic of the rod with its sheared off middle sping pin and the missing roller pin at the end of the rod. Look how straight the rod became after all the force was applied. Keep in mind I worked on this for about 14 hours over 2 days, slowly increasing the force as I went, using heat and soaking in PB fluid for 2 nights overnight. It was determined to stay put.

396993827.jpg


396993826.jpg


So now I have nothing to pull on to get that seal holder out. I drilled it out with a 1/2" bit to clear all the rubber away so I could see whats next. I guess I have to keep increasing drill sizes until its thin enough to break apart. Gotta be careful not to damage the frame. Im doing my drilling upside down so the shavings dont fall inside the lower. Just trying to keep it as clean as I can. I assume I am going to need to open up the lower unit to do a thourough cleaning. How do you do that? :cool:
 
I am hesitant to give any more suggestions on this.... nothing seemed to work so far.

Before you go too far and damage the gearcase, you might take it to a local machine shop. They probably have a tool that can remove it or they will have the ability to drill out the rest of it without damaging the case.

As far as pulling the prop shaft...again with hesitancy...there are only two bolts that hold the prop shaft, holder, reverse gear, and clutch dog. There should be a couple of places on either side of where the holder is against the gearcase for you to put the blade of the standard screwdriver. Use two screwdrivers, one in each slot, and gently pry both at the same time. The holder should come right out....famous last words.

I hope something in this process goes easy for you.

Mike
 
Thanks Mike. I have a few more questions to help me finish.

1. Do you suggest marine grease or anti-sieze compund for the new seal holder. Shop manual says marine grease but I want to use the best I can to prevent this from happening again.

2. Will I need any new o-rings or seals just to pull out the prop shaft holder assembly and put it back in? The shop manual doesnt show any non-reusable parts for pulling the assembly as a whole. I do not expect to have to tear apart this assembly, which looks to be a whole other level of complexity. Just pull it out, ensure no shavings/bits are in the case, and reinstall.

3. Here's a silly question that has been bugging me about not tearing apart the prop shaft assembly. If I happen to miss cleaning out a tiny aluminum shaving (from my drilling) and it eventually finds its way inbetween the gears and whatnot upon operating the motor, do you think it would hurt anything? My hope is no, that it would be too flimsy to damage the hearty gears in there. I cannot imagine they would but I wanted your opininon. Maybe you would suggest tearing apart the assembly to make sure? (I hope not I dont feel up to that job after all this).

I also read one of your posts from the archives saying not to pull this assembly out with the shift rod in place. Obviously mine is/will be already out when I pull the assembly.

4. Are there any other "dont's" that I should be aware of about this assembly, or how it mates up to the main drive shaft? Is there any synching of gears or matching up of match marks when putting the prop shaft assembly back in? Shop manual doesnt show any but its not exactly the the most detail oriented manual Ive worked with and I dont want to miss something important.

Thanks again. If you take contributions, let me know. My paypal account is standing by. You haved saved me so much time, stress, and billable shop hours. I really appreciate your replies :cool:
 
Last edited:
Hi Guys! What a booger bear! I just love these kinds of problems...when they ain't mine!

Tall Pine,
Maybe the pins breaking was a GOOD thing. Like Mike said, getting the prop shaft holder out and out of the way should give you good access to find and remove the pieces. But, I'd take it a step further and pull the main shaft so that I could gain access to the shift rod holder from the inside. I would try to insert a bolt up through the hole and then nut it in place. That would give you a "platform" to weld another fastener that would adapt to fit a slide hammer. Slow and patient are going to be your two best friends if you are to save your gear case.

The Blaster is good but be careful with the heat. They sell a pretty effective electric heat gun at Harbor Freight for cheap and that might be a good tool to use here. Also, there is a product sold at some hardware stores called "Freeze-It" that could be useful too. The whole idea behind using heat to break a bond is that you are utilizing the different "shrink" rates of the pieces and the metals. The parts delaminate during the cool down cycle. Heating up both parts and then "freezing" one of them (the holder) with that spray could work.

Again, slow and methodical "bumping" will eventually get it to move. You just gotta have faith. Slamming and beating will get it to move too but it may take a piece of case with it.

Good luck sir.
 
Last edited:
You can probably use never seize on the metal. Lubricate the o ring as the book says.

You should probably replace the o ring that goes around the holder.

As to the post you saw about not pulling the holder without the shiftshaft pulled, that was for a different (bigger) engine. Disregard for this job.

Also, as to not finding the pin pieces....find them anyway you can. They can do major damage. Do not put it back together without finding them. Most likely they have fallen behind the forward gear (the gear that is still in the front of the gearcase. If you flush the gearcase real good after you get the shift shaft holder out, they should come out. Make sure you do the flushing somewhere where you will be sure to catch the pins so you know they are out. Maybe a big screen under the unit.

When you put the prop shaft holder back in, have the shift shaft already in and in forward. Make sure you do not loose part # 5 (pin) and especially #25 (ball) http://www.boats.net/parts/search/Honda/Outboard%20Engine/2005/BF30D5%20LRTA%20MARINE%20ENGINE%2C%20JPN%2C%20VIN%23%20BAUJ-1100001%20TO%20BAUJ-1199999/PROPELLER%20SHAFT/parts.html
when you go to put it back together. They come out easily if you are not paying attention.

As for the Pay Pal account.....pay it forward....when someone else needs some help.

Mike
 
Thank you both for the replies. Victory is mine! I finished the job and here is a summary.

I decided to drill out the seal holder to a thin diameter and pick it out. This worked well only because I went slowly and didnt drill all the way though the holder, and kept the bit straight as I drilled. You have to mark your depth on the bit so that you do not drill out the "stop" ledges that keep the seal holder from going too far down into that tube. I used a 1/2 drill and 7/8" drill bit. Here you see the old seal holder is stuck in there and the rubber inner seal has been removed:

396993827.jpg


So I drilled it out, being very careful to drill perfectly straight, cannot deviate and drill into the frame socket. A 7/8" bit was the absulte max I dared go, after analyzing all measurements with calipers, etc. Heres a pick after the drill to max depth was finished. It left a perfect thin "sleeve" and base that was easy to pick out:

397047686.jpg


397047684.jpg


397047681.jpg


Here are the bits and pieces from the broken off lower rod, and the two main pieces of what was left of the seal holder:

397047676.jpg


And finally, the end result. A clean frame with no damage:

397047670.jpg


I took Mike's advise and fully cleaned out the gear case as best I could and filtered the oil to see what came out. Drilling upside down kept most all shavings out of the case. I feel good that I got everything out, but I did not take out the front gear that Mike mentioned. I did squirt fluid up in there upside down and gravity should have carried any unseen pieces out. The prop shafter holder assembly is easy to take out, you can leave the prop itself attached. Just remember what Mike cautioned about not missing the front 2 pieces (that plunger rod thing and ball bearing behind it). I ensured they stayed in place on re-assembly by placing the prop assembly on the table and lowering the gear case down onto it so there was no chance gravity would dislodge those pieces. Worked like a charm. Replacing the o-ring on the prop shaft holder assembly Mike mentioned was a good idea as mine was kinda old and brittle.

Many thanks to all who helped me, especially Mike. Its great to have this forum and its members to help us through the tough times.
 
Nice work! Congratulations on a job well done and thank you for the detailed, blow by blow description of the process. The pics are great!
This will undoubtedly make someone's life a little easier when they encounter the same problem...maybe even mine!
 
Nice job! I know it had to be very frustrating.

If you are going to this trouble, you should remove the prop to be sure there is no fishing line wrapped around the prop shaft that will cut into the seal.

Now it is time for that beer! Maybe...two!

Mike
 
Mike, which seal are you talking about with the fishing line? The gear case is all back together and oil pumped in. Are you saying just pull off the prop itself, check for any fishing line, and thats it?
 
That is exactly what Mike meant. Fishing line is the #1 killer of prop shaft seals. The line gets wound up and trapped behind the special spacer/thrust washer and then melts from friction heat. Then it is a sort of glass like wad of plastic constantly chewing away at your thrust washer and seal. You should remove the prop every few trips or so and check for monofiliment fishing line or nylon anchor line. The face of the thrust washer should be smooth also. If the thrust washer face is scored at all, replace it.
Boating can be fun...
just not on maintenance day.
 
Jimmy answered your question...but I have a question for you, Tall Pine...

Looking back on this, would you do anything different than you did to get that bugger out?

Mike
 
Jimmy answered your question...but I have a question for you, Tall Pine...

Looking back on this, would you do anything different than you did to get that bugger out?

Mike

As far as before the rod came disconnected, I might have tried JGMOs advise on post# 14 and use the heat/cool trick, I didnt know about that. I am not sure using less force on the hammer strikes to get me more hits on it would have done anything. After 1 full day of it and not seeing it move, you get a feeling it will never move until more force is applied. But it might have worked. I think the seal holder was in there since 2001, and was just corroded stuck.

As far as after the rod came out, if I had easy access to a welder I would have made home-made J hook looking tool to stick up in there and pull it out. That would have avoided the dangerous and messy drill-out. I would have easily gone with that before the drill-out. I really hated to drill it out for fear of messing up the frame but thank goodness I took my time and it all worked out okay.
 
Back
Top