Logo

Steering - 1989 Johnson 110HP 2 Stroke

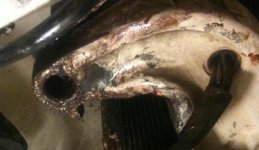
I am referring to the rubber seal on starboard side that hugs (inside and outside) cable tube.

I do not know if the old cable was bent, but I replaced the whole lot in anycase - new cable, helm, etc.

I am at work so unable to 'play' atm. Will do so when I arrive home later in day.

After I remove cable from engine, and I do not feel any (or minimal) friction - what is my next step?

Cameron
 
If you have cable entry from stb side of engine, it should not be any 'rubber seal' on stb side, only at exit on port. The one shown in the pic.
 
As I stand on the ground facing the transom, I regard Port being on my Right Hand Side - Do you agree with this same interpretation ?

After I remove cable from engine, and I do not feel any (or minimal) friction - what is my next step?
 
Port side is port side no matter what direction you are looking!
If sitting behind the steering wheel, port is left, stb is right.
If turning and looking towards the transom, port is right and stb is left
Some claims it is derived from the old viking ships that had the steering oar on stb side (steering board) and thus had to put the other side to the 'port'(dock) for not breaking the steering oar.
 
You are correct. My mistake. Sorry.

After I remove cable from engine, and I do not feel any (or minimal) friction - what is my next step?

Cameron
 
If removed and close to no friction, (hopefully no sharp bends ?), clean out the steering tube, and check that it is not damaged/ dented from when you remove the old cable, lubricate and put back.
Test the stroke of the cable before you remove it and when removed. It should be the same.
 
how do i clean the tube and with what?

How do i check the internal of this tube is not dented / damaged from inside?
 
i pulled the cable out and check it and greased it and re-inserted - still same.

i also tested the stroke of the cable before you removed it and when removed. It was not the same - shorter when installed.

thoughts?

cameron
 
Last edited:
Your engine tilt tube might be dented at the end or damaged from when you pulled out the old cable.
What was the turns of the wheel when not installed?
Remove the rubber cap on PORT side.
It should be a mark on the steering cable where the grease has bee pulled off??
 
hi.

how far should the steering cable tube be showing on the starboard side?

turns of the wheel when not installed is same as installed - 2, 3/4 turns.

cameron
 
Last edited:
how far should the steering cable tube be showing on the starboard side?

So, the number of turns of wheel is the same for when cable is connected and disconnected.

What else should I be lookign into. Almost at a loss now...

Maybe I have too much angular range towards Port??
 
Are you sure that the cable is properly seated and installed in the helm?
Are you installing the link between cable and motor on the INNER hole of the engine steering arm?
Is the steering link an original type? (correct length?)
Is the cable running smooth in the engine tilt tube? Almost no difference between cable installed in the tube or free.
 
How do i know the cable is properly seated and installed in helm?

What / where is this inner hole of the steering arm?

How can I determine if steering link is OEM and correct length?

Cable is running smooth in tilt tube.

Prior to this new install, the old steering system worked the full range from starboard to Port with the same link.

How far should the tube be showing on starboard side?
 
1: The locking pin/screw goes through the slot in the end piece of the cable, cable can not be pulled out.
2: The steering arm should have at least 2 holes. Inner for the link, outer for a tie-bar when running twin engines.
3: The original normally has a part number stamped on it.
4: Good!!
5: If nothing has been changed - it should be the same in this set-up. Steering are according to international standards.
6: On PORT side, the threads should protrude about 1/2" outside the nut. At STB side, at least long enough to tighten the cable nut fully. Normally the port side nut is tightened to the end of the threads, which just gives space for the scraper nut (rubber seal) to be installed.
 
i will provide more photos later, as I believe the starboard side of tube is out too much.

I am getting close to giving up and having to pay copious $$ for some boat dealer to fix this now.... :-((

Steering arm configuration / hoels have not changed at all - even when this steerign was workign through it's full range...

And, I do not see any nut/thread on the port side where the rubber sleeve is inserted.

Does the steering tube need to be protruding out past the engine mount on Port side?


is this thread you refer to on this steering tube?
 
Last edited:
Have a look at this link:
http://www.marineengine.com/parts/j...LCEM&manufacturer=Evinrude&section=Midsection
#44- loc-nut, one each side. On port side, tightened to end of threads to give room for:
#92 - wiper nut - same as your rubber seal. Sometimes just a plastic cap with o-ring inside.
The threaded part of the tube on port side is about 3/4-1" which is as far as it has to go outside the bracket.

If the tilt-tube is not correct positioned, like too far to stb, you have max turn to port (cable retracted) and far less to stb (cable extended).
 
Great info.

I think we have determined root cause.

The tilt tube is not fitted all the way through it's range.

I cannot even see the other side of this tube (port side).

I have too far out at starboard, and I have max turn to Port and far less to stb - just like you stated.

Attached are photos...of this tube.

I do not know how this tube became where it is, and I have actually banged it in about 1.5 " already.

So, the question is, how do I ensure this tube is seen on port side? I have tried to bang it in further - and will not move.

I think the center swivel bracket and stern brackets (both Port and Stb) are not aligned - causing blockage.

And, I think I am missing those 2 thrust washers (item 46).

How to ensure alignment between these 3 brackets before I bang the tilt tube in any further?

What should I use to bang this tilt tube without damaging the thread?

Attached photos for reference...


Apologies for the muck and grease everywhere...work in progress :)
 

Attachments

  • Portside.jpg
    Portside.jpg
    47 KB · Views: 99
  • Portside 2.jpg
    Portside 2.jpg
    47.1 KB · Views: 83
  • Starboard.jpg
    Starboard.jpg
    42.2 KB · Views: 83
  • Starboard2.jpg
    Starboard2.jpg
    54 KB · Views: 88
Last edited:
Trim down the engine so the fin is supported and the weight is offloaded.
Slightly loosen the bracket screws holding it to the transom on port side, not more than you need to give it a 'knock' to adjust. Feel with your finger from port side that there are no sharp 'edges' indicated unalignment.
Use a lead/copper mallet or a piece of wood between tube and steel mallet when knocking in.
I used to have a special tool(home made by me) looking like a giant steel bullet to guide the tube through bushings and washers with dia as outer dia of the threads. If you have a thick iron rod or socket with extension that fits into the tube from port side makes it easier to wiggle it right as well.
 
Ok - I think I have really stuffed it now :-(


I banged too hard on the end of the tilt tube at stb side and flared/compressed the inner hole which is now too small to allow the cable end to pass through.

I was not able to get the tilt tube back to where it should be, and have the port side end of the tube showing with thread.

So, now I am really screwed!

Thoughts?
 
Last edited:
would this thread have been compressed all the way along the entire thread or just the first few?

i have tried with a drill but there is not enough clearance to achieve a horizontal action for the drill bit.

If I do fix this problem, and i manage to extract the other end of the tilt tube at port side, do u think this travel range issue will be fixed?
 
Test the thread with the nut. If that works, ok.
Use a Dremel or whatever, it may not be too bad.
Perhaps you may take out the whole tube, bring it to a workshop that may hone or drill it back again?
Get it sorted out and your steering will be OK.
 
thanks.

I will go and buy a dremel today and play tonight.

It is a shame i do not have sufficient clearance to get a drill horizontal in this area.

I will report back later on findings.

Cameron
 
update - i damaged one of the thrust washers, and still cannot get that tube in.

so, i have decided to buy brand new tube, washers, everything - and then install all new stuff once they arrive.

obviously, i will need to remove the motor. hints/tips on the best/safest method?

Cameron
 
I to have a special tool(home made by me) looking like a giant steel bullet to guide the tube through bushings and washers with dia as outer dia of the threads. If yoIf you have a thick iron rod or socket with extension that fits into the tube from port side makes it easier to wiggle it right as well.

so the outer diameter of the bullet is the same as the outer diameter of the tube?

cameron
 
It went into the tube about 1", then the outer dia was as mentioned. However a long socket that fits into the tube works OK if you are careful.
No need to completely remove the engine, but it helps being able to take the load off by using a chain hoist or similar and just remove one of the mounting brackets, preferably port side.
Insert the tube from stb side, through the washers and swivel bracket, put on the port side washer and slide on the bracket.
Tighten the end-nuts, but not too hard!!!!
 
Back
Top